


The DNA detective game Teach article
With the help of a detective game, Kenneth Wallace-Müller from the Gene Jury team introduces the use of DNA in forensics and the ethical questions involved.

and blackred / iStockphoto
Peter has been found dead in his hotel room. Who could have killed him? What DNA evidence can you find at the crime scene and how can you analyse it? Can you find the murderer?
The game is most suitable for students aged 10-15 [note that the reviewer suggested using the activity with older students]. You will need time to print, cut and laminate the resources, 30 minutes to play the game, and additional time for discussion.
Before introducing the game, explain how DNA fingerprinting works. Do not forget to point out the differences between DNA fingerprinting (profiling) and sequencing the complete genome. You may find Hodge & Wegener (2006) and the resources on the Gene Jury websitew1 helpful.
Materials
evidence cards
Image courtesy of Gene Jury
To run the game, you will need the following materials, all of which can be downloaded from the Gene Juryw1 website.
- Worksheets (one per student or group)
- One set of DNA evidence cards to be laid out around the crime scene; see Figure 1, left.
statement
Image courtesy of Gene Jury
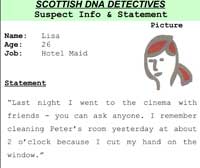
- One set of suspects’ statements (green) and the pathologist’s report (purple); see Figure 2.
- Several sets (one per group) of suspect (blue) and victim (purple) DNA profile cards; see Figure 3.
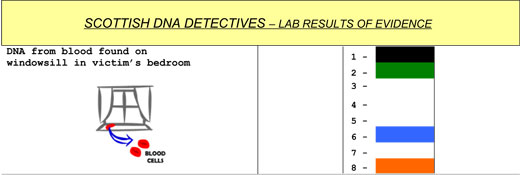
- Several sets (one per group) of cards showing the DNA profiles found around the crime scene and of the people in the DNA database; see Figure 4. Do not give these materials to the students until later.
Ideally, all the materials except the worksheets should be printed in colour and laminated.
Preparing the game
card of a suspect
Image courtesy of Gene Jury
Six students take the roles of the suspects: Alex, Eric, Lisa, Olivia, Melinda and Dave. Give each of the students the statement card and DNA profile card for their character.
One student is the police pathologist; give him or her the pathologist’s report card and the DNA profile card of the victim.
Optionally, one student represents the victim: lying on the floor with a knife (or substitute) nearby. Even if you choose to imagine the victim and weapon, place the five DNA evidence cards (the knife blade, the knife handle, the victim’s fingernails, the victim’s jacket, and the blood on the window) around the ‘crime scene’.
The rest of the class are the investigators, working in groups of about four. Give these students the worksheets.
The teacher plays the role of the chief inspector and the forensics laboratory. He or she needs the sheets with the DNA profiles from the evidence and the DNA database.
Playing the game
The flow diagram (Figure 5, below) illustrates the game sequence.
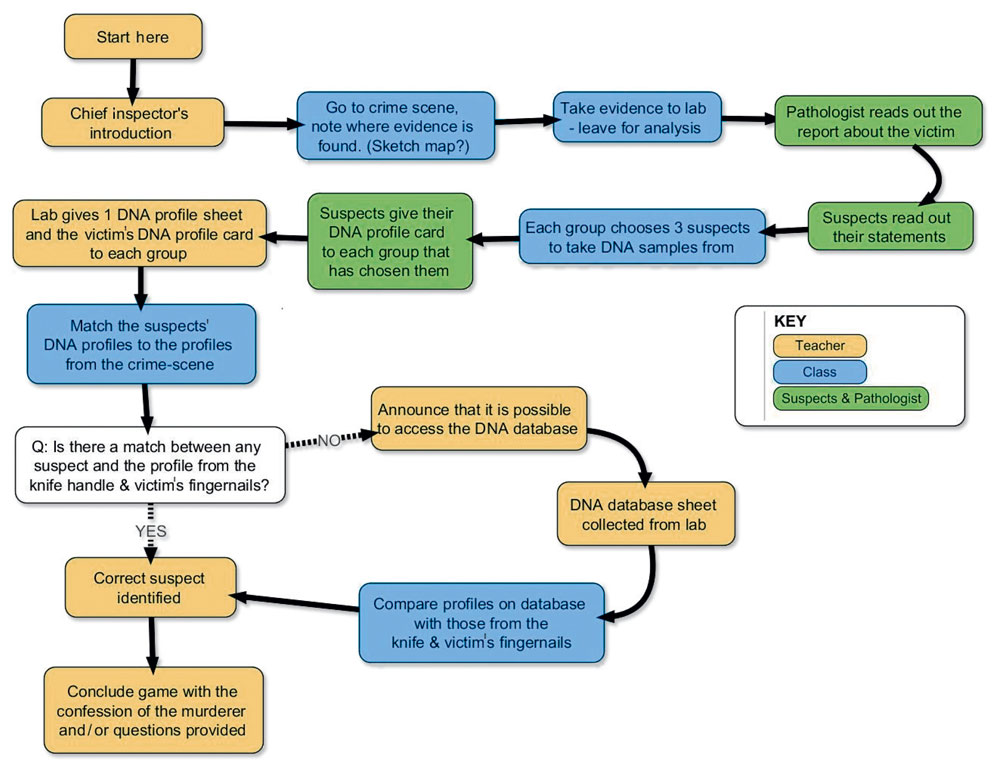
Image courtesy of Gene Jury
- Chief inspector (teacher): read out the introduction to the class.
Last night in the local hotel, a terrible crime was discovered. Peter, a well-known businessman, was found dead in his hotel room by two guests, Alex and Olivia, at 11pm. They immediately telephoned the police, who arrived soon afterwards. The pathologist examined the body, and estimated the time of death at 9pm, not long after Peter had finished dinner.
Peter had held a dinner party that evening with some friends to celebrate finishing writing, by hand, a book about his life. The party had taken place in the hotel dining room with his five friends, who had all stayed that night in the hotel. After the police arrived, the five guests and the hotel maid were woken, and assembled downstairs to be questioned.
- Investigators: look around the crime scene and use Table 1 to record any evidence (the DNA evidence cards in Figure 1; one example has already been entered in the table below).
Type of sample (e.g. blood or skin) Where was it found? Table 1: Collecting the evidence at the crime scene Skin On the victim’s jacket - Investigators: take your evidence to the forensics laboratory (the teacher) for analysis.
- Police pathologist: read out the report on your analysis of the victim’s body.
Investigators: make notes about the pathologist’s report. - Suspects: read out your statement of who you are and what you know about the crime (Figure 2).
Investigators: using Table 2, below, make notes on the suspects’ statements. Who do you think could be the murderer? All of them have given you their permission to sample their DNA but the police chief inspector has allowed you to take samples from only three of the suspects. Decide which three to sample.
| Name | Notes from suspect’s statement | Do you suspect him / her? | Ask for sample? (Select only three) |
|---|---|---|---|
| Alex | |||
| Eric | |||
| Lisa | |||
| Olivia | |||
| Melinda | |||
| Dave |
- Investigators: take a sample from each of your three chosen suspects (the samples have already been analysed by the laboratory, to make things easy for you).
Suspects: give your DNA profile card (Figure 3) to the investigators who ask for it. - Forensics laboratory: give the investigators the results of the DNA analysis from the crime scene (the victim’s DNA profile), and the DNA profiles found on the evidence (Figure 4).
Investigators: does the DNA profile of any of your three suspects match the DNA profiles on any of the evidence found at the crime scene? - Investigators: using Table 3, below, what can you conclude from your comparison? Do you know who the murderer is? Remember what the suspects said in their statements, and do not forget that not all the DNA found at the crime scene necessarily has anything to do with the murder.
| Sample from the crime scene | Does this profile match any of your suspects? If so, which? | Do you think this sample is from the murderer? |
|---|---|---|
| Blood on the windowsill | ||
| Blood on the knife blade | ||
| Skin cells on the knife handle | ||
| Skin cells under the victim’s fingernails | ||
| Skin cells on the victim’s jacket |
- Chief inspector: did any of the groups identify the murderer? If not, announce that the investigators can compare the samples taken from the crime scene against a national DNA database. You may choose to let the investigators compare their samples against the database, even if they have identified a murder suspect.
Investigators: can you find a match between the evidence collected at the crime scene and the profiles in the DNA database (Figure 4)? Who do you think is the murderer? - Chief inspector: once all the groups have decided who they think the murderer is, reveal the murderer’s identity as Eric and read out his confession.
After his arrest, Eric decided to confess to the police what happened that night.
In his former life, Eric had been arrested several times for carrying and taking drugs. He had decided to forget his old life, and he now owned his own restaurant. Only a handful of people knew about his past, including Peter. Peter also had a dark past, and had known Eric very well. He decided to write about Eric and include details of his criminal activities in the book of his life story.
On the evening of the murder, Peter was celebrating the completion of his book by having dinner in the hotel with some friends, including Eric. During the conversation over the meal, Eric realised what Peter had written about him in his book, and how it could damage his reputation.
After dinner, all the guests stayed in the restaurant for coffee. Eric finished and went for a walk in the gardens to plan a way to silence Peter and steal his book. He crept into the kitchen and stole a knife, concealing it in his trouser pocket. Eric hatched a plan to meet Peter in his hotel bedroom for a chat, and – when Peter was least expecting it – to kill him using the knife.
Everything went according to his plan, but while Peter lay dying on the floor covered in blood, Eric heard footsteps walking past the room, and as he grabbed the book, he panicked, accidentally dropping the knife.
After quickly walking back to his room, he hid the book in his suitcase in order to destroy it later. He planned to use the excuse of an early business meeting to leave first thing the next morning.
How well does the game reflect reality?
The DNA profiles used in the DNA detective game are loosely based on band patterns from real profiles. Profiling involves forensic scientists looking for markers (small sequences) within DNA, the sizes of which vary between people. By including multiple markers, all with size variations between individuals, it is possible to create an almost unique profile for each person. In early profiles, these marker sizes were shown as bands of different sizes (rather like barcodes), but these days, profiles are now often represented as graphs.
In the UK, 10 pairs of markers plus a sex chromosome marker are analysed to ensure that two given people can effectively be differentiated. This would give a match probability (the chance of finding two people with the same profile) of less than one in a billion (1 000 000 000). The chance of finding a match is higher between family members, whose DNA is shared, and identical twins, who have identical (or nearly identical) DNA profiles. Profiles generated in England and Wales are currently stored in the UK National DNA Database.
The DNA detective game reflects reality in that profiles, loosely represented here as the original ‘barcodes’, are generated for every individual as well as from crime scene stains (such as blood, skin cells or hair). The eight markers used in the game are more than enough to differentiate the six suspects from one another. As in reality, each profile in the game is compared with those of other suspects of a crime being investigated and other profiles found at the crime scene. It can also be compared to a profile database of suspects and criminals and of samples from previous crimes.
The main problems that forensic scientists face in generating real-life profiles are crime scene stains containing DNA from several people, stains containing very small amounts of DNA, or stains containing degraded DNA. These problems can be overcome to an extent by profiling all of the suspects and those who may have visited the crime scene, by developing newer profiling techniques and by using larger numbers of DNA markers.
DNA profiling technology is used as a complement to other investigative techniques and, in court, DNA-based evidence should be backed up with other non-DNA-based evidence, such as video or witness statements.
Ethical questions
The game raises several ethical questions about the forensic uses of a DNA database. Below are some questions, together with possible answers, which can be used in a discussion. Remember that there are no correct answers here: governments, doctors, scientists and the general public may all have different opinions.
- Why do you think the murderer’s DNA was in the DNA database? How might you have found the murderer if his DNA had not been in the database? The murderer had been convicted on several occasions for drug possession, and each time, his DNA was put onto the DNA database. If the murderer had not been in the database, DNA samples would have to be taken from all of the suspects (rather than just three). More ‘traditional’ evidence would also have been useful, such as fingerprints, closed-circuit television if available, and deduction from the suspect and witness statements.
- What do you think should happen to the DNA profiles taken from suspects who turn out to be innocent? Should their DNA profiles be put into the DNA database or should they be destroyed? What is the situation in your country? In Scotland, a suspect’s DNA must normally be destroyed immediately if they are not found guilty. For serious crimes such as murder, an innocent suspect’s DNA may be kept in the database for three years. DNA from convicted criminals is kept permanently in the database.Until recently, in England, DNA was taken from everybody who was arrested and put into the database – even the DNA from people who were later proven innocent was kept permanently. Following a decision in 2008 by the European Court of Human Rights, the situation in England will be changed to one similar to the Scottish system.
- What do you think should happen to the DNA profile of a 12-year-old shoplifter? Should children’s DNA be in the DNA database – and does it depend on how serious the crime is? What about a 12-year-old convicted of murder? In Scotland, the minimum age at which someone is considered to be responsible for a crime that they commit is eight. Some people believe that children should not be treated and labelled as criminals, because they should be given a chance to learn from their mistakes. Other people believe, however, that young offenders are more likely to re-offend, and that putting their DNA in the database will help to catch them if they do commit a crime in the future.
- After playing this game, what do you think about using DNA databases for solving crimes? Can you think of any reasons why you might not want your DNA on a database? Although a DNA database is very useful in catching criminals and identifying dead bodies, there are several reasons why people wouldn’t want their DNA on a database. For example:
- Some people are concerned about the chances of mix-ups in the database, or that someone may hack into the database and change information.
- Criminals themselves might be concerned, as if they re-offend, they might be caught more easily.
- Many people are worried about privacy, as DNA can reveal personal information. Although the DNA profile itself is fairly uninformative, the original cell sample or DNA may also be stored; although unlikely, it is possible that the DNA could be sequenced from that sample.
- An answer which might not be raised by the class is proportionality – this is the term used to ask the question: is putting everybody’s DNA onto a criminal DNA database going to solve or cause more problems? These may be financial or administrative, as well as ethical and moral.
- A balance must be found between valid personal concerns such as these, and the benefits of using a criminal DNA database. These are identified by discussion and enforced by law.
Acknowledgements
This game was developed as a collaborative effort by the Gene Jury team – Heather McQueen, Fiona Stewart, Sarah Keer-Keer and Kenneth Wallace-Müller – at the University of Edinburgh, UK. For more details, see the Gene Jury websitew1.
Thanks to Sandra Couperwhite, forensic scientist with Lothian and Borders Police, for her help with the box ‘How well does the game reflect reality?’
References
- Hodge R, Wegener AL (2006) Alec Jeffreys interview: a pioneer on the frontier of human diversity. Science in School 3: 16-19.
Web References
- w1 – The Gene Jury project located in Edinburgh, UK, aims to engage children aged 7-14 with bioethical issues surrounding the use of modern genetic technology, via interactive workshops and teaching activities. For more information and to download materials, visit the Gene Jury website: www.genejury.biology.ed.ac.uk
- To download the materials for the detective game, visit: www.genejury.biology.ed.ac.uk/databaseDNAdetectives.html
- For more details of DNA profiling, see: www.genejury.biology.ed.ac.uk/databaseTeachersResources.html
- For a list of more materials about DNA on the Gene Jury website, see: www.genejury.biology.ed.ac.uk/learningzone_whoseDNA.html
Resources
- The University of Edinburgh has also developed a discussion activity on the use of DNA databases in criminal investigations and for medical research. To download the instructions, visit: http://sibe.bio.ed.ac.uk/resources
- For more detective mysteries in the science classroom, see:
- Gardner G (2006) The detective mystery: an interdisciplinary foray into basic forensic science. Science in School 3: 35-38.
Review
This article offers a brilliant idea for teaching about the DNA molecule, and should motivate quite a number of students. It would be feasible in any standard school classroom, so long as the teacher allocates enough time for preparation.
Andrew Galea, Malta