Supporting materials
Download
Download this article as a PDF


A walk on the wild side: invite some ants to take a walk on your petri dish and discover how bacteria from their feet could help us reduce pesticide use.

Ants are superorganisms that are masters of cooperation. They use pheromones to communicate quickly and effectively with each other, which also makes them efficient hunters. Most ants eat a lot of different insects, which makes them a great alternative to chemical pesticides.
As ants live closely together, they are at high risk of catching and transmitting diseases. To protect themselves against diseases, they produce a wide variety of antibiotic chemicals,[1] and they even house bacteria and fungi on their bodies and feet, which, in some cases, also produce antibiotics.[1] Thus, when ants walk, they leave behind a trail of microorganisms. Some of these produce antibiotic chemicals that can be effective against a wide array of pathogens, including plant diseases. So, when ants walk across a plant, they can actually protect it against diseases. In this way, ants are guardians of the forest, as they can protect trees against harmful insects and diseases.

Ants have been used in agriculture for centuries,[2] as their protective effect in forests can be moved into agricultural systems, like fruit orchards. Here, ants can be used to protect crops against both pest insects and crop diseases,[3,4] just like they naturally protect trees in a forest. Using ants instead of chemical pesticides is both sustainable and organic and serves as a promising tool for feeding the world in the future.
The following experiments are suitable for students aged 11–19. The experiments give insights into the complex microbial community of ants, and showcase how ants and their associated microorganisms can be used to combat plant diseases, and maybe in the future even human diseases. The activities link to the following curriculum topics: microbiology, ecology, sustainability, biology, agrobiology, zoology, antibiotics, applied biology.
Through this experiment, students can investigate the diversity of bacteria and fungi that ants have on their feet. This can be done in smaller groups of two to three students. The experiment should be performed under as sterile conditions as possible.
The first part of the experiment (setting up the incubations) takes around an hour if the teacher knows where to find some ants nearby and the agar plates have been prepared beforehand, but can be done in 30 min if ants have already been collected. Time can vary depending on the students’ age. The results will be observable after 2–3 days and a second session will be needed to analyse and discuss them.
Notes

Before starting with the practical steps, the Ant infosheet can be used to provide students with some background information to understand the context. Alternatively, this can be discussed in the second lesson when the results are discussed.
Ants can be found in many different habitats, including forests, parks, and even on pavements. To collect ants, bring a few empty Petri dishes (keep them in a ziplock bag, so they remain sterile), a pack of inoculation loops, and some nitrile gloves. Do not touch the Petri dishes or inoculation loops without gloves; they need to be kept sterile.
If you plan on doing Activity 2 following Activity 1, you can save time by collecting ants for this experiment as well.
Once the ants have been collected, they are brought back to the laboratory.
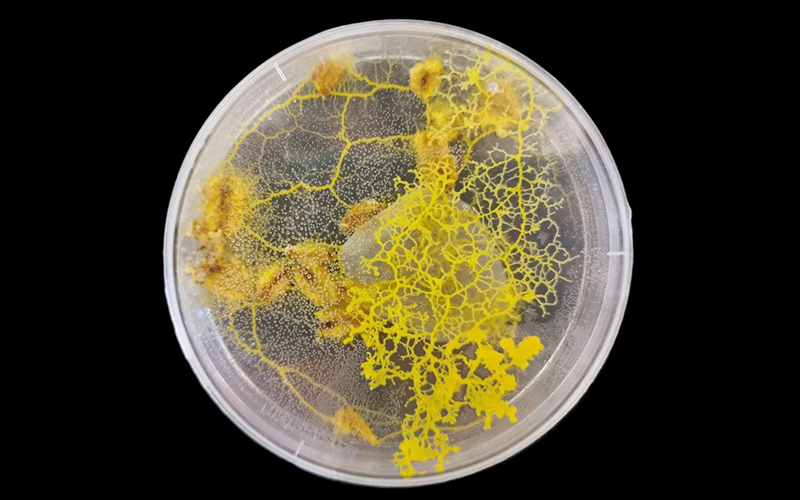
After a few days at room temperature, microbial growth is visible (figure 2). If you are lucky, the exact steps of the ant are visible as tiny microbial footprints.

Students can count the number of colonies, or describe their morphology (colour, form, structure, texture) and compare it to the other students’ results. Older students can examine the different microorganisms under a microscope, to assess different cell structures (bacteria versus fungi). If different ant species are tested by different groups, they can compare their results to see if there are differences between the species in terms of microbial communities.
Some of the bacteria and fungi that ants have on their legs and feet are antimicrobial. Through this activity, students will investigate whether the ants transfer any antimicrobial microorganisms that are able to control a plant pathogen.
The first part of the experiment (setting up the incubations) takes around an hour if the teacher knows where to find ants or if the ants were already collected during Activity 1, and if the agar plates were inoculated with the pathogen by the teacher beforehand. However, it can be extended to 2 h for older students, who can inoculate the plates themselves (15–19 years is recommended for this). Results will be observable after 2–3 days and a second session will be needed to analyse and discuss them.
See the teacher instructions for details on how to autoclave the water and grow initial plant pathogen cultures (Botrytis cinerea or Fusarium graminearum are recommended; the former is used as an example here). This experiment should be performed under as sterile conditions as possible.
This can be done by students on the day of the experiment (the agar plates need to dry for 5 minutes before ants are added) or by the teacher beforehand. If the teacher chooses to inoculate the agar plates beforehand, this should not be done more than 12 h in advance.


4. Pipette the B. cinerea solution (50 µL) onto a clean agar plate.
5. Use a Drigalski spatula to evenly distribute the solution on the agar plate (figure 5).

6. Once the agar plate has been inoculated, leave it to dry for 5 min, before proceeding to the next step (testing the antimicrobial effect of ants).
After incubation, the growth of B. cinerea should be visible on the agar plates, as well as the microorganisms from the ant footprints (figure 6).

If any of the ant-associated microorganisms are able to control the pathogenic fungus, it can be seen as an inhibition zone or clearing zone, which is a clear zone around the microorganisms (figure 7). This means that the microorganism is producing antibiotic substances that are killing the fungus or keeping it from growing.

Students can assess the number of antimicrobial microorganisms their ants have transferred and further describe their morphology. Older students can, as described in Activity 1, assess the antimicrobial microorganisms under a microscope to further assess cell structure (bacteria versus fungi).
These experiments reveal the antimicrobial effects of ants and their associated microorganisms, and how they can be used to combat plant diseases in agriculture. You will get first-hand experience with microbiology, when you discover the diversity of microorganisms that can be found in ant footprints and test the antimicrobial effect of these feet bacteria and fungi. The power of antibiotics can be viewed with the naked eye when antibiotic bacteria and fungi excrete antibiotic chemicals that kill or inhibit plant diseases, resulting in a clearing zone. These are the chemicals that are important in agriculture, but especially medicine, where resistance to antibiotics is a big problem. Therefore, we need to continuously find new antibiotics – maybe you just found something that could be used as medicine in the future!
[1] Offenberg J, Jensen IC, Hansen RR (2021) Combatting plant diseases with ant chemicals: a Review. Journal of Applied Ecology 59: 25–38. doi: 10.1111/1365-2664.14017
[2] Huang HT, Yang P (1987) The ancient cultured citrus ant. BioScience 37: 665–671. doi: 10.2307/1310713
[3] Jensen IC et al. (2023) Implementing wood ants in biocontrol: suppression of apple scab and reduced aphid tending. Pest Management Science 79: 2415–2422. doi: 10.1002/ps.7422
[4] Schifani E et al. (2020) New tools for conservation biological control: testing ant-attracting artificial nectaries to employ ants as plant defenders. Insects 11: 129. doi: 10.3390/insects11020129
Antibiotic resistance poses a significant challenge in hospitals globally. At the European XFEL, researchers are using very bright x-ray lasers to shed light on the structure of structure of enzymes linked to antibiotic resistance and to analyze the key reaction steps from a beta-lactamase enzyme responsible for antibiotic resistance in tuberculosis bacteria.
Ida Cecilie Jensen is a biologist and PhD student at Aarhus University, Denmark. She studies ants and how their associated microorganisms can be used as sustainable alternatives to chemical pesticides.

Image courtesy of Nicolai Hildebrand/Aarhus University
Download this article as a PDF
What are slime moulds? And what do they eat for breakfast? Discover these fascinating giant microbes and explore chemotaxis and the scientific method with these slimy experiments.

You may have heard pathology labs mentioned in crime shows, but what is plant pathology? Find out about the feuds between plant and pathogen that…


Basic research is often misunderstood by the public and misconstrued by the media. Try this role play to learn how research is funded and how basic…
