Supporting materials
Download
Download this article as a PDF


What are slime moulds? And what do they eat for breakfast? Discover these fascinating giant microbes and explore chemotaxis and the scientific method with these slimy experiments.
Teaching eukaryotic evolution and ecology often means teaching about animals, plants, and fungi. But most of the metabolic, morphological, and ecological diversity is within the unicellular eukaryotes, called protists.[1] To understand our world better, we need to teach students about microorganisms in all different forms, colours, sizes, and habitats.
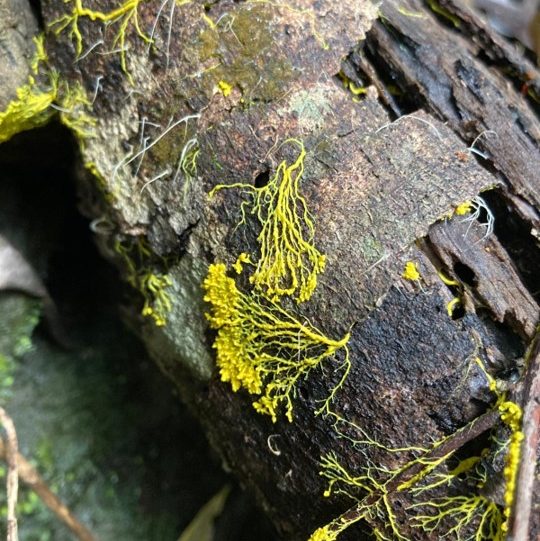
An especially stunning protist that can help students to become fascinated with microbial eukaryotic diversity is the slime mould Physarum polycephalum (figure 1).[2] Its single amoeboid cell reaches sizes up to several hundreds of square centimetres, contains multiple nuclei, and spreads out network-like while searching for food. Chemoreceptors and external memory (which consists of colourless slime that the slime mould leaves behind and can recognize if it comes across it again) allow them to be very efficient in their search.[3,4] Slime moulds do not just move around but seem to know exactly where they are going. But what kind of food do they like? In nature, slime moulds feed on bacteria or pieces of dead organic material that they take up via phagocytosis. [2,3]
The following experiments allow students aged 11–16 to explore the food choices of slime moulds over a period of three lessons by first offering them different kinds of food and then determining what substances attract or repel them. The experiments allow students to learn about the sensing strategies of organisms and to learn how to test hypotheses and design experiments with control variables (i.e., how to be scientists themselves).
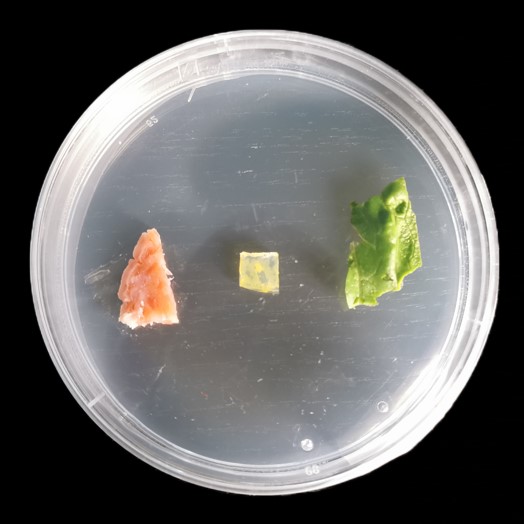
In this experiment, students offer the slime mould two kinds of food to observe its preference. Students should be encouraged to hypothesize about the results and discuss and debate the reasons for their hypotheses. It is recommended that the students work in pairs or small groups. The activity takes 45 to 60 min, although time varies with the students’ age. The results will be observable in the next lesson.
See the teacher instructions in the supporting material for details on how to prepare for the experiments (e.g., acquiring and culturing the slime mound).
It is important to work under conditions that are as sterile as possible. Wear gloves while performing experiments.
After several hours, the slime mould grows towards the lettuce (see figure 3). Its network-like structure will be moving towards or growing onto it.
The slime mould decides against the salami, but the students still do not know why. This leads to a second round of experiments, in which the students try to find out the reason for the slime mould’s food choice.
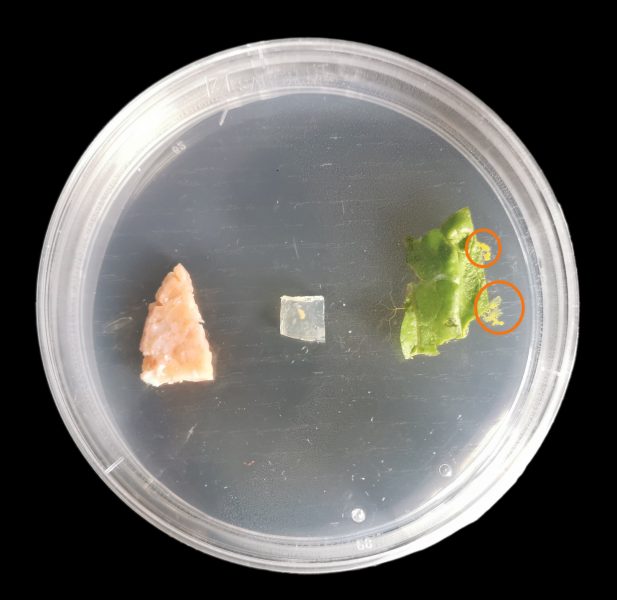
To discuss the observation, the following questions can be considered: Does the lettuce attract the slime mould? Or does the salami repel it? If it is repulsion, what exactly is repelling the slime mould? There are many different ingredients in salami. Students should be encouraged to discuss them and their possible influence on the observed repulsion. This discussion can be used to collect ideas for test substances for Activity 2.
Note: Focussing on repulsion is an advantage because it is easier to think of substances in the salami which can be used in the next experiment and that produce clear results than to isolate substances from the lettuce that could be attracting the slime mould.
Chemoreceptors in the slime mould’s cell membrane detect chemical molecules in the environment that either attract or repel it.[2,4,5] In this activity, the students design experiments to find out which ingredient(s) in salami is (are) repelling the slime mould. If possible, the students should design the experimental setup themselves, while the teacher functions as a guide during this process.
The slime mould is offered two stimuli: a control (oat flakes) and a test substance (oat flakes + test). Oat flakes are the slime mould’s usual food in the laboratory. Therefore, oats are used for both the control and test food options. If a substance is added to the oat flakes, there are three options for the results:
As the slime mould likes and knows oat flakes, result 1) would mean the added substance is causing the movement away from the test, which leads to the interpretations that we observe negative chemotaxis and that the substance is a repellent. Alternatively, result 2) would mean the substance is adding something to the oats, so that they appear more attractive than usual/the control; this can be interpreted as observing positive chemotaxis and the substance being an attractant. Result 3) would mean the added substance seems to be neutral for the slime mould. The students’ different ideas for test substances can be collected and each group of students gets assigned one.
The activity takes 45–60 min. The discussion should be done in the following lesson when the results are available.
It is important to work under conditions that are as sterile as possible. Wear gloves while performing experiments.
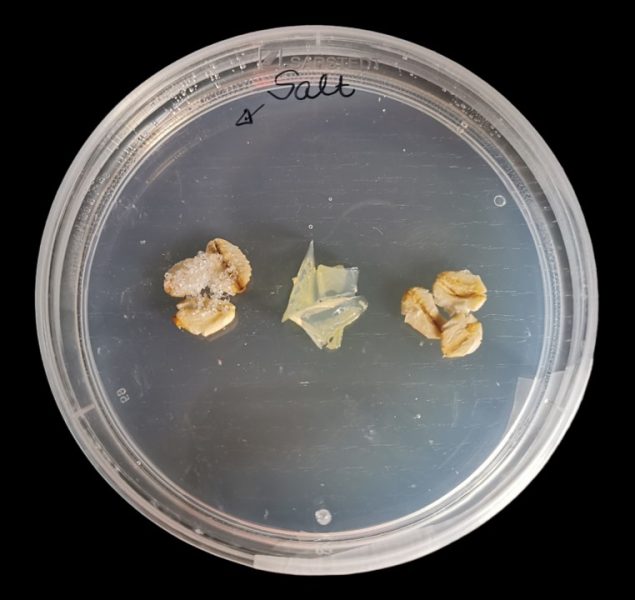
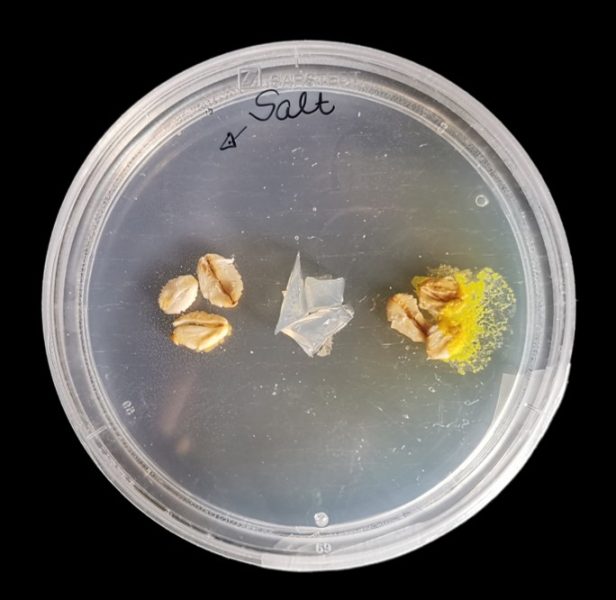
The slime mould moves towards the oat flakes without salt (see figure 5). Just like acid or caffeine, salt is a known repellent in the literature.[2–5] The slime mould’s chemoreceptors allow it to detect chemicals and direct it away from harmful substances without needing further sensing organs.
Note: The experiments do not have to be restricted to the salami/lettuce problem. If the students are interested in trying other substances (e.g., sugar, acids) or finding out whether the slime mould prefers lettuce over its usual oat flakes, they should be encouraged to do so.
Activity 2 teaches students about the slime mould’s general chemotaxis, but also provides possible explanations for the results of Activity 1, or could be used to predict further food choices.
Students should consider the following questions:
Some further questions to explore with older students (aged 14–16):
Slime moulds also offer opportunities for many other experiments. They are influenced by other environmental factors, such as light (phototaxis), or can be used to map routes or solve mazes due to their habit of strengthening only the most efficient connections by creating thicker plasma streams in the pseudopods between food sources and withdrawing the pseudopods with less nutritional flow.[4,6]
[1] Burki F et al. (2020). The new tree of eukaryotes. Trends in Ecology and Evolution 35: 43–55. doi: 10.1016/j.tree.2019.08.008
[2] Dussutour A, Baily S (2022) Moi Le Blob. Éditions humenSciences, Paris.
[3] Vogel D, Dussutour A (2016) Direct transfer of learned behaviour via cell fusion in non-neural organisms. Proceedings of the Royal Society B: Biological Sciences 283: 20162382. doi: 10.1098/rspb.2016.2382
[4] Reid CR et al. (2012) Slime mold uses an externalized spatial “memory” to navigate in complex environments. Proceedings of the National Academy of Sciences 109: 17490–17494. doi: 10.1073/pnas.1215037109
[5] Ueda T et al. (1975) Threshold phenomena in chemoreception and taxis in slime mold Physarum polycephalum. Journal of General Physiology 65: 223–234. doi: 10.1085/jgp.65.2.223
[6] Wegner C, Strehlke F, Weber P (2014) Intelligent slime? A hands-on project to investigate slime moulds. Science in School 30: 16–20.
The slime mould is a very interesting eukaryotic organism for educational purposes. It is easy to maintain under laboratory conditions and inexpensive. Without a brain or nervous system, it can choose the healthiest food from a diverse menu, finding the shortest path through a maze and mimic the layout of a transportation network.
The article could be used to stimulate discussion about decision-making and information processing that can lead to the emergence of complex social behaviour.
Hugo Faria, Biology teacher, Esc. Sec. Augusto Gomes, Portugal.
Download this article as a PDF