How do astronomers measure distances to the stars? Using a digital camera to record parallax shift is an accurate and authentic method that can be used in a classroom.
Astronomers are remote observers, separated by great distances from the objects they study. Knowing the distance of celestial objects is crucial: it provides a key factor in distinguishing a very luminous, distant object from one that is much closer but inherently less bright – and thus in working out what the object is. Even single stars and whole galaxies can look similar – until we know that one is a billion times further away than the other, and thus in reality trillions of times brighter.
The most important astronomical method for determining distances from Earth to the stars is parallax – the apparent shift in position of a viewed object when the observer changes position. We notice the parallax effect when we look out a train window: nearby objects seem to move past much faster than distant ones. Using this effect, we can work out the distance of an object by measuring the apparent change in its position when our position as observers changes.
The challenge, of course, is accuracy. How can we make distance measurements based on parallax as accurate as possible? In this second article on measuring distances using parallax, we use an authentic method very similar to that used by astronomers, which has been adapted for use in a classroom (for the previous article, see Pössel, 2017). Instead of using angle-measuring devices (as in the previous article, based on theodolite measurements) to work out the distance to a ‘star’, here we take photographs from different positions and use these to provide the measurements we need to calculate our star’s distance.
When we look at the sky at night, bright stars far away look similar to duller, nearer stars. Parallax measurements allow us to tell these apart.
Image courtesy of ESO / B Tafreshi
A variation of this photographic method, described later in this article, is even more authentic and accurate, although slightly more complicated. It involves using a fixed reference point outside the classroom – just as astronomers use very distant background objects (e.g. active galaxies called quasars) as fixed reference points when measuring stellar parallax, rather than relying on their telescopes pointing in the same direction for each observation.
For these activities, you will need a digital camera, mounted (if possible) on an optical bench (see figure 1). The activities can be carried out by groups of students. Allow around 30 minutes for setting up and taking measurements, and an additional 30 minutes for the analysis and calculations.
Materials
Digital camera with lens of known focal length (at least 50 mm)
Optical bench (or similar setup for moving the camera sideways and measuring the shift, such as a flat table top and a long ruler)
Model star (a small sphere no more than 1 cm in diameter or an LED, mounted on a stick)
Object of known length with clear markings (e.g. a metre rule), as a calibration object
Tape measure
Image processing programme, e.g. Adobe Photoshop, GIMP
Procedure
Mount the camera on the optical bench so that you can shift the camera sideways by a known distance. The camera should be pointing at right angles to the length of the bench (figure 1). If you don’t have an optical bench, tape a long ruler to the surface of a table so that you can move the camera along the ruler and measure the shift distance.
Figure 1: Camera mounted on optical bench for easy sideways shifting
Image courtesy of HdA / M Pössel
Mount the model star so that it is at eye level with the camera and a few metres away from the camera bench.
Slide the camera to one end of bench, making sure that the star is visible through the camera. Take a photo of the star from this position.
Then, shift the camera along the optical bench so that the star is still visible through the lens. Record the distance moved, and then take another photo from this position.
Move the camera back to a central position. Now place the calibration object (e.g. a metre rule) at a right angle to the camera’s direction of view and take a photo of it. This image will be used to calibrate your measurements.
Using a tape measure, find and record the distance from the camera to the metre rule.
Calculating the star distance
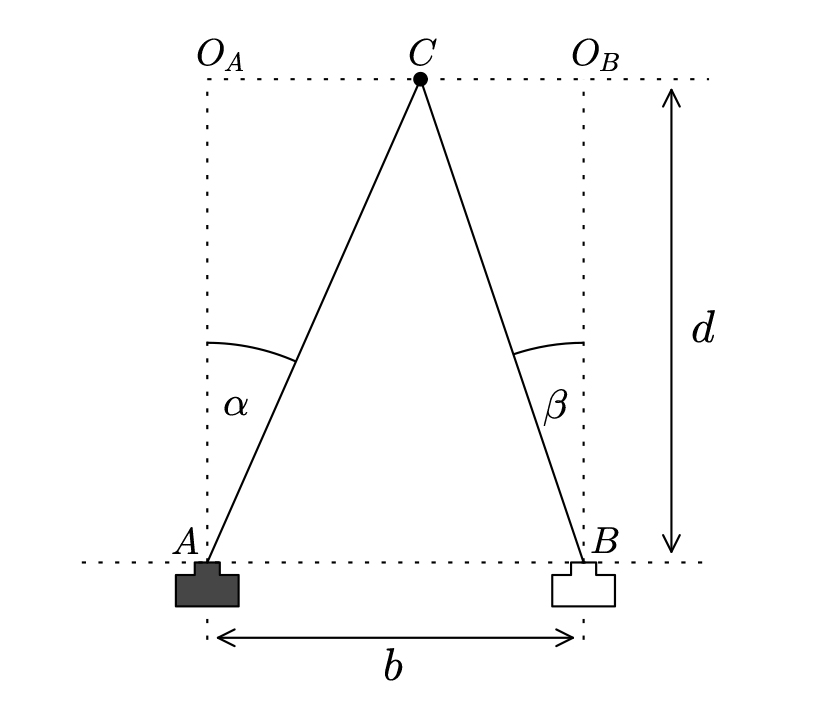
The experimental situation is shown in figure 2. Here, b represents the shift distance along the camera baseline (the optical bench or table) between the first and second positions (A and B), while C is the position of the model star, and d is the distance from the camera baseline to the star – that is, the distance we are trying to calculate.
The steps for calculating the distance d are set out below.
If we a draw a line that is parallel to the baseline and at the same distance d as the star, the camera’s line of sight from position A will intersect the new line at OA, and from position B at OB. The angles between the camera’s lines of sight and the direction to the star at camera positions A and B are α and ß, respectively.
Figure 2: The model star, at position C, photographed from two different camera positions, A and B, separated by a shift of distance b
Image courtesy of HdA / M Pössel
Unlike theodolites, cameras do not allow us to measure angles directly. We thus need to relate the location of the images of the star on the camera’s image detector screen to the angle of the light rays from the star when the camera is in different positions.
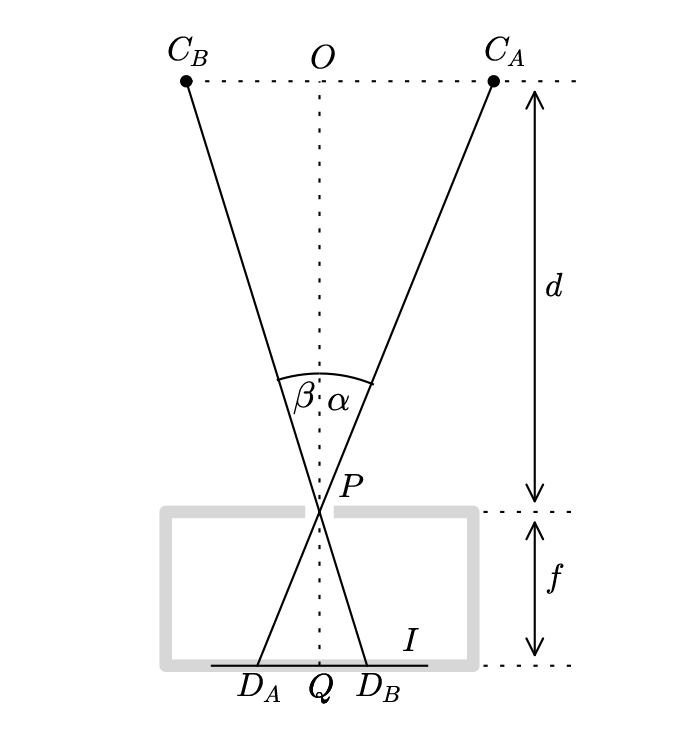
To do this, we need to think of the situation in a slightly simplified and fictionalised way. First, we treat the lens in the camera as a pinhole – as shown in figure 3, where P is the position of the lens. So a light ray from the star travels in a straight line through the camera lens and hits the photographic detector on the imaging screen at a distance f (the focal length of the lens) behind the front of the camera.
Figure 3: Simplified model of the parallax setup
Image courtesy of HdA / M Pössel
Starting with figure 2, we then think about the situation from the point of view of the camera as it is moved from A to B – as if we were an observer sitting on the camera throughout. We can achieve this by, in effect, shifting the position of the camera position A (and the line AC) to the right by the distance b that the camera was moved, so that the two camera positions now coincide. The viewpoint of the camera is shown in figure 3. The star’s apparent location will be at location CA when the camera is at the first position (A), and its image will be located at DA on the detector screen. Similarly, after moving the camera to B, the star’s apparent location will be at CB and its image at DB. (Here, the line segment OQ represents the distance between the camera’s image plane and the parallel plane that contains the star.) The length CBCA is the distance b in figure 2, while the angles a and ß remain the same.
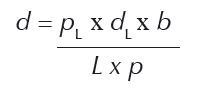
Looking at the geometry, we can see some similar triangles. Using these triangles yields a formula linking the distance d to the other known lengths b and f, allowing us to calculate its value. You can find out how to derive this formula on the additional materials sectionw1. The formula is:
Where: d = distance to star L = actual length of the calibration object b = actual distance the camera was moved (which corresponds to the distance from CA to CB) dL = actual distance of the calibration object from the camera baseline (along line OQ) p = distance as the number of pixels between the star images (at DA and DB) pL= length as the number of pixels of the image of the calibration object
To use this formula, you first need to use an image processing programme to find p, the number of pixels (on the horizontal axis) that separate the positions of the star’s image between the two photos when you view them on screen. You can also use the programme to find pL, the length of the calibration object as the number of pixels on screen.
When you have worked out a value for d, you have successfully used parallax measurement to determine the distance to the star.
Now use the tape measure to find the distance d directly, and compare this to the value calculated from the parallax measurement. How accurate was the calculated measurement?
You can repeat this activity with the ‘star’ placed at different distances, to find out whether the accuracy of parallax measurements changes with distance (see section below, ‘What accuracy can we expect?’).
Parallax photography with a reference point
For even more astronomical realism, we can adapt the parallax photography method to use a reference object outside the classroom, which should be considerably further away than the ‘star’. With this procedure, instead of relying on the camera pointing in the same direction after having been moved from A to B, we choose a distant reference object that is visible in each of the two images. We then measure the star image’s pixel distance from the reference object in each image. This alternative approach, which we describe here, should yield more accurate results.
Procedure
For the reference object, find a small feature of the most distant object visible in both images – this must be much more distant than the model star. In our case, we chose a reference feature on one of the observatory domes of the Max Planck Institute for Astronomy as a marker, which was located about 80 m from our camera.
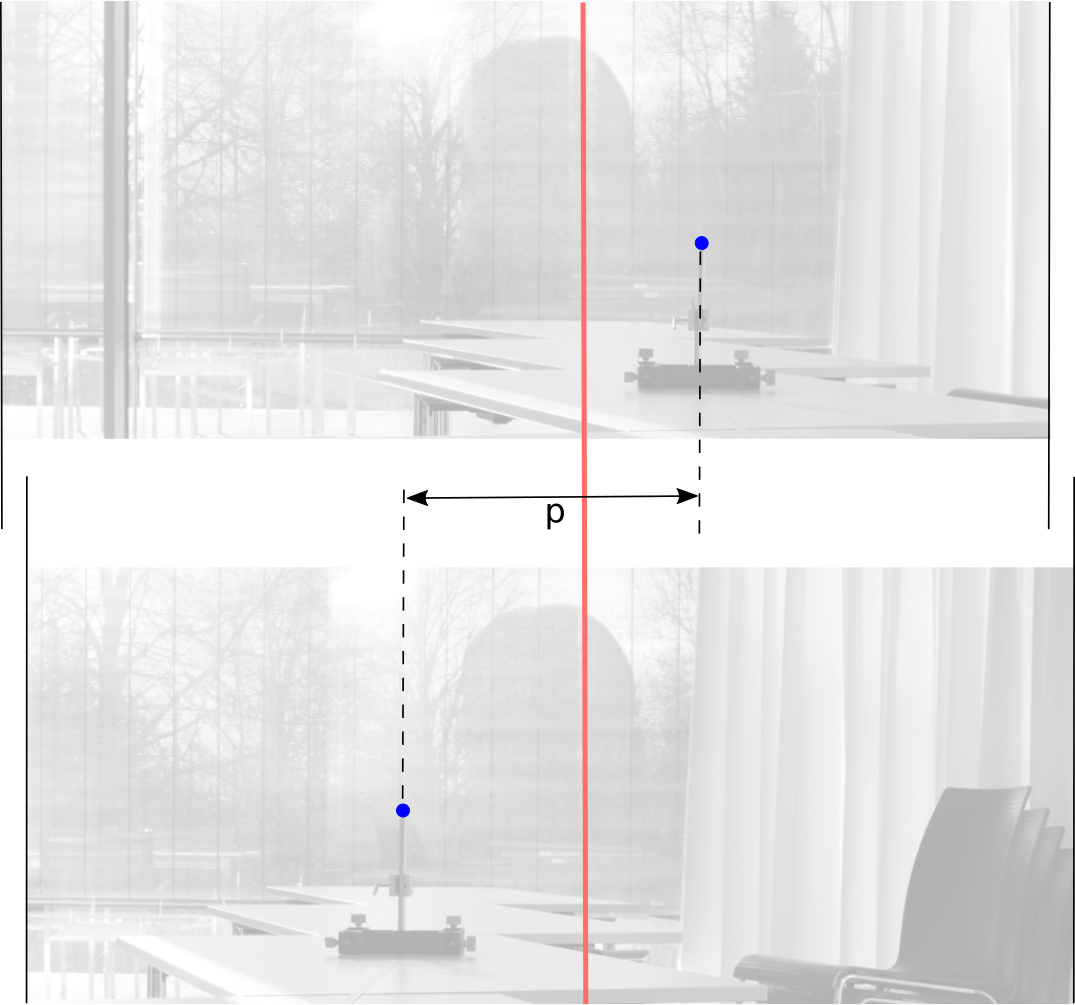
Draw a vertical line through the reference feature in each image. This is the reference line. We can now use the reference line to find the pixel shifts between the two images, as shown in figure 4.
Figure 4. Two sample images from the camera activity, showing a horizontal pixel shift p. In the images, the reference object (a feature on the dome in the background) lies on the red reference line.
Image courtesy of HdA / M Pössel
To work out p, the on-screen distance in pixels, you first need to find the model star’s horizontal pixel distance from the reference line in both images separately. Then simply add these (corrected) horizontal pixel values to each other to find p. For example, –24 px would be 24 pixels to the left of the reference mark, while +36 px is 36 pixels to the right, giving a distance p of 60 pixels.
From this point onwards, the calculations are the same as in the earlier method (see the section above, ‘Calculating the star distance’).
What accuracy can we expect?
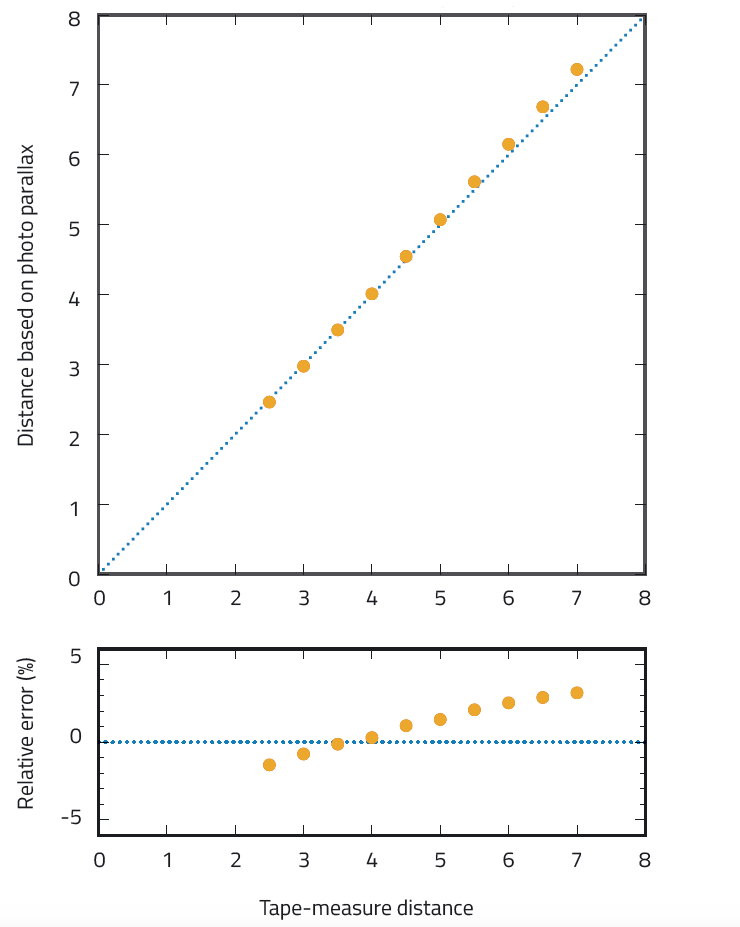
So, how accurate are the results obtained using this improved method? Our data suggest that they can be remarkably accurate (compared with directly measured distances), as shown in figure 5. The largest relative error amounts to just 3.2%.
Figure 5: Top: distances to the model star measured by the parallax method plotted against tape-measure distances
Bottom: relative errors of distances measured using the reference point parallax photograph method, compared to the tape-measure distances
Image courtesy of HdA / M Pössel
Note that, at larger distances, there is an increase in the relative error as well as the actual error. This is because the geometry changes: the distance to the model star becomes larger compared with the distance of the reference object, so the error introduced by the parallax of the reference object becomes ever greater.
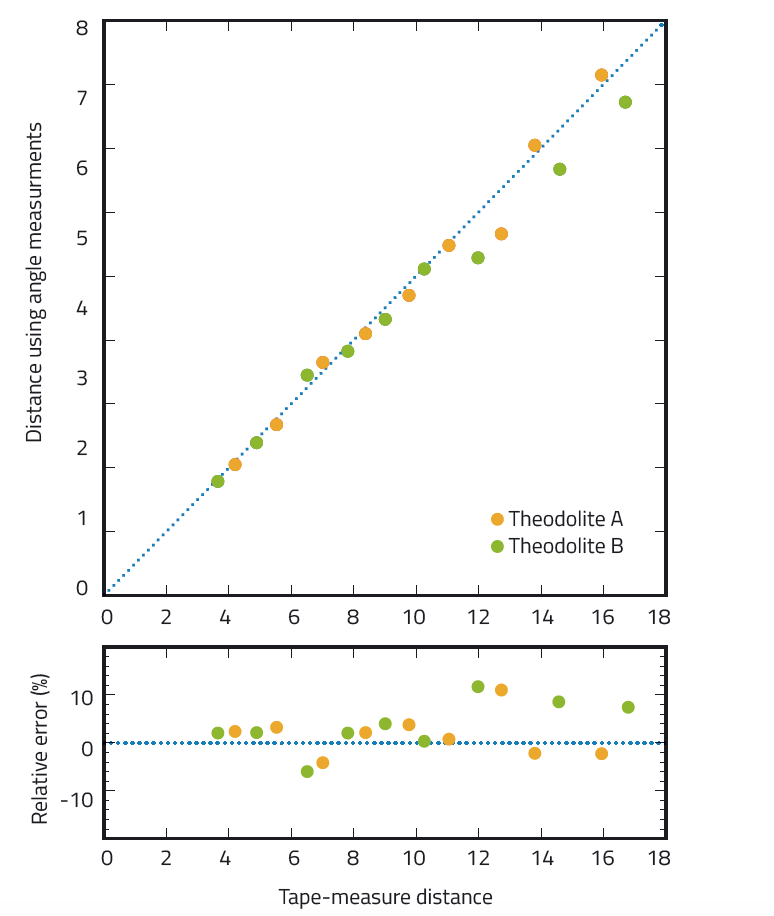
With the simple angle-measuring method described in the previous article (Pössel, 2017), the accuracy of distance measurements was significantly lower – generally within about 10%, as shown in figure 6. So the method described in the current article provides a significant improvement in accuracy from the previous method, where the dominant sources of error are the angular measurements.
Figure 6: Top: parallax distances measured using theodolites plotted against tape-measure distances. (For perfect accuracy, all data points would lie on the dotted line.) Bottom: relative errors of distances measured using the theodolites, compared to the tape-measure distances
Image courtesy of HdA / M Pössel
w1 – An algebraic derivation of the formula for calculating the star distance using similar triangles can be downloaded from the additional materials section.
Resources
For information on how to carry out real astronomical parallax measurements with small instruments, see:
Deutschman WA (1977) Parallax without pain. American Journal of Physics45(5): 490. doi: 10.1119/1.11009
Author(s)
Markus Pössel is Managing Scientist of the Haus der Astronomie (the centre for astronomy education and outreach) and Senior Outreach Scientist at the Max Planck Institute for Astronomy, both in Heidelberg, Germany.
Review
This article describes an innovative way to find the distances to celestial bodies using the parallax method. It is very suitable for students and teachers who have a keen interest in both photography and astronomy. It presents the necessary detail to be able to calculate the distance to a ‘star’ to a good degree of accuracy, illustrated with an example.
The activity is ideal to use with a group of students or in a workshop on astronomy or photography for advanced students.
Stephanie Maggi-Pulis, Secretariat for Catholic Education, Malta