


The Bone Trail: generating enthusiasm for earth sciences in the classroom Teach article
Emm Barnes from the British Society for the History of Science describes an initiative to develop exciting interdisciplinary activities. And gives the recipe for a delicious edible geology project!
‘The Bone Trail’ is an exciting schools project funded jointly by the British Society for the History of Science, Bolton Local Authority Secondary Strategy, and the Manchester Museum, UK. A team of three educators – one academic historian of science (the author), and two science teachers (Peter Fowler and Alison Henning) – designed two full days of activities for Year 9 students (ages 13-14) on the history of comparative anatomy, geology and palaeontology. The emphasis was on teaching thinking skills, inspiring enthusiasm in earth sciences in particular and in learning in general. Students from Westhoughton High School and the Frances Bardsley School for Girls tested the activities in May 2006, and we are most grateful to the teachers in these schools for their ongoing commitment to the project.
Most primary schools in England teach and integrate history and geography, science and art, literacy and numeracy, using themes such as “where we live” or “life in the 1930s”. In contrast, children in secondary schools are taught these subjects separately, and many children appear to decide at this stage that they do not like or are not good at science or the humanities, or indeed that they do not belong in school at all. We wanted to combat this tendency by reuniting science with history, mathematics, literature, art and food technology. Interdisciplinary activities encourage children to reflect on their process skills, and offer scope for teachers to cater to the full range of learning preferences. We have tried to produce materials that are as enriching and fun as those that are sometimes made available to children identified as gifted and talented. We intended our materials, however, to be used with all children, as we believe that every child can benefit, intellectually and socially, from the extra attention and from making connections between different subject areas.
During the pilot of ‘The Bone Trail’, it was obvious that those activities which avoided worksheets were the most popular, stimulating discussion over lunch breaks and on follow-up weblog sites set up to evaluate the activities. One of the simplest activities was to present children with two different solid geology maps of England, one a replica of William Smith’s 1815 map – the first to represent the whole country – and the other a modern survey. We set the children three tasks to work on in small groups: to list the similarities and differences between the two maps, to suggest when each had been drawn, and to come up with their own questions about the maps. This last task was crucial, as it encouraged the students to decide what the most interesting questions about the maps were, and allowed their teachers to assess more accurately the level at which individual children were working. We found that children were stunned to discover that the older map had been produced almost two centuries ago, from the work of one surveyor, especially given how similar the two maps were.
To explore how we know how extinct animals looked and moved, we set each child the task of compiling a one-page poster about the history of theories about dinosaurs, using Internet searches. We recommended several sites with reproductions of artists’ reconstructions from the 19th and 20th centuries, and showed the children how to use image search engines, so that they could discover for themselves how theories about the animals’ anatomy and physiology had evolved over time. The children showed great sophistication in presenting their findings to their peers.
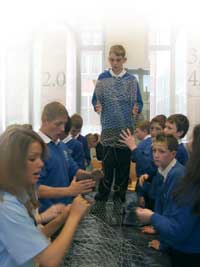
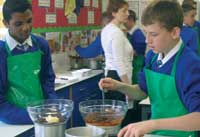
The final activity was for teams to design and build a life-size model of an iguanadon leg from galvanised wire, newspaper, and gauze impregnated with plaster of Paris. Children started by dissecting cooked chicken legs to determine how the muscles on a present-day descendent of the dinosaurs attach to the bones.

and its creators
We then set them a simple mathematics problem: to scale up from a chicken to an iguanadon, remembering that volume increases on the cube rule. In one session, we were fortunate enough to have a fossilised iguanadon femur to help the children to calculate the size of the model leg required. The resulting models were, frankly, stunning. Some of those children who were often disruptive in the classroom proved themselves to be great engineers and team leaders in this exercise, and we could see their self-esteem grow as the models took shape.
The full range of resources are available to download from the outreach page of the British Society for the History of Sciencew1. We welcome suggestions on how to improve the resources, as well as stories of how you have used them in classrooms and museums. To give you a taster, here is part of the ‘edible geology’ activity. Making edible models helps children learn how sedimentary rocks are made, and the theory of superposition. Sculpting with food also increases interest and engagement in class discussion of the different purposes of and relations between various ways of representing strata – 2D representations such cross-sections and surface views of solid geology, and 3D models such a relief maps. In the full set of resources, children are given two ways to make 3D models of the solid geology in their local area: firstly with bread and butter, and secondly with three colours of chocolate. Below is the recipe for the second and sweeter option.
Want to get involved?
For further information on the project, or to register an interest in taking part in the second year of the pilot (2006-2007), please email outreach@bshs.org.uk.
Stratified chocolate refrigerator cake
In 1859, Punch jokingly suggested that a good way to teach the public about geology would be through the sale of layered cakes: “Let cakes be made to illustrate the science of geology – composed of strata resembling those of the earth except in their relation to the sense of taste. Children might thus be crammed at once with cake and geological science, and acquire a knowledge of the crust of the earth in eating the model of it” (Anon, 1859).
n this recipe, children sandwich a cherry-studded layer in between two other strata of chocolate “rock”. After it has set, they create a fault line to reveal the cherry seam.
Ingredients
- 100 g white chocolate
- 100 g milk chocolate
- 100 g dark chocolate
- 3 pieces of butter, each weighing 20 g
- 25 g rice crispies
- 120 g glacé cherries, cut into halves (if not available, use sultanas or raisins)
- 75 g digestive biscuits, broken into crumbs
You also need a round cake tin 15-17 cm in diameter. (Small disposable foil baking trays also work and can simply be ripped open when it is time to cut, mine and eat the cake, which removes the need to line the cake tins.)
Method
- If using a cake tin, prepare it by lining with baking parchment.
- Melt the white chocolate with one of the 20 g pieces of butter, in a microwave on medium power (set it for 30 s and then stir, and repeat until it is melted; it will take about 2 min in total), or in a heatproof bowl placed over a saucepan of simmering water.
Add the rice crispies.
Pour the mixture into the cake tin, level it off and press down. (Here you are compressing ‘sediments’ to help them become densely packed rock.) Place somewhere cold to help it set a little while you prepare the next layer. - Melt the milk chocolate with 20 g of the butter, as above.
Add the cherries.
Pour on top of the white chocolate layer, level it, then press down. - Melt the dark chocolate with the remaining 20 g of butter.
Add the biscuit crumbs.
Pour onto the top of the other two layers, level it and then press firmly. - Place the cake tin in a refrigerator and leave to set for about 8 h.
Once the cake has set, remove it from the tin by lifting it out onto the baking parchment. Carefully remove the paper. Leave to warm for 15 min or so before attempting to ‘fault’ the ‘rock’. - Take a sharp knife and make a cut through the middle of the cake, preferably at a slight angle rather than straight down. This is your fault line.
- Now move one of the pieces so that the top of the dark chocolate layer on one half is level with the middle of top of the milk chocolate layer on the other, exposing the cherry seam. If you like, you could use toothpicks to carefully mine out the cherries. Try not to disturb the other layers of rock – you don’t want to cause a rock fall!
References
Web References
- w1 – The full range of ‘Bone Trail’ resources can be downloaded from the outreach page of the British Society for the History of Science.
Review
This article is very interesting and enjoyable, and the project addressed is even more engaging. The particularly strong points of The Bone Trail are the link between academic research and school teaching; the interdisciplinary approach, stressing the unity of culture and the multiple connections between science and humanities; the integration of traditional teaching with hands-on and e-learning activities; the use of models built with common household or kitchen materials; and the transferability to other teaching contexts.
I recommend this article to secondary school teachers (for students aged 10-15) willing to develop a multidisciplinary curriculum and to foster students’ interest in the history of science. The practical activities like building the anatomical model of a dinosaur’s leg and preparing the “geological cake” (with geological faults!) are simply fantastic to arouse enthusiasm and motivation among the pupils.
Creative teachers may also be inspired to extend and adapt the proposed materials with the help of the quoted website.
Giulia Realdon, Italy