Supporting materials
Collaborative activity: calculating the circumference of Earth (Word)
Collaborative activity: calculating the circumference of Earth (Pdf)
Download
Download this article as a PDF


Get your students to use their smartphones for some hands-on astronomy.
Exactly where are you at this moment? One way to find out would be to use the satellite positioning function (often known as GPS) of your mobile phone. In the past, though, you might have relied on the stars to tell you where you were – especially if you were a sailor at sea in a largely featureless landscape.
In this article, we describe some of the early developments in navigation based on the stars, and show how these traditional techniques can be reproduced in the classroom using simple apps on a smartphone. Your students can then use the GPS function on their smartphones to check the accuracy of their work before considering potential sources of error.
Suitable for students aged 14–18, the two activities link history, astronomy, geography and mathematics: determining your latitude (figure 1) using the Sun, and determining your latitude using the star Polaris. Details of a collaborative activity between schools, to calculate the circumference of Earth, can be downloaded from the additional materials section. The three activities require little more than a smartphone and take no more than an hour each.
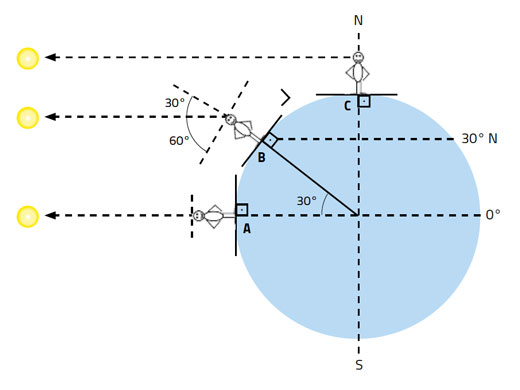
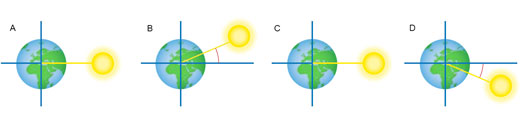
‘What is noon?’ may seem like an odd question. Surely noon is 12 o’clock midday? Strictly speaking, though, solar noon is the moment when the Sun crosses your meridian, or line of longitude, and will usually appear to be either due north or due south. This is when the Sun is at its highest point in the sky and shadows are at their shortest. It is at this moment that the position of the Sun can be used to determine your latitude, or angular distance from the equator.
How does this work? Let us consider the situation at one of the equinoxes (approximately 20 March and 23 September each year), when the plane of the equator runs through the centre of the Sun (figure 2).
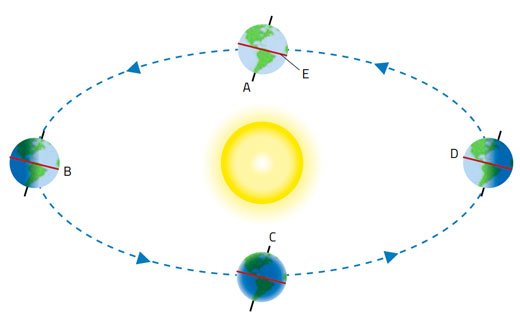
(We stated that at noon, the Sun is usually either due north or due south. At the equinoxes, it is directly overhead.)
Latitude = 90° – altitude of the Sun at noon at the equinox (Equation 1)
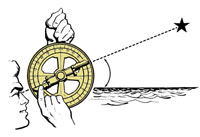
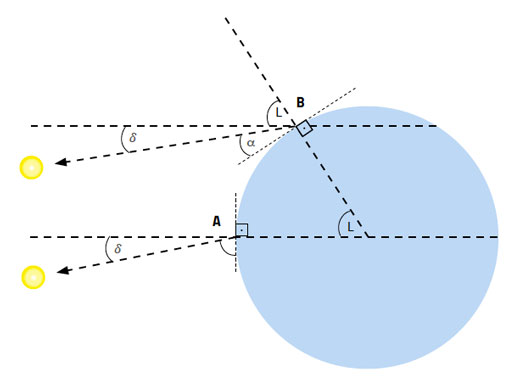
How can we use this knowledge in practice? In the 15th and early 16th centuries, many navigators used mariner’s astrolabes to measure the Sun’s altitude and thus calculate their ship’s latitude. The mariner’s astrolabe was essentially an inclinometer: suspended in the vertical plane, it was pointed at a celestial body, for example the Sun. A rotating alidade was used to read the altitude of the celestial body from the scale around the outer ring (figure 4).
While a mariner’s astrolabe is comparatively simple to buildw2, it is also easy to use a smartphone to measure the altitude of the Sun with the aid of an inclinometer app. Before we do this, however, we need to introduce a refinement so that our calculations work all year round.
Due to the tilt of Earth’s rotational axis (23.45°) and the fact that Earth orbits the Sun, it is only at the equinoxes that the Sun appears directly above the equator. Starting at the March equinox, the position of the Sun at noon appears to move north of the equator, reaching a maximum angle of +23.45° at the June solstice, returning to 0° at the September equinox, and moving south of the equator to reach -23.45° at the December solstice. This angle is known as the Sun’s declination (figure 5).
Thus the Sun’s noon altitude, which early navigators measured with a mariner’s astrolabe and which we can measure with a smartphone, depends on both the time of year – and therefore the Sun’s declination – and our latitude (figure 6):
Altitude of the Sun at noon = 90° + declination – latitude (Equation 2)
Or, rearranged:
Latitude = 90° – altitude of the Sun at noon + declination (Equation 3)
To determine the declination of the Sun, early navigators used tables of data or sophisticated mariner’s astrolabes with the declination of the Sun marked on the rotating disc. We can obtain the same information from a planetarium app, after which we can measure the Sun’s elevation to determine our latitude.
Each group of students will need:
To determine their latitude, your students will need to:
Depending on your location within your time zone, solar noon may be as early as 11.30 am, and because of daylight saving, it could be as late as 1.30 pm.
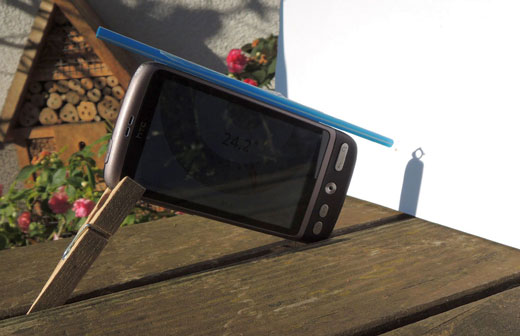
Alternatively, to enable the students to point their smartphones more precisely at the Sun and thus measure the elevation of the Sun more accurately, they could build a support that can be placed on a tripod. Full details of materials and construction are available onlinew3.
Ask your students to compare their results with the exact latitude given by the GPS function on their smartphone or by using the planetarium app. How accurate was their calculated value? What sources of error might there be?
Of course, the accuracy depends on the precision of the students’ work, e.g. how exactly the straw was aligned with the edge of the phone or whether the shadow was really at its smallest. For maximum accuracy, the measurements should be taken at noon, but a few minutes either side will not affect the estimate much because when the Sun is at its highest, its change in altitude is slowest.
Smartphones are able to measure slope angles with a precision of 0.1°, which is not bad. It could be interesting, however, to calibrate the inclinometer app with a spirit level to see if a reading of 0.0° truly is horizontal.
You could also ask your students why they think that although latitude could be determined in the ancient world, it was only in the 18th century that it became possible to measure longitude.
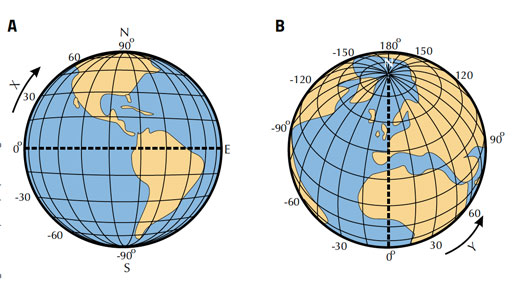
The answer lies with Earth’s rotation: 360° in one day or about 15° every hour. Thus by comparing the local time with the time at a reference point of known longitude, it is possible to determine your longitude. Local time could be estimated from the Sun, but the difficulty was the time at the reference point: a clock that kept time accurately, even on board a moving ship, was only invented in 1759, by John Harrison.
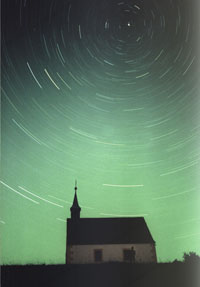
In the previous activity, we measured the altitude of the Sun at local noon: as the Sun crosses your meridian. It is at this moment – and only at this moment – that the Sun will appear to be either due south or due north. If your students were to calculate their latitude from the Sun at other times of day, their results could be wildly inaccurate. Fortunately, there is another method that is not so time critical – although it only works in the northern hemisphere and needs to be done after dark – relying on Polaris, the North Star.
While the positions of other stars seem to change during the night, Polaris appears to remain fixed in the north (figure 8), because its position is in line with Earth’s rotational axis. If you were to stand at the North Pole (latitude 90° N), Polaris would appear to be directly above you, at an altitude of 90°. At the equator (latitude 0°), in contrast, Polaris would appear to be on the horizon, at an altitude of 0°. Thus the altitude of Polaris is equal to your latitude: if you were in Paris, at a latitude of around 49° N, you would measure the altitude of Polaris as about 49°.
Latitude = altitude of Polaris (Equation 4)
Early navigators used a marine astrolabe to navigate by the stars, as they did when navigating by the Sun. Again, we can use a smartphone.
It is simpler to calculate your latitude from Polaris than from the Sun: it is not necessary to consider the declination, because the position of Polaris remains unchanged throughout the year.
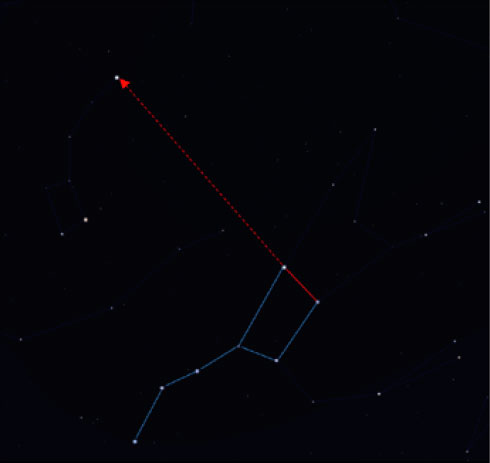
How can you find Polaris? Look for the constellation of Ursa Major, also known as the Big Dipper or the Plough (figure 9). Extend an imaginary line upwards from the furthest two stars of the tetragon, extending about seven times their distance. The first bright star along that line is Polaris, which is part of Ursa Minor, the Little Dipper. Alternatively, you can use the planetarium app and the search function.
Because it is much fainter than the Sun, observations of Polaris can be made directly, without an alidade, but its faintness also makes it rather difficult to locate. It can help to train your measuring skills by practising on brighter objects such as planets or the Moon.
Ask your students to:
They will need some ambient light for this, to recognise the edge of the phone in the dark.
Alternatively, working in pairs, they can use binoculars. One student should point the binoculars at Polaris so that the star is in the centre of the visual field (rest the binoculars on, for example a wall to keep them steady). Another student should rest the smartphone on the binoculars and determine the angle of elevation using the inclinometer app. If necessary, calibrate the binoculars: lay them on a horizontal surface, place the smartphone on top and check the angle on the inclinometer app.
Ask your students to look up the altitude of Polaris in the planetarium app. How accurate was their measurement? How does their estimated latitude compare to the exact latitude given by the planetarium app or the GPS function on the smartphone? What sources of error can they think of, in addition to the ones discussed in the previous activity?
Although Polaris is a bright star, it is considerably fainter than the Sun, which makes it harder to get an accurate reading of its altitude.
Another source of error is the position of Polaris. We said that Polaris would appear to be directly above you if you stood at the North Pole: at an elevation of 90°. In fact, its elevation would be 89.3°, which introduces an error of 0.7° into your students’ calculations, corresponding to about 100 km.
This method works best at medium latitudes. Very far north, it is hard to point at the star, which appears above your head. Near the equator, Polaris appears close to the horizon, which means there are disturbances introduced by the atmosphere.
This article is based on an activity published by Science on Stage, the network for European science, technology, engineering and mathematics (STEM) teachers, which was initially launched in 1999 by EIROforum, the publisher of Science in School. Science on Stage brings together science teachers from across Europe to exchange teaching ideas and best practice with enthusiastic colleagues from 25 countries.
At Science on Stage workshops in Vienna, Austria, and Berlin, Germany, as well as discussions over email and the open-source learning platform Moodle, 20 teachers from 14 European countries worked together to develop 11 teaching units that show how smartphones and apps can be used in maths, physics, chemistry or biology lessons. These units were then published in 2014 by Science on Stage Germany as iStage 2: Smartphones in Science Teachingw4. The project is supported by SAP.
In addition to Gerhard Rath and Philippe Jeanjacquot, Pere Compte from Spain and Immacolata Ercolino from Italy were very involved in the development of this project. Martin Pratl provided valuable assistance with the article text.
Ever wanted to know where you are? Use the Sun or the stars to calculate your latitude using just your smartphone, some sticky tape and a drinking straw. These activities could be used not only for a physics lessons on astrophysics or space, but also in an interdisciplinary lesson on history and early navigation, or mathematics and the uses of trigonometry.
The article also provides an interesting pan-European project idea, whereby schools at different latitudes do the same experiment and use their results to calculate the circumference of Earth.
Graham Armstrong, UK