


Getting down to Earth: ideas for the earth science classroom Teach article
Are you looking for ideas to spice up your earth science class? Why not try out one of the rich collection of activities developed by Chris King, Elizabeth Devon and Peter Kennett from Earth Learning Idea.
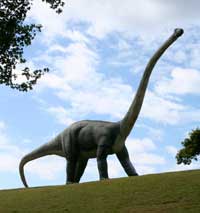
Image courtesy of shrizzine /
iStockphoto
To coincide with the UN International Year of Planet Earth (2007-2009), three earth science teachers from the UK compiled a website with a vast, varied and still expanding collection of teaching activities: Earth Learning Ideaw1.
The simple activities require few resources (but can be readily adapted for use with standard school lab equipment) and are designed to encourage students aged 8-18 to investigate how Earth works (the recommended age range is given in each activity).
There is an online discussion around every idea in order to develop a global support network, and each activity is accompanied by ‘back-up’ notes for teachers. The activities are also being translated into Spanish, Norwegian, Italian, Chinese and Tamil.
You can help the team (and yourself), if you are a teacher trainer or school teacher in science, geography or earth science, by subscribing free of charge on the project website to receive two new earth learning ideas each month during 2010. You can then discuss the idea with other interested people across the globe on the associated blog. All activities are free to download at any time, but if you subscribe, you will be notified when a new activity is published.
The activities on the website are divided into nine different categories: ‘Earth as a system’, ‘Earth energy’, ‘Earth in space’, ‘Earth materials’, ‘evolution of life’, ‘geological time’, ‘investigating the Earth’, ‘natural hazards’ and ‘resources and environments’. They include activities on volcanoes, tsunamis, dinosaurs, oil and gas, earthquakes, permeability of soil and many more. Most are practical activities, whereas others can be thought experiments, such as a paper-folding activity to help students visualise how Darwin developed his theory of how coral atolls formed. Many protocols include an extra section of additional follow-up experiments.
Examples of two of the activities are given below (without the back-up details, which appear on the website).
Trapped! Why can’t oil and gas escape from their underground prison?

the top of a bottle, a tube
from a ball-point pen and
some clay
This experiment is used to demonstrate how oil and gas can be trapped in reservoir rocks beneath the surfacew2.
Age range: 14-18 years
Required time: 10 min
Learning objectives:
Students should be able to:
- Explain that oil and gas float on top of water, because of their lower density;
- Explain that oil and gas may become trapped underground, if they rise until they reach an impermeable layer of rock;
- Appreciate the need to control the drilling for oil and gas, to avoid ‘blowouts’ at the surface.
Context: This could form part of a lesson on the world’s resources. It could follow a lesson on porosity and permeability.
Materials
- Any large container, e.g. a bucket, preferably with clear sides, nearly full of water
-
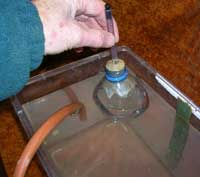
Home-made apparatus showing
the model oil trap in action
Images courtesy of Peter KennettThe top end cut off a clear plastic bottle (e.g. 2 l bottle) to be used as a funnel
- A thin tube, e.g. the barrel of an old ball-point pen, with a bung
- Clay, to seal the tube into the neck of the bottle
- A drinking straw or tubing for blowing air into the funnel
- Cooking oil (if possible)
Procedure
- Insert the thin tube or ball-point pen into the funnel or top of the bottle, so that most of it is sticking out, and seal the bottle with clay (see image).
- Push the funnel well down into the water in the container.
- Only then seal the top part of the thin tube with a bung.
- Blow air underneath the lip of the funnel with a piece of tubing or a straw, displacing roughly half the water. The air represents gas.
- Put some cooking oil into the tubing and blow it up into the inverted funnel, to represent oil.
- Explain that the inverted funnel (or the top of a clear plastic bottle) represents the impermeable cap rock forming a trap in a permeable layer containing natural gas and oil.
- Ask the students the following questions, the answers to which are in the PDFw2:
- In what order do the different ‘layers’ of gas, oil and water occur?
- Why does the gas (and oil) lie on top of the water and not the other way round?
- Are the bases of the ‘layers’ of gas and oil above the water horizontal or not?
- What will happen when the bung is removed from the funnel?
- Why might this be a problem in a real oil or gas well?
- Remove the bung sharply and see what happens.
- Ask why this might be a problem in a real oil or gas well.
Note: If no cooking oil is available, the principles can be demonstrated using only the air blown through the tubing.
How to weigh a dinosaur
How can the relationship between pressure, force and area be used to estimate the mass of a two-legged dinosaur from the area and depth of one of its fossilised footprints? Dinosaurs sometimes left footprints in wet mud or sand, which hardened to leave trace fossils. We can work out how heavy the dinosaur was, if we compare the footprint with the mark made by a known weight in the classroom.
We are giving a worked example here, to make it easier to follow the calculations, but other values may be obtained at school, depending on the equipment availablew3.

measure pressure in the sand
container
Image courtesy of Peter Kennett
Age range: 14-18 years
Time required: 30 min
Learning objectives:
Most students should be able to:
- Calculate the pressure from a given force and area;
- Invert the equation and calculate an unknown force from a known pressure and area;
- Debate whether the result gives the mass of the dinosaur, or if it needs to be doubled to account for it being two-legged;
- Appreciate that such calculations can only be an approximation.
Context: The lesson introduces the concept that an imprint (trace fossil) is just as much a fossil as the remains of the actual body – and can sometimes give very valuable information on the lifestyle of the organism. It provides a useful link between physics, mathematics and geology.
Materials
- Soft, very wet sand in a deep (e.g. 10 cm) container
- A 1 kg mass, or a 1 l plastic bottle full of water (which imposes a force of 10 N)
- A calculator and a ruler
- A rectangular block, 2 cm x 2 cm (i.e. 4 cm2 cross-section) by, say, 10 cm long, preferably marked at 1 cm intervals
- A diagram showing an outline drawing of a single dinosaur footprint on a 5 cm grid for estimating the area (to the right, or to be printed from the PDFw3)
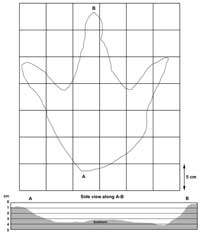
Click on the image to download
the full-size worksheet
Procedure
- Fill the container with sand, and soak it thoroughly with water. Pour off any excess water.
- Stand the rectangular block upright on the wet sand.
- Place the 1 kg mass on top of the block and let it sink into the wet sand. It imposes a force of about 10 N. Ideally, you would also calculate the weight of the rectangular wooden block, but it is small compared to the 1 kg mass, so it can be ignored, given that the total force is only approximately 10 N.
- Measure the depth in centimetres to which the bottom of the block sinks into the sand (1.5 cm).
- Pressure = force/area, so the pressure exerted by the block = 10 N / (2 cm x 2 cm) = 2.5 N/cm2.
- The diagram (see image above) shows one footprint left by a small two-legged dinosaur.
- Measure the area of the dinosaur footprint, by counting squares on the diagram, where each square represents 25 cm2. (Answer: 325 cm2.)
- Estimate the average depth in centimetres of the footprint from the side view in the diagram (3 cm).
- Assume that the ‘sinking depth’ is proportional to pressure (i.e. if pressure is twice as great, the dinosaur’s foot will sink in twice as deeply). Calculate the pressure exerted by the dinosaur’s foot (2.5 N/cm2 x 3 cm / 1.5 cm = 5 N/cm2).
- Force = pressure x area, so force (i.e. weight) = 5 N/cm2 x 325 cm2 = 1625 N.
- There are about 10 N per kg, so the mass of the dinosaur acting on one foot would have been 1625 N / 10 N/kg = 162.5 kg. This is the mass of a person about 2.7 metres (9 feet) tall – a giant!
- Does this represent the total mass of the dinosaur? What other explanation could there be?
For a further investigation, students could devise ways of investigating whether the sinking depth is indeed proportional to pressure, using a variety of objects on a range of substrates. The effect of the water content of the substrate could also be investigated.
Acknowledgements
The activity on trapped oil and gas is based upon an original idea by DB Thompson, published in Earth Science Teachers’ Association (1992).
The dinosaur activity is based on part of a teacher-training workshop run by the Earth Science Education Unit.
In addition, thanks are due to Dr Martin Whyte of Sheffield University for his helpful comments on a draft of this activity.
References
- Earth Science Teachers’ Association (1992) Science of the Earth 11-14 Power Source: Oil and Energy. Sheffield, UK: Geo Supplies Ltd. ISBN: 1873266057
Web References
- w1 – The website of the Earth Learning Idea project is: www.earthlearningidea.com
- w2 – You can download the full PDF of the activity, ‘Trapped – why can’t oil and gas escape?’, from the Earth Learning Idea website (www.earthlearningidea.com) or via the direct link: http://tinyurl.com/yd82s3w
- w3 – For the PDF of the ‘How to weigh a dinosaur’ activity, see the Earth Learning Idea website (www.earthlearningidea.com) or use the direct link: http://tinyurl.com/yaw6c6k
Resources
- Suggested Earth Learning Idea activities to complement the ‘Trapped oil and gas’ activity include:Modelling for rocks: what’s hidden inside and why
- The space within: the porosity of rocks
- Where shall we drill for oil? Sorting out the sequence – oil prospect
- Make your own oil and gas reservoir
- In addition, you might find the following articles on energy and fossil fuels useful:
- De Vries G (2009) Powering the world. Science in School 11: 58-63.
- Van Dijk M (2009) Hydrocarbons: a fossil but not (yet) extinct. Science in School 12: 62-69.www.scienceinschool.org/2009/issue12/energy
- To complement the ‘How to weigh a dinosaur activity’, there is a vast selection of Earth Learning Idea activities on dinosaurs and fossils, including:The meeting of the dinosaurs – 100 million years ago
- Dinosaur death – did it die or was it killed?
- A dinosaur in the yard
- What was it like to be there? – bringing a fossil to life
- For more information on dinosaur footprints, see:
- For further suggestions of teaching fossils and dinosaurs in the classroom, see:
- Barnes E (2006) The Bone Trail: generating enthusiasm for earth sciences in the classroom. Science in School 3: 52-55.
- Demoncheaux E (2007) Review of Fossils: A Very Short Introduction and Dinosaurs: A Very Short Introduction. Science in School 6: 85.
Review
As an earth science teacher I frequently found it difficult to address some topics without being able to do experiments in the classroom. The Earth Learning Idea resources gave me a valuable instrument to overcome this problem and make my lessons livelier.
The project offers a set of hands-on activities for a wide range of topics related to earth science and geology from primary to upper secondary school. These activities can be easily carried out at school in a limited period of time (usually less than one hour) and with nearly no lab equipment; the required materials are very cheap and easy to get. In addition, every activity is complemented with a back-up section to fit them well into the science curriculum.
The article presents two activities which make it possible to link earth science with physics (density, pressure), biology (evolution, history of life) and mathematics (calculations). The article may be used as a starting point to discuss related topics such as energy resource management, the theory of evolution and its evidence (e.g. the fossil record). It can also provide valuable background reading before a visit to a natural history museum, a fossil exhibition or an oil or gas well (if applicable in your country).
Many more activities can be found on the project websitew1, where a keyword index and a category list help the search. I would recommend this article, together with the website, to earth science teachers looking for novel didactic materials to enrich their lessons: both they and their students would really enjoy and profit from the experience.
Giulia Realdon, Italy