Supporting materials
Download
Download this article as a PDF


This activity was presented at the Science on Stage Festival 2024. ![]()
Explore how researchers investigate artworks without damaging them and reveal hidden information in paintings by using different wavelengths of light!
In 2014, scientists and art conservators from the Phillips Collection, the National Gallery of Art, Cornell University, and the Winterthur Museum discovered the form of a man under the main painting of a Picasso artwork by using infrared (IR) technology. More specifically, a bearded man wearing a bow tie and supporting his head with his hand appeared beneath the famous Picasso painting The Blue Room.[1] However, this is not the first time that a hidden image has been revealed beneath a painter’s artwork.[2]
Technology and modern imaging techniques are constantly revealing new elements and hidden details of artworks, and thus, the way we perceive art is constantly changing. The main idea behind the use of the technique multispectral imaging (MSI) is as follows: the degree that radiation penetrates into the artwork depends on the wavelength of radiation. So, you can study different layers of an artwork by simply using different wavelengths of light.
Three main concepts underpin this technique.
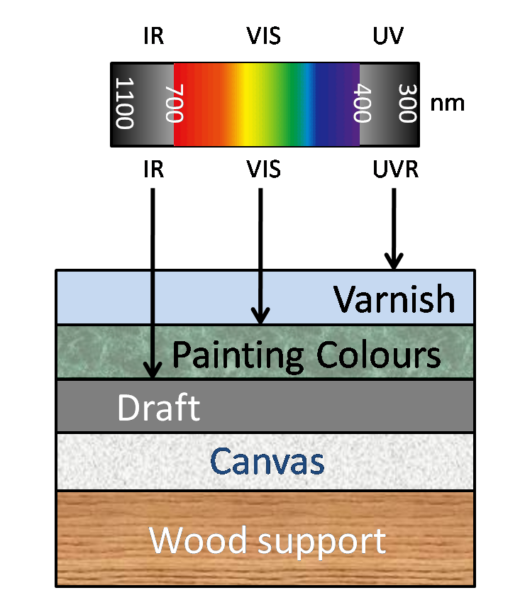
The first is that light penetrates into the materials of the artwork to different degrees, depending on its wavelength (figure 1). The top layer (light blue) corresponds to the varnish, the next layer (green) corresponds to the colours of the artwork, the third layer (grey) corresponds to the draft, and the final layers are the canvas (white) and the wooden support (brown). Light (arrows) of different wavelengths reaches different depths into these layers: ultraviolet (UV) rays only up to the varnish, visible-light rays down to the main pigment, and IR rays down to the draft.
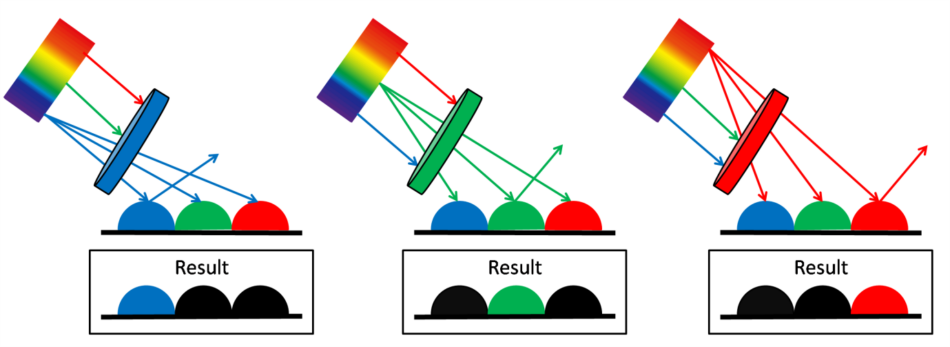
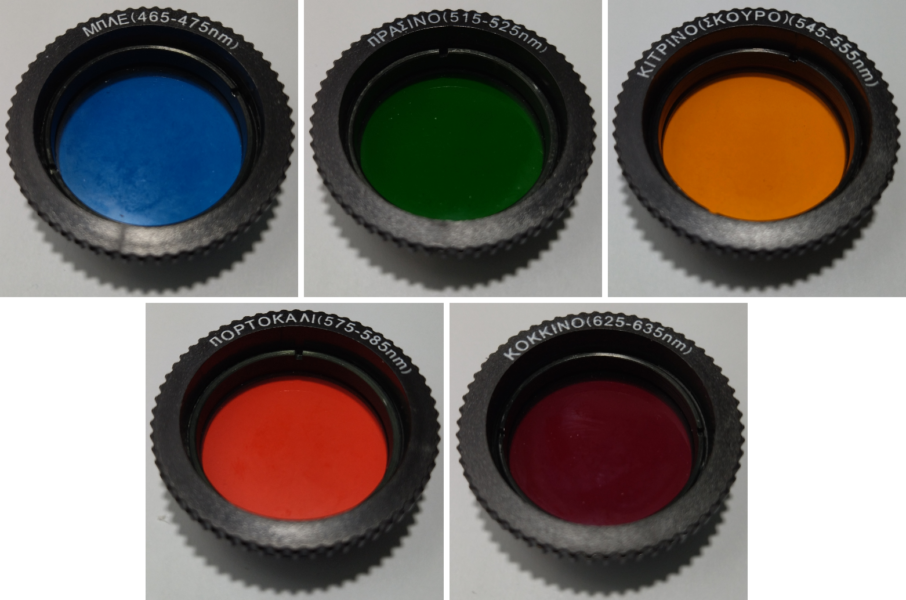
The second is the function of filters (figure 2). Filters only let certain colours or wavelengths of light pass through while blocking others. For example, a blue filter (left part) allows blue light to pass through but absorbs or reflects other colours like red and green. As a result, we can see only the blue paint colours because they are reflected. The other paint colours absorb the light, so we see black spots in those areas.
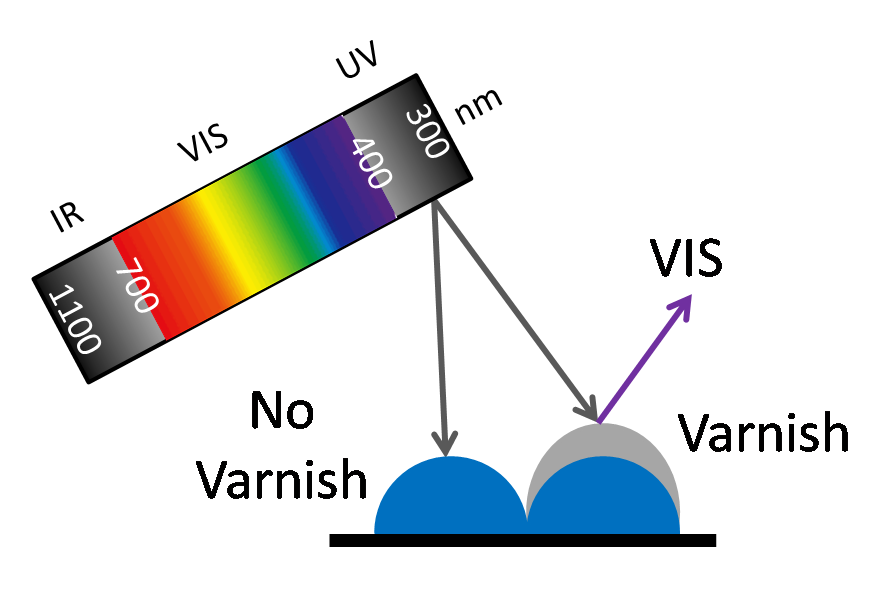
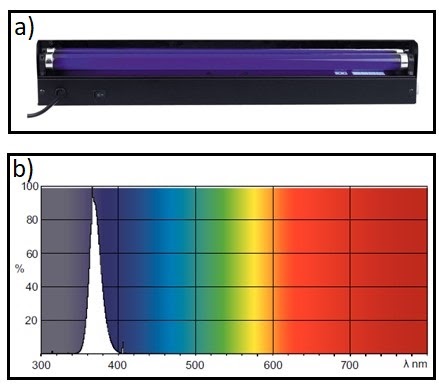
The third is fluorescence (figure 3). Some varnishes contain special molecules that absorb invisible UV light and then almost instantly (a few nanoseconds) release part of that energy as visible light. This is called fluorescence, and it makes the varnish glow in the dark when it is exposed to UV light.
By exploring different imaging techniques, students understand the interaction of light with matter, get familiar with applications of basic principles of physics in practice, and finally realize the interdisciplinary nature of scientific knowledge. This STEAM project aims to combine students’ love for both art and science, and it is suitable for students aged 14–18.
This activity is related to UV fluorescence imaging, and takes advantage of the fact that varnishes used on paintings often fluoresce under UV light. Therefore, with this particular technique, it is possible to examine and diagnose the state of conservation of the painted surface of an artwork.[3]
Time required: 40 minutes.
Caution is needed when using UV light. In addition to ensuring that students do not look directly into the light source, please check for any local guidance or requirements.
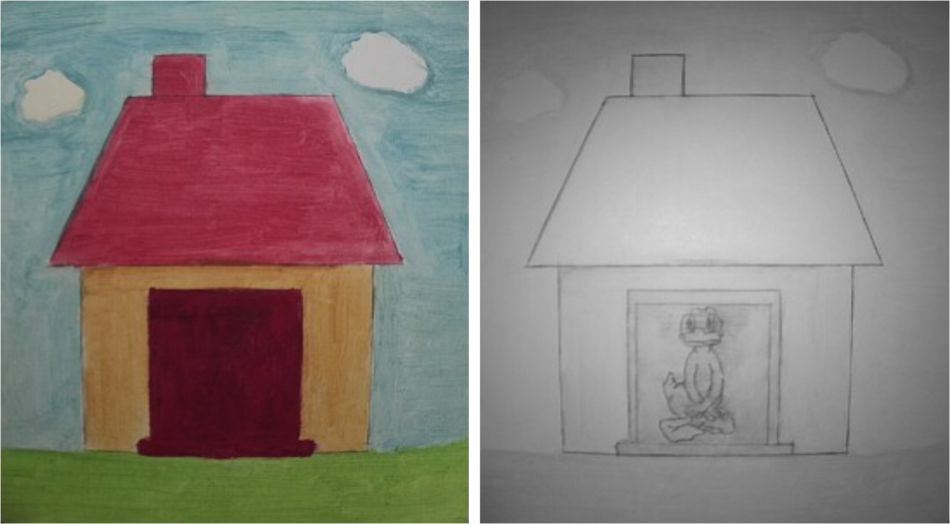
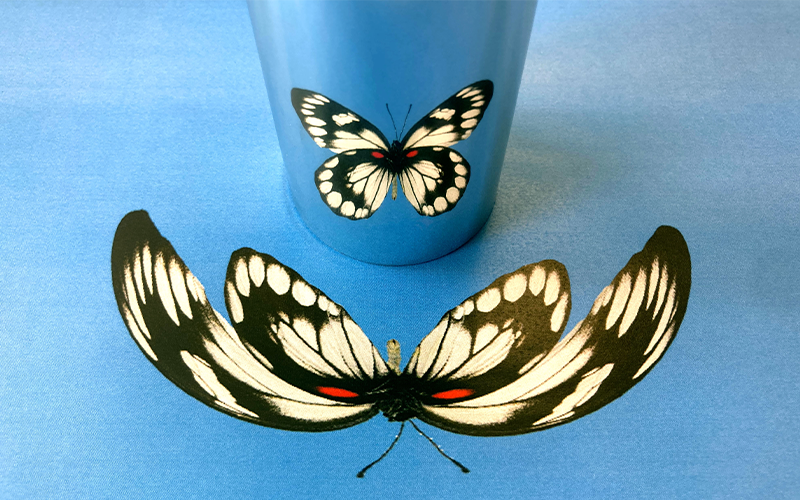
In figure 4, one cloud is covered with varnish, while the other is not. If the painting is illuminated with normal lighting, then we see it as it is shown on the left. If painting is illuminated with a UV lamp, then areas that are covered with varnish appear brighter.
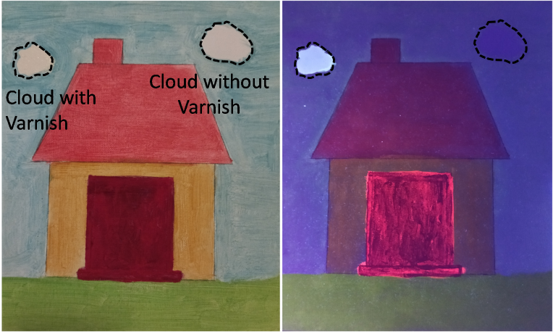
This happens due to the property of certain pigments of fluorescing in the visible region of the spectrum after excitation with UV radiation with a wavelength between 300 nm and 400 nm.
Varnishes, used on the surface of artworks, whether older or more modern, show this fluorescent property, in contrast to any later interventions or surface damage, which appear as dark spots without any fluorescent property.
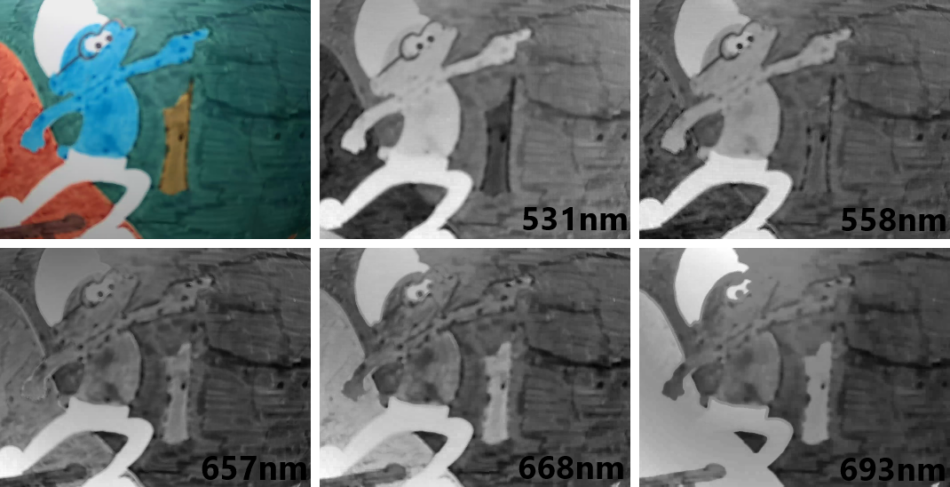
Imaging using radiation in the visible region of the spectrum gives us information about the artist’s work itself, since visible radiation penetrates the varnish and reaches a level below it. The use of different filters can allow the selective passage of light. Images of the painting are captured by a typical camera and can be converted into black and white (greyscale) for easy identification of areas that absorb radiation (black areas) and areas that reflect radiation (white areas), as shown in figure 6.
This activity can be implemented in two ways, depending on the age level of the students. In the first case, the filters are held in front of the camera. In the second case, a rotating platform is constructed and controlled by an Arduino microcontroller.
Time required: 40 minutes.
A nice extension activity is to build a rotation platform and program it to cycle through the filters. Rotation could be achieved with a servo motor that is controlled by an Arduino microcontroller.[5] Also, PC software could be used to send commands to the Arduino controller to rotate the platform for specific angles. The Arduino sketch and the software that we made (source code and executable) can be found in the supporting material, along with full instructions for the construction of the rotating platform.
Older students can also get the intensity normalization of the captured images, and they can also construct a graph of intensity of the pixels of a specific area of the drawing versus the wavelength. This way, we get the ‘fingerprints’ of our pigments! Full instructions are given in the supporting material.
This activity enables students to observe that, as we change the filter, different areas of the image appear brighter. For example, if we have a blue filter (λmean = 531 nm), the blue areas of the project appear brighter, while the red areas appear darker. Conversely, for the red filter (λmean = 693 nm), the roof of the house appears bright, while the blue areas appear dark. This is very useful from a teaching point of view for students, as they can understand the reflection and absorption of radiation, but also the fact that colour is not an objective property of matter.
In the art world, the study of different colours through the use of different optical filters enables art conservators to study the pigments the painter has used and check the authenticity of a painting.
Imaging using IR radiation uses the near-IR region (750 nm to 2500 nm). The radiation penetrates the first layer, which is usually the varnish, but can be the entire colour layer, and thus, reaches the artist’s draft (figure 8).[6] Graphite, mainly used in an artist’s draft, strongly absorbs IR radiation.
Time required: 40 minutes.
This noninvasive technique is often used by art conservators to discover hidden details or hidden images beneath a painter’s artwork. And this is exactly the case with many of Picasso’s paintings. In earlier times, many artists, mainly for economic reasons, painted on already-painted canvases, with the result that today we discover many hidden paintings under the main artwork. So, this constant revealing of hidden details in artworks is very important, as it changes the way we perceive art.
The specific experimental process is an opportunity for secondary school students to connect theoretical concepts found in school textbooks, such as the electromagnetic spectrum, photons, wavelength, and reflection, with the observation of suitable optical phenomena, which often exceed the limits of our own senses. Research at an international level shows that phenomena related to light and its properties are very difficult for students of all age levels;[7–9] this is also confirmed by our own daily experience in the classroom.
The aim of this project is, on one hand, to help students face their personal preconceptions about visible light and its properties, especially with respect to light transmission, and to remove any misconceptions regarding invisible radiation, such as the origin of UV and IR radiation or the dangers and usefulness of each radiation. On the other hand, this project could be an alternative teaching proposal for teachers themselves. In the activities, materials found in school laboratories and free software have been used, while the cost of any additional component is low.
Finally, the project cultivates the students’ STEM skills because, during the implementation and execution of the activities, the students are confronted with various challenges at a mathematical, technological, and engineering level. At the same time, however, this specific project also encompasses the students’ love for the arts and the creation of their own ‘works of art’, because an interdisciplinary approach is followed to achieve the final goal.
[1] The Blue Room painting by Picasso: https://www.phillipscollection.org/collection/blue-room
[2] Some examples of hidden images behind Picasso’s paintings: https://www.smithsonianmag.com/smart-news/new-exhibition-reveals-the-hidden-images-under-picasso-blue-period-paintings-180979875/
[3] Subbarao M (1988) Parallel depth recovery by changing camera parameters. Second International Conference on Computer Vision 149–155. doi: 10.1109/CCV.1988.589986
[4] How to turn your phone screen to greyscale: https://www.theverge.com/23637672/grayscale-iphone-android-pixel-samsung-galaxy-how-to
[5] Instructions for the construction of the rotating platform: https://sites.google.com/view/scienceonstage2024/rotating-platform-construction-guide
[6] Fontana R et al. (2018) Multispectral IR reflectography for painting analysis. In Bastidas D, Cano E (eds) Advanced Characterization Techniques, Diagnostic Tools and Evaluation Methods pp 33–47. Springer. ISBN: 9783319753157
[7] Knight RD (2004) Five Easy Lessons: Strategies for Successful Physics Teaching. Addison-Wesley, San Francisco. ISBN: 0805387021
[8] Fetherstonhaugh T, Treagust DF (1992) Students’ understanding of light and its properties: teaching to engender conceptual change. Science Education 76: 653–672. doi: 10.1002/sce.3730760606
[9] Karrqvist C, Andersson B (1983) How Swedish pupils, age 12–15, understand light and its properties. In Helm H, Novak JD (eds) Proceedings of the International Seminar: Misconceptions in Science and Mathematics pp 380–392. Cornell University, Ithaca.
Did you know that physics can help uncover hidden paintings? At CERN, scientists use special technology to look beneath layers of paint without damaging the artwork. A small particle accelerator called MACHINA can scan paintings and artefacts to reveal hidden. Along the same lines, CERN’s Timepix particle detectors helped prove that a lost painting was actually made by the great Renaissance master Raphael.
Just like in “Shedding Light on a Picasso”, where students explore how light interacts with art, CERN’s technology helps experts study paintings in new ways. Science isn’t just for labs—it can also save history!
Download this article as a PDF

Have you ever seen a blue cow? A blue apple? Or a blue tree? Blue is rare in nature, so why are some plants and animals…


With flying colours: Try some simple but striking experiments to illustrate temporal additive colour mixing, and create and mix coloured shadows.
Through the looking glass: unlock the secrets of anamorphosis, where art and science meet to create mind-bending illusions!