


Radioactivity in the classroom Teach article
Luis Peralta, professor at the University of Lisbon’s physics department, and Carmen Oliveira, physics and chemistry teacher at Casquilhos High School in Barreiro near Lisbon, describe the ‘Environmental radiation’ project, in which students become actively and enthusiastically involved in…

participating in the project.
Click to enlarge image
Adapted from an image courtesy of
Rei-artur; image source: Wikimedia Commons
The ‘Environmental radiation’ project, which started in 2007, emphasises the importance of ionising radiation – radiation with enough energy to remove electrons from atoms or molecules – in daily life. It now involves students (aged 12-18) and teachers from 25 high and middle schools throughout Portugal and the Azores, who receive technical and logistical support from the physics departments at the universities of Lisbon and Beira Interior, and from the Laboratory of Instrumentation and Experimental Particle Physics. The idea for the project was born when students from several high schools visited Lisbon University for a few days in Summer 2006, and a first trip to uranium mines was organised for them.Teachers and students involved in the project are invited to conduct hands-on experiments and share their results on the project’s websitew1 (see graphs below) and during an annual one-day workshop hosted by one of the participating schools.
This includes a science fair where students present their results and share new ideas, and the best works are awarded symbolic prizes. At the end of this day, there is a ‘pros and cons’ debate between the students and guest scientists concerning radiation issues. This workshop is also an interesting social event, attracting the attention of newspapers and local radio stations.
The ‘Environmental radiation’ project also provides extracurricular activities. In 2008, students and teachers, accompanied by two geologists, visited the uranium mines near Nisa, a small town about 200 km north-east of Lisbon. This is one of several locations in Portugal where rocks with some degree of radioactivity can be collected. The students collected over 50 kg of rocks at the site, which were later used to perform experiments at school. There are several areas in Europe where such rocks can be collected, for example in the Czech Republic.
The project’s chosen topic may seem controversial, as we are dealing with radioactivity and young people, but all the samples we use have a low radioactive content and, in fact, this negative aspect can be transformed into a positive one, as this project enables students to develop a culture of protection and good practices that carry through to the way they deal with radioactivity in everyday life – for instance, in medical imaging. To that end, the project’s website has a dedicated forum where students are encouraged to debate radiation-related issues.
The experiments

one of the pieces of work
presented by school students in
2008
Image courtesy of the
‘Environmental radiation’ project
We come across natural radiation in a variety of situations. For instance, radiation caused by radon and the elements into which it decays represents around 50% of the total radiation that people are normally exposed to in Europe. In turn, radon itself forms naturally when uranium present in rocks, most commonly granite, decays. Radon gas leaks from the soil and through cracks in the walls, and accumulates in closed rooms such as cellars, or inside buildings near the ground floor, where its presence can be detected through simple experiments that students can perform at their own schools.
The experiments developed for this project can be performed using a minimum amount of inexpensive materials. Each of the participating schools was provided with a kit comprising a Geiger counter, irradiated seeds, X-ray dental film, and a plastic box with up to 2 kg of rocks collected at the uranium mines. The schools provided lab space, computers and the enthusiasm of students and teachers.
A wide range of experiments can be performed to introduce and explore radioactivity, with varying degrees of complexity. For instance, students can use Geiger counters to measure radiation levels in and around their schools, and create a local radiation map using GPS coordinates which they then feed into Google Earthw2. Other simple experiments using only a Geiger counter involve detecting radiation in salts used in food preparation, such as potassium chloride, and in natural rocks; in more complex experiments, students can place metal plates with different thicknesses and compositions (lead, aluminium) between radioactive material and the Geiger counter, to discover how radiation diminishes when it traverses metal.
Experiments developed by the ‘Environmental radiation’ project also include using a balloon to catch radioactive dust from a closed room: rub the balloon with a furry cloth to create static electricity which will attract the dust, hang it for 30 minutes in a room which is usually kept closed, deflate it and use a Geiger counter to measure the radiation it emits. Students can even re-enact Becquerel’s historic experiment that led to the discovery of radioactivity, in which radioactive rocks are placed on dental X-ray plates and developed to reveal the ‘auto X-ray’ they have created.
For detailed descriptions of all the experiments and a discussion forum on radioactivity (all in Portuguese), visit the project websitew1.

Image courtesy of the ‘Environmental radiation’ project
Using the protocol below, students can explore a commercial application of radioactivity. The experiment has been successfully performed by students aged 13-20, but is also suitable for younger students, if the evaluation (measurements and graphs) is adapted accordingly.
While the fact that ionising radiation damages DNA and other cellular structures poses a risk to humans, it can also be – and frequently is – used to our advantage. Ionising radiation is used to kill all microbes on surgical instruments, sterilising them, and it is also employed in a similar fashion to extend the shelf life of some foods, and even in agriculture, where it is used to eliminate parasites from plant seeds. In Portugal, seed irradiation is done for research purposes only, while in the USA, this is common practice. Of course, the latter could inflict radiation damage to the seeds themselves. However, plant seeds are generally more resistant to radiation than the micro-organisms that plague them, so it is a question of finding the right balance: the radiation to which the seeds are subjected must be strong enough to kill the parasites, but not so strong as to harm the seeds.
By tracking the development of plant seeds subjected to different amounts of radiation, students can observe the effects of radiation on plant germination and growth.
For this experiment, the ‘Environmental radiation’ project had their seeds irradiated at the University of Lisbon’s physics department and at a facility that sterilises surgical implements. You can contact similar institutions in your country to irradiate the seeds you need.
Equipment and materials per group of 2-4 students
- Several trays (all the same shape and size)
- Plant seeds previously subjected to different (known) doses of radiation (ideally 0-400 Gy)
- We recommend the use of wheat seeds if possible, but canary grass (Phalaris canariensis, a common birdseed) will also work and is perhaps easier to find.
The most important factor is dose uniformity (i.e. when irradiated, all seeds in a batch should receive the same amount of radiation). We used a Philips high-power X-ray tube to perform the irradiation. The seeds (a volume of about 0.5 l at first) were placed inside a plastic cup, which stood about 0.5 m from the X-ray tube window. To control the delivered radiation dose, a PTW Farmer ionisation chamber was placed inside the cup, right in the middle of the seeds. When one of the desired doses was reached, part of the seeds were taken out of the cup and separated in a labelled bag. In this way the dose was cumulative for the remaining seeds in the cup.
One of the problems during irradiation was the fact that the seeds closer to the tube window received a higher dose, even though the cup was rotated by 180° between irradiations. A better solution in the future would be to place the cup on a rotating base (such as an old record player). - Soil (garden earth will do)
- Water
- A ruler
- Optional: temperature, light, pH and humidity monitors.
Procedure
- Place equal amounts of the same kind of earth in each tray.
- Divide the trays into equal areas (one area for each radiation dose), label them accordingly, and sow the seeds that received each radiation dose in their respective area. Make sure you sow the same number of seeds (50-100) in each area and note down the number! If possible, sow in a grid – this really helps when you have to measure and count individual plants later on.
- Cover the seeds with a 2-3 mm thick layer of earth (if you use more, they will take longer to sprout).
- Regularly water all your seeds with the same type and quantity of water.
- Keep all trays in the same place throughout the experiment, to ensure growth conditions are the same.
- If you have the necessary instruments, measure and register the environmental variables (temperature, light, pH and humidity) regularly. If you perform this as an extracurricular activity, students can perform daily measurements. Otherwise, checking the plants during class hours will do.
- For each radiation dose, count how many seeds germinate. You may also want to make a note of which dose led seeds to germinate first.
The growing time is very dependent on local conditions. We have experienced differences of more than a week among our schools. Light and temperature are very important factors, as is the depth at which the seeds are sown. In one of the schools, plants could already be measured after 4 days, while in others it took 12 days. As a rule of thumb you can make the first measurement when the tallest plants have reached 4-5 cm.
- Measure the height of each plant 8 and 12 days after it started to germinate and record it. As mentioned above, this is only a guideline as growing time is variable. Each individual plant is measured, which takes about 15 minutes for 50 plants. Sowing the seeds in a grid makes this step easier.
- For each radiation dose, group the measured heights in intervals of 0.5 cm, and draw a histogram showing the number of plants in each height group (see example histogram).
- Calculate the average plant height for each radiation dose 8 and 12 days after germination.
- Note down these results in the tables and draw a graph showing how the average plant height varies with radiation dose.
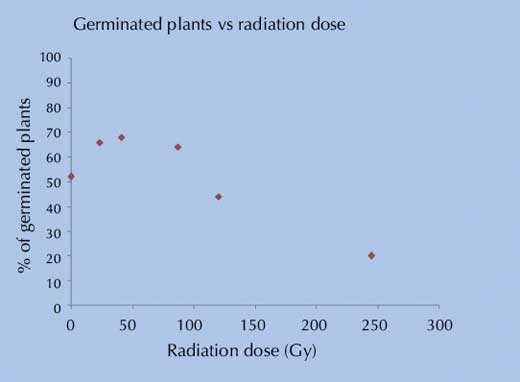
- Calculate the percentage of seeds that germinated for each dose (relative to the number of seeds you planted for that dose). Display these results in a graph showing how radiation dose affects the percentage of germinated seeds (see example graph).

Images courtesy of the
‘Environmental radiation’ project
Safety notes:
- Place the radioactive rocks in a plastic box and wear gloves when you handle them.
- Experiments involving radioactive rocks should be performed in a ventilated room.
- For the experiments with irradiated seeds, it is enough for the students to wear gloves when they sow the seeds. The irradiation of seeds is carried out in the Physics Department of Lisbon University by technical experts who follow appropriate security.
- For the Becquerel experiment, gloves must be worn to handle the X-ray dental film when students are developing the film.
Discussion
- Does the radiation dose influence the number of seeds that germinate? How?
- Does the radiation dose affect how tall plants become? Does it affect how fast they grow?
- What radiation dose leads to the largest possible number of germinated seeds? Which is the right dose to obtain the greatest plant height?Students should conclude that increasing radiation dose increases the percentage of germinated seeds and the average height the plants reach, up to a certain dose of radiation above which the radiation becomes harmful to the seeds themselves and so the number of germinated seeds and the average plant height decrease. In our experience, depending on plant species, above 300-400 Gy, most seeds will not germinate, and those that do germinate have serious problems, for example they rot after only a few days.
The organisers of the ‘Environmental radiation’ project are currently in contact with biologists and biology teachers in an effort to further expand this experiment to encompass a multidisciplinary approach, in which students may be able to observe the effects of radiation on the plants’ cells and genetic material. Interested teachers may contact the organisers through the forum on the project’s website.
Acknowledgement
This project was financed by Ciência Viva, the Portuguese National Agency for Scientific and Technological Culture, the Science and Innovation Program for 2010, and ERDF (European Regional Development Fund).
Web References
- w1 – The website of the ‘Environmental radiation’ project can be found here: www.lip.pt/radao
- w2 – To download and install Google Earth for free, see: http://earth.google.com
Resources
- Rego F, Peralta L (2006). Portuguese student’s knowledge of radiation physics. Physics Education 41: 259-262
- The UK’s Institute of Physics has developed a teaching unit on radioactivity, which can be found on its website (www.iop.org) or here: http://tinyurl.com/lsr5r5
Review
With its various forms and applications, radioactivity has come to play an increasingly vital role in our everyday lives. Nowadays, the amount of radiation from human activities is already roughly equal to the amount of radiation originating from natural sources (Earth and space). In addition, the number of nuclear power plants continues to increase.
As future citizens will be forced to make critical decisions on related issues, students of today should start to prepare by studying the potential applications of radioactivity and the possible consequences of its use.
In this article, Luis Peralta and Carmen Oliveira offer information and ideas on involving students in motivating educational activities relating to the importance of ionising radiation. The variety and the number of ways in which these activities can be integrated into the curricula are remarkable.
Vangelis Koltsakis, Greece