


Scientists at play: contraptions for developing science process skills Teach article
In the second of two articles on developing the processes of enquiry, hypothesis and testing, Alfredo Tifi, Natale Natale and Antonietta Lombardi describe how to build and apply some of the low-cost equipment they have developed.
To recap, science process skills are fundamental to science, allowing everyone to conduct investigations and reach conclusions. We are convinced that there is a serious educational gap in this area, both in bringing these skills into the classroom and in training teachers to do this. To facilitate the introduction of science-inquiry principles in school, we developed a set of lab activities for use in primary and secondary schools. In the first of two articles (Tifi et al., 2006), we discussed the development of these activities and described games involving ‘transformer machines’. Below, we describe contraptions – physical black boxes to inspire exploration, hypothesis and testing.
Contraptions
The principle behind contraptions is similar to that of the operating machines described in our first article, but these are physical black-box machines that have at least two external movable parts that act as input and output. The parts may be coloured threads, rotating knobs or stems, penetrating bars or tilting levers. The two are coupled through an inner mechanism of gears, pulleys and belts, wheels or Technic Lego®. Alternatively, common objects may be used, such as the rollers found in corrector pens.
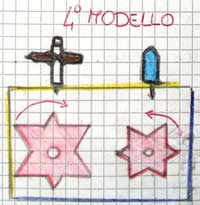
The students explore the contraptions and do experiments, manipulating one of the external parts (input) and observing causal behaviour (output) on other external parts. The students can only infer the inner mechanism by developing models and comparing the predictions from the models with what happens with the actual machine.
contraption
Gear and pulley machines can have two or more wheels of the same or different diameters. They can be coupled using a single thread, or a continuous belt, creating a wide assortment of hidden mechanisms. See below for a construction plan of the tape contraption.
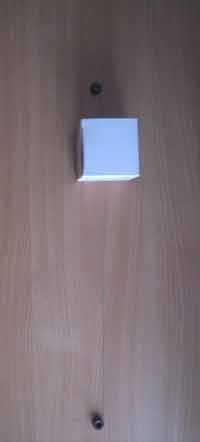
With a simple reel wound with two coloured threads in opposite directions, all hidden inside a card box, you can make a machine in which pulling a red thread causes a white thread on the opposite side to be drawn inside. If the threads are wound in opposite directions on two coaxial bobbins of very different diameters, pulling both threads causes the box itself to move vertically, whereas pulling just one thread causes the other thread to be drawn into the box at a different rate. See below for a construction plan of the thread-lifting contraption.
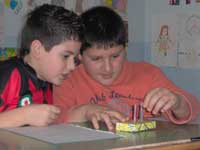
These investigations were the most popular among grade 4-5 children (ages 10-12): ideas within ‘research groups’ (3-4 pupils) were discussed and the children enthusiastically searched for effective models, using ribbons, wheels, pencil-made axis, and paper stripsw1.
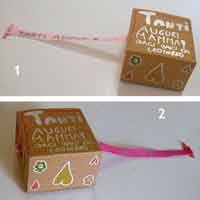
Not only did the students closely observe the machine behaviour and record the factual evidence, as well as conjecturing, improving, debating and defending their models; they also had a strong creative need to make their own prototypes of the models. One group used the principle of the thread machine to build pretty gadgets for their mothers, in which different words of affection were displayed on the same fabric band, depending on the side from which the band was pulled.
The manipulative aspect of these tangible machines encourages representative and kinaesthetic thinking, both of which are crucial for scientific insight and speculation. Furthermore, the children feel comfortable with these investigations, because they are at the same level, tackling a completely new job with classmates of equal abilities. This is in sharp contrast to the low self-esteem that children often have in content-based curricular subjects. It is not uncommon to find children who cope successfully and participate actively in these modelling and creative activities, despite low scores in traditional schoolwork.
Construction plan for the thread-lifting contraption
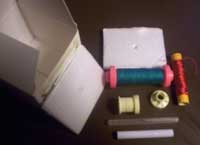
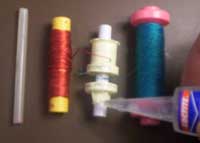
Materials
- Cardboard box
- Two 50-70 cm pieces of strong, coloured thread
- Two pieces of compact foam polystyrene cut to fit the opposite walls of the box, both with a hole in the centre
- A plastic tube (e.g. from a pen) and an axis to be inserted inside the plastic tube (this latter is as long as the opposite sides of the box and permits the external tube to slide and to rotate freely; the tube is shorter then the internal axis so that it is free to rotate once it is mounted in the box)
- A spool that can be fixed on the tube with the larger diameter
- One or two discs adaptable to the rotating tube, to control the rolling-up of the thread
- Two nuts.
Method
- Open a paperclip and heat it over a flame; use this hot point to make a hole in the plastic spool where you want to fix the thread and where the thread will be rolled up. Pass the thread through this hole and fix it with a big knot.
- Attach another piece of thread, tying it tightly near the centre of the tube.
- Insert the spool almost onto the centre of the tube, and then fix the knot with a drop of quick-drying glue. The two threads must be rolled up as far as possible near the centre of the tube.
- Insert the counter-disc on the opposite side of the big spool (this is optional). If the spool groove is not deep enough, use another disc to separate the two threads and prevent them from tangling. Fix all pieces over the tube with quick-drying glue.
- Cut 50-70 cm of each thread; make two narrow holes at the centre of two opposite sides of the box at a right angle to the rotating axis direction, then pass the threads through the two holes. Only one thread must be completely rolled around its seat. Tie two nuts to the free end of the threads.
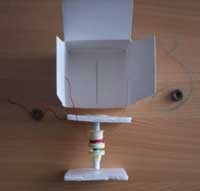
- Insert the axis inside the tube and mount the rotating axis over the two facing styrofoam rectangles, standing outside of the box.
- Insert the mechanism into the box, pulling out the threads to leave them free to go out and in. Close the box and seal it only when you are sure it works well; then give it to the children!
Operating
When both threads are pulled, the box moves upwards and towards the thread that is rolled around the smaller pulley. Relaxing the pulling force allows the box to drop under gravity. The rates of disappearance and emergence of the two threads are proportional to the diameter of the pulley to which they are fixed.
It is advisable to start playing with a similar machine where the big pulley is absent and the two threads are rolled on the same reel. The children will devise a simpler model; then it will be easier for them to jump to the two-wheel model.
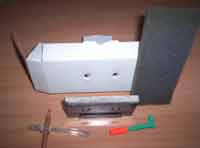
Construction plan for the tape contraption
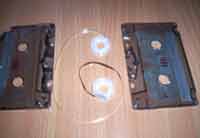
wheel

contraption
- Open an old recording tape cassette.
- Unblock one end of the tape, cut out most of the tape, leaving 20-25 cm, and fix the free end to the wheel again (see figure).
- Enclose the tape cassette in a box, fixing it with adhesive tape.
- Make two small holes in the box, corresponding to the two wheels on the cassette. Cover the gears to make them invisible from outside and then close the box.
- Model two suitable pens, adapting them to the gears behind the holes.
This contraption is very puzzling for children and should be introduced after the simpler gear and pulleys contraptions. The tape contraption can be complicated further by changing one of the two wheels for a bigger one.
References
- Tifi A, Natale N & Lombardi A (2006) Scientists at play: teaching science process skills. Science in School 1: 37-40
Web References
Resources
- The American Association for the Advancement of Science stresses that key science concepts need to be given in the context of an authentic understanding of how scientists go about their work to reach conclusions. For an example, see here.
Review
This article deals with science process learning in school, and I recommend it for teachers both in primary and secondary schools. These are practical descriptions of how to construct the black boxes with hidden contents. There are good examples of different boxes that can be used with different ages of students according to their ability. Pictures showing the boxes and experiments are provided to help the teacher make the black boxes.
Sølve Marie Tegner Stenmark, Norway