Set the wheels in motion: maximize your creativity by using old bicycle parts to create art installations and demonstrate energy conversions.
This cross-curricular, multi-lesson project was born from the desire to take physics out of the textbook and generate a project that treats physics and design as equal partners.
With creativity and imagination, students construct an installation using old bicycle parts: the patterns of different gears and ring-chain combinations demonstrate different energy conversions.
This DIY, hands-on project illustrates a number of physics, as well as art and design, principles:
generation and storage of electrical energy
electric circuitry
circular motion, forces, centripetal acceleration, torque, and energy conversions
augmentation of power by means of gears and pulleys
how divergent thinking can reinterpret the use of a designed machine
sustainability topics, like upcycling and green energy
aesthetics of installation and presentation
This activity can be targeted at different ages. The main project is aimed at older students (16–19), but young students can be included with a peer-to-peer interaction in the presentation stage.
Phase 1: Overview of concepts
The first phase consists of a revision of the concepts of energy, power, voltage, and current (including alternating current (AC) and direct current (DC)). This is done by implementing multiple practical activities with series and parallel circuits. Practical applications include the physics of bicycles.
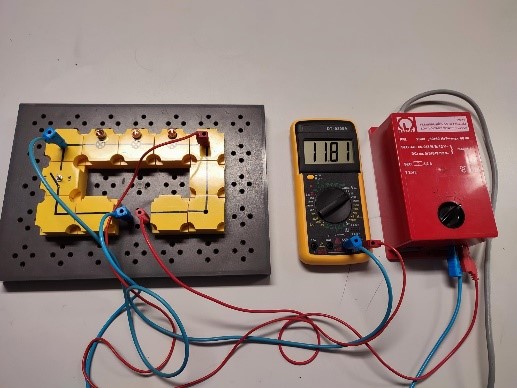
Activity 1: Electrical circuits
This activity involves building series and parallel circuits with three bulbs. Students measure the voltage and current in different parts of the circuit. Using different resistors, they also observe changes in the brightness of the bulbs, voltage, and current.
At the end of this activity, students understand the difference between a parallel and series circuit and how they can calculate voltage and current.
Estimated time:60 minutes.
Materials
Bulbs (three)
Resistors (100 ohms, 500 ohms, and 1000 ohms)
Electric wires
Voltmeter
Ammeter
Procedure
Image courtesy of the authors
Connect the series circuit with the three bulbs.
Measure the voltage and current in different parts of the circuit.
Add the resistors one by one: observe the change in the brightness of the bulbs and measure the voltage and current.
Repeat the same procedure for the parallel circuit (add the resistor to the main circuit).
Activity 2: The science of bicycles
The final project involves deconstructing bicycles and using different parts to build the installation. Before we start, it is important to understand the functions and the physical principles behind it.
A bicycle or diagram of a bicycle (e.g. the provided bicycle worksheet)
Labels for physical concepts or energy transformations: friction (kinetic energy → heat), lever (force multiplier), even weight distribution, wheel (force multiplier), gears (convert torque and speed)
Procedure
Have students consider a bicycle and label it with the concepts seen in the picture. You can cut out the labels and have students stick them on a large bicycle at the front of the class, or have them write the labels around a bicycle diagram.
Image: Rosaria Cercola and Tamaryin Godinho
Go through the concepts one by one, ensuring all key points are understood.
Work through the exploratory questions below, either as a class, or in small groups followed by a class discussion.
Exploratory questions
The exploratory questions are used to revise the concepts of energy, power, energy conversion, forces, torque, centripetal acceleration, and centripetal and centrifugal forces.
When you ride your bicycle, where does your energy go?
Why do we change the bicycle gears when we cycle up a hill?
Can you explain why bicycle frames have different shapes?
Phase 2: Installation design, planning, and construction
To run their own installation project, we encourage teachers to adapt these ideas to their own individual material and budget parameters. The following instructions detail one possible approach.
Different stations can be used simultaneously to give an overall view of the different energy conversions or in isolation to highlight their individual dynamics.
This phase includes the formation of different working groups, according to students’ individual skills and interests: practical construction of the installation, documentation of assembly, design of teaching aids, activities, and presentation to others.
Activity 1: Installation design
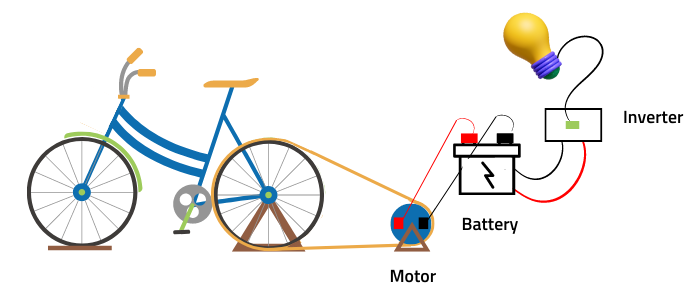
In this activity, students familiarize themselves with bicycle parts and come up with a design for two mechanical stations: 1) converting mechanical energy into electricity and 2) a gravity battery.
Estimated time: 60 minutes.
Materials
Some old bicycles (complete or deconstructed by the teacher/technician beforehand)
Hand tools: spanners, wrenches, screwdrivers, pliers, and hex keys
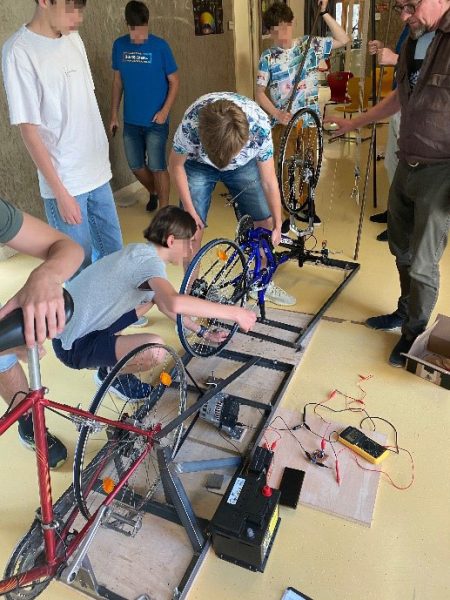
Firstly, students deconstruct the bicycles by disassembling each component (gears, frame, chains, brakes, etc.) using hand tools, when necessary. Be careful to keep all parts organized and labelled to facilitate reassembly. Now is also the best time to clean the parts. In so doing, students familiarize themselves with the equipment and how all the parts might be repurposed in creative ways.
Next, students should consider the different components required for a bicycle generator and the combined generator and gravity battery, shown in the simplified installation diagrams, and come up with some designs.
Students should consider the diverse ways of achieving the results of this activity, especially regarding the construction of the base frames that secure the two bicycles, the alternator, and gravity-battery stand.
From this initial idea, students propose different designs and alterations with a variety of materials, not only to secure the bicycle and alternator solidly in a frame, but to prepare the rims of the bicycle wheels to engage with the flat belt connecting the driving wheel and alternator.
Some practical construction notes for our design are given in the supporting material. Teachers are encouraged to improve upon this design, according to their particular resources and abilities.
After defining the best design, students start to construct the first station: the conversion of mechanical energy into electricity, regarding the function of the different electronic components used.
Estimated time: 120 minutes (one lesson for each station).
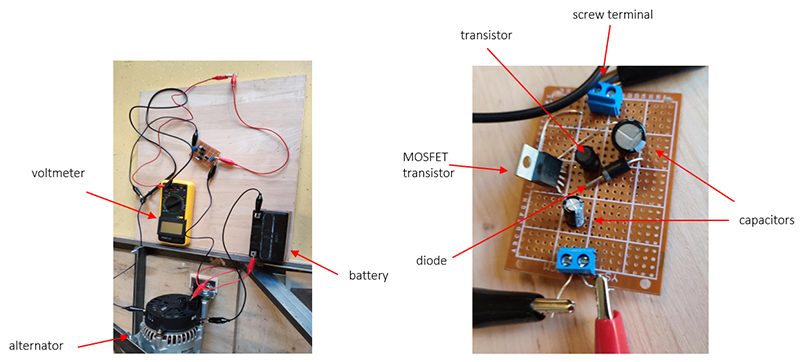
Station 1: Converting mechanical energy into electricity
Station 1 can also be built alone and configured to produce a fixed 5 V DC current, to charge a variety of batteries and mobile phones (larger 12 V batteries can drive an inverter to produce AC/DC current), or left unthrottled so the voltmeter output shows directly the amount of electricity being generated by the alternator. The latter offers a particularly thrilling challenge to students and adults: see how many volts you can generate! 29.7 V was our record with our ex-Fiat alternator.
Notes
A local alternator-repair store (Kaufmann GmbH, Graz) donated a used, renovated alternator in return for a video of our results. Enquire about informal partnerships to help stretch your budget! Other motors can also be upcycled (hot tip: some paper-shredder motors can generate >40 V).
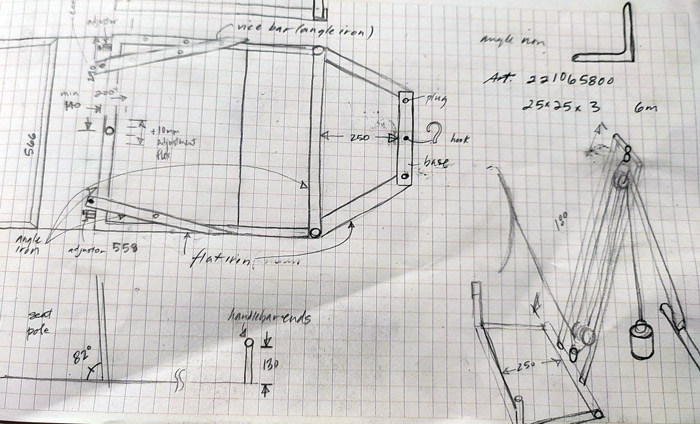
Get inspired and check our final concept and technical drawings of our steel-frame support. The steel-frame supports are welded and made in such a way that the students can fully dissemble and reassemble the entire installation.
The design is also dependent upon the bicycle and alternator models used. Based upon the students’ designs and measurements, the steel-frame supports are welded – away from school for insurance reasons – yet made in such a way that the students can fully dissemble and reassemble the entire installation.
Materials
Bicycle components (frames, gears, chains, tyres roughly in the amount of 2 complete bicycles)
Alternator
Multimeter
Electric wires
Belt (we use a 210 cm circumference 17 mm ´ 2 mm flat belt)
Mount the drive bicycle to its frame, ensuring perfect alignment between the rear wheel and alternator pulley, as well as proper tension of the drive belt.
Connect the electrical circuits, including alternator, battery, and voltmeter. The electric circuit includes two screw terminals, a diode (120 V), a JM34RP metal oxide semiconductor field-effect transistor (MOSFET), a TO-18 transistor, and two capacitors (16 V and 25 V).
Image courtesy of the authors
Measure the voltage produced.
This setup can be used to charge your mobile phone (add a USB connector) or light a lightbulb (12 V).
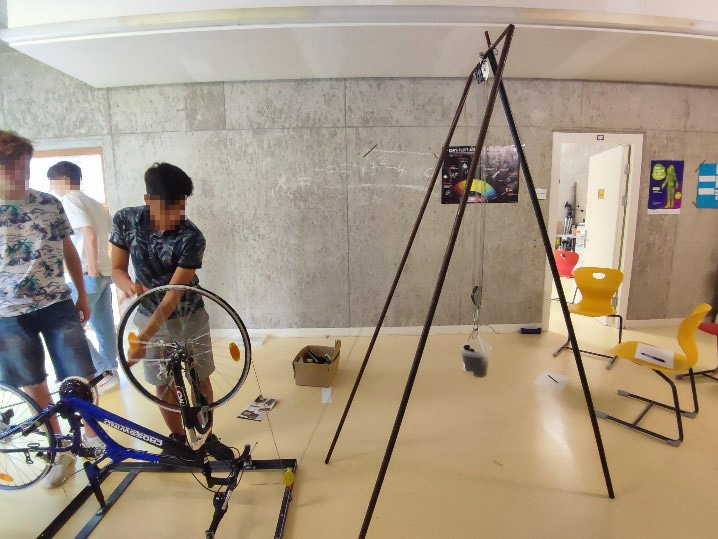
Station 2: The gravity battery
The second station, employing a block-and-tackle pulley system, demonstrates storing energy by converting mechanical energy into gravitational energy with a block-and-tackle pulley system and translating rotational motion into linear motion. It consists of a second bicycle (mounted upside down on an angle-iron frame bolted to a plywood underframe), the rear wheel of which can be engaged with the alternator belt. It turns with the pedals to give a series of mechanical conversions, from radial to linear to augmented radial, ultimately lifting a weight to demonstrate the principle of the gravity battery.
Mount the second bicycle (upside down) on its frame, engaging its rear wheel in perfect alignment with the alternator belt. Note: the drive belt will turn the back wheel of the driven bicycle backwards, turning the chain and pedal sprocket. The steel rod connected to the pedal sprocket must be adjusted carefully to engage with pegs on the front wheel, turning it more slowly.
Erect the gravity-battery stand, connecting the weight line from the block and tackle to the front wheel of the driven bike. Attach a weight line to front wheel, wrapping it around until the line is taut.
Observe the front wheel, in particular, the brake housing. The brake disk should have been altered to provide a ratchet cut that catches upon a weighted wedge mounted by the brake housing. The wheel can thus turn only in one direction.
Before the battery weight rises high enough to collapse the block and tackle, which would cause damage, disengage the ratchet weight to allow the back wheel to reverse and allow the weight to descend.
Students assemble station 2, preparing to connect it to the alternator belt. Image courtesy of the authors
Students test the connection between the front wheel of bike2 and the battery weight. Image courtesy of the authors
Exploratory questions:
Could we use bicycles to charge my mobile phone or computer?
How efficient is our installation, and what can we do to improve it?
Discussion
The project’s value is greatly enhanced if students can present their installations and communicate what they have done. This not only enhances their own comprehension, but it gives the opportunity to engage younger students in the school or broader community through peer-to-peer interactions. We call this Phase 3: Outreach, and further details can be found in the supporting materials.
This is a project that can be adapted to the requirements of the school and the interests of the students. Using a smaller generator and one bike, you can build a fun project with your science class. Small or big, this project brings a fun and creative approach to the topic of energy in the classroom.
Patrícia Martins Raposo-Weinberger is an experienced physics and chemistry teacher (25 years and still full of energy and motivation) with a master’s degree in science. She is passionately enthusiastic about her work and actively develops educational projects (STEM) and interdisciplinary projects with strong cooperation with industry and universities.
Shannon Wardell has regularly exhibited artworks in various media, including wood, metal, stone, and oil painting. Artist in residence (since 2010) at an international school in Graz, Austria, he has sought to highlight how art can enrich learning through cross-curricular projects (with science and IT) and outreach projects (schools and museums).