Supporting materials
Download
Download this article as a PDF


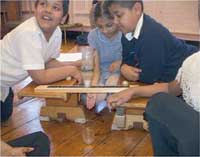
Wayne A Mitchell, Debonair Sherman, Andrea Choppy and Rachel L Gomes from the Next Generation project describe some of their science activities to introduce primary-school children to the science all around us.
This experiment looks at solids and liquids and examines how to separate them, placing what pupils have learned in the classroom into a real-world setting. Pupils learn how to design and build a simple water filtration system using a variety of materials. Each material is suited to separating different sized solids and dissolved particles from water. The pupils learn, through trial and error, what each material is most appropriate for.
To put the topic into context, you will need to give the pupils a brief introduction to the importance of treating wastewater so that it is safe to be released into rivers. Wastewater treatment is typically a three-stage process consisting of preliminary treatment to screen out large solid impurities, primary sedimentation to remove impurities through sorption to solids, and secondary treatment to break down or degrade the remaining impurities using micro-organisms.
This experiment investigates the physical process of removing solid impurities of varying sizes and the chemical process of removing dissolved particles by sorption to charcoal. The pupils can discuss what makes water dirty, emphasising key terms such as solid waste, dissolved impurities, filtration and micro-organisms.
The experiment investigates the primary treatment, i.e. the removal of solid impurities. A worksheetw1 is provided for the pupils to complete in support of this experiment.
Through trial and error, and observation, the pupils will learn that the best approach for cleaning the water is to pack the materials in order of size. The cotton wool needs to be placed at the bottom (in the neck of the bottle), to prevent the other packing materials from falling through. Above the cotton wool comes the ground charcoal, then the sand, and then the gravel. (As an optional extension to this exercise, the thickness of the layers can also be varied to see how this affects the purification process.)
From this experiment, the pupils will learn that each packing material is suited to different types of solid impurities in the dirty water and, when combined to make an effective water filtration system, must be packed in order of size. The sand and gravel separate or filter out solids of different sizes (sand removes the smaller particles). The powdered charcoal adsorbs the dissolved coffee, taking away the colour. Additionally, by the time the dirty water has reached the charcoal, it is trickling very slowly, which gives it more time in contact with the charcoal.
The longer the dirty water is in contact with the powdered charcoal, the more time the charcoal has to adsorb the colour. The cotton wool prevents any of the other filtration materials from falling out of the bottle.
This experiment demonstrates that impurities in dirty water can be removed by using a series of barriers, which use either physical (filtering by gravel and sand) or chemical (sorption using powdered charcoal) processes to remove the impurities. This type of treatment would not be effective on micro-organisms, however. Can you think what could work well instead?
The construction of the Earth-Moon orbital model will help pupils understand the basic movements of planets in space and provide them with a lasting – and homemade – reminder of the activity. The orbital can be used to introduce the principle of planetary movement around the Sun and also the orbit of the Moon around Earth.
Furthermore, by using an external light source such as a desk lamp, pupils can examine the phases of the Moon as well as the concepts of solar and lunar eclipses.
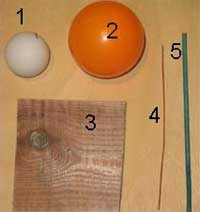
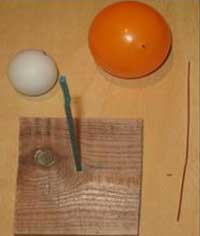
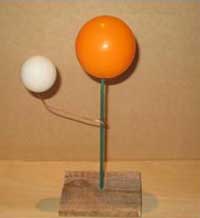
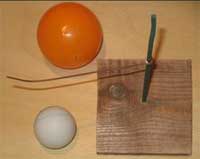
The model can be used to demonstrate the Moon’s orbit around Earth or different planets in the Solar System orbiting the Sun.
Using an external light source to represent the Sun, the relative positions of the Moon and Earth can be used to examine the different phases of the Moon. For example, ask the class to observe what happens when the Moon is placed between the light source and Earth (no sunlight reflected from the Moon can be seen from Earth – no moon in the night sky), or when Earth is between the light and the Moon (all the sunlight reflected from the Moon can be seen from Earth – full moon).
By placing the Moon in different positions relative to Earth (e.g. change the position by 45 degrees), the class can describe the amount of moonlight seen from Earth. This can be used to explain the different phases of the Moon.
Another suggested project is to ask the class to draw the shape of the Moon every night for one month; the drawings can then be used to chart the different phases of the Moon.
To investigate planetary movement around the Sun, additional orbitals can be attached to represent further planets and allow the class to examine the effects of planetary distance from the Sun on the planets’ temperature, or the amount of time to complete one rotation of the Sun.
A useful website to accompany this project is the National Schools’ Observatory demonstration of phases of the Moonw2.
This experiment can be used to investigate topics including micro-organisms and gases all around us. Pupils are encouraged to design an experiment to test different variables which affect yeast’s ability to grow, and to investigate a by-product of this process, carbon dioxide.
Start by asking the children for their ideas on how humans use yeast and other micro-organisms as part of our everyday lives. Provide pictorial examples such as blue cheese, bread, beer, compost heaps and bacterial cultures. These examples demonstrate that micro-organisms are important for human survival. Ask the children what they think micro-organisms need to survive, and how humans have used this knowledge. You will need to explain that gas is produced as a result of yeast growth; ask the children if they know which gas is produced.
Ask the children to design an experiment that tests the conditions needed for yeast to survive, using the apparatus listed below. After they have planned their experiments, provide the children with the apparatus. They can use a variety of approaches to measure the gas produced, such as using string to measure the circumference of the balloon, or bubbling the gases into an inverted measuring cylinder filled with water to measure the volume.
Allow the experiments to run for about 20 minutes before discussing the results. Pupils should state whether the results of their experiments agree with their predictions.
Ask the children as a group to identify the best conditions for yeast growth; they should suggest warm water and sugar. The pupils can also discuss what conditions prevented the growth of yeast: no sugar, cold water, or the presence of acids. What would happen if you use honey instead of sugar?
You can extend the lesson by investigating the nature of the gas produced – by weighing the balloon, or testing the effect of the gas on lit and glowing splints. The pupils could also try experiments to demonstrate how micro-organisms contribute to the gases all around us.
A description of the experimental set-up is available on the Exploratorium websitew3.
The table below shows some of the other activities developed as part of the project. More information on the science activities used in the project is available on the Next Generation websitew4.
The Next Generation project fosters close working partnerships between scientists and teachers. Delivering science in an engaging and informative manner is the catalyst to encouraging a better and wider understanding of science for our children. In time, it is hoped that some of the pupils involved will become the next generation of scientists, sparking interest in science among future children.
| Experiment/Demonstrations | Topic | Scientist |
|---|---|---|
| Water filtration system | Solids and liquids: how to separate them | Arun Arora |
| Woodlouse and maggot race | Movement and growth | Rachel Gomes |
| Liquid nitrogen | Solids and liquids: changing states | Gavin Jell |
| Lemon power station | Interdependence and adaptation | Dina Shola Laila |
| Pondweed and light | Interdependence and adaptation | Wayne Mitchell |
| Slinky soundwave | Changing sounds | Valerie Nadeau |
| Glitterbug | Micro-organisms | Valerie Nadeau |
| Heat in space | Earth, Sun and Moon | Berangere Tissot |
Download this article as a PDF