Supporting materials
Download
Download this article as a PDF


This activity was presented at the Science on Stage Festival 2022 ![]()
Pocketful of sunshine: build a solar cooker and learn about the thermoelectric effect with Peltier modules.
The aim of the project is to test the feasibility of a device that cooks using energy from the Sun and produces electricity to charge a phone battery. From the viewpoint of sustainable development, students can consider how to meet the cooking and communication needs of isolated countries.
This project was carried out by 13–14 years old students during one school year. They named the project Kiluikui, which is a phonetic rendition of Qui lui cuit (‘the one that cooks’). The students built a prototype of a solar cooker that can generate electricity. They adopted an engineering approach to study existing devices and add innovation.
The project addresses different concepts, ideas, and skills of the curriculum. Students record physical measurements; draw graphs; and tackle energy conversion and transfer, electric power, and more to reach their goal.
Students compare the characteristics of different phone chargers: a solar charger, a Peltier module charger (cook and charge), and a mains charger. They innovate by studying and building small solar cookers with reflectors, absorbers, and insulators.[1] Students also find a way to use Peltier modules as converters of thermal energy into electricity. Finally, they determine the characteristics of their generator cooker and propose ways to improve it.
This project can be adapted to different age groups, from 12–16 years old, by varying the level of scientific explanation and analysis. It can be run as a longer, more independent project, with students coming up with their own experimental setups and designs for each aspect, or as a series of guided activities over a few lessons.
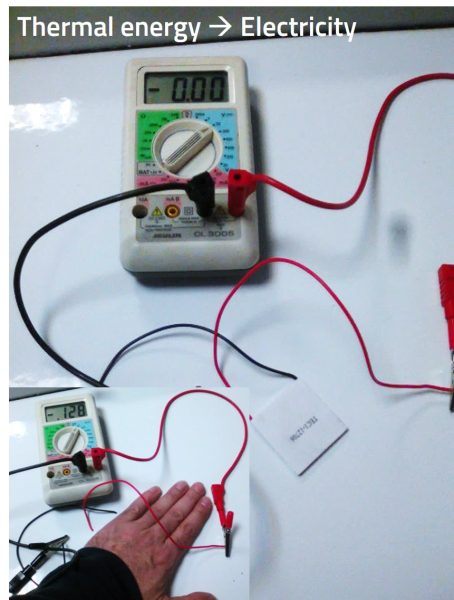
A solar cooker transfers light to a food container. It converts light into thermal energy, so food can be cooked. This thermal energy can also be converted by a Peltier module, using the thermoelectric effect, into electricity that can be transferred to a device.
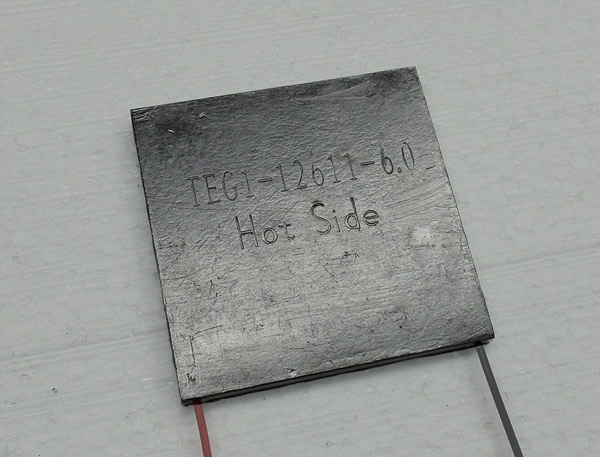
Peltier modules take advantage of the thermoelectric effect, also called the Seebeck–Peltier effect.
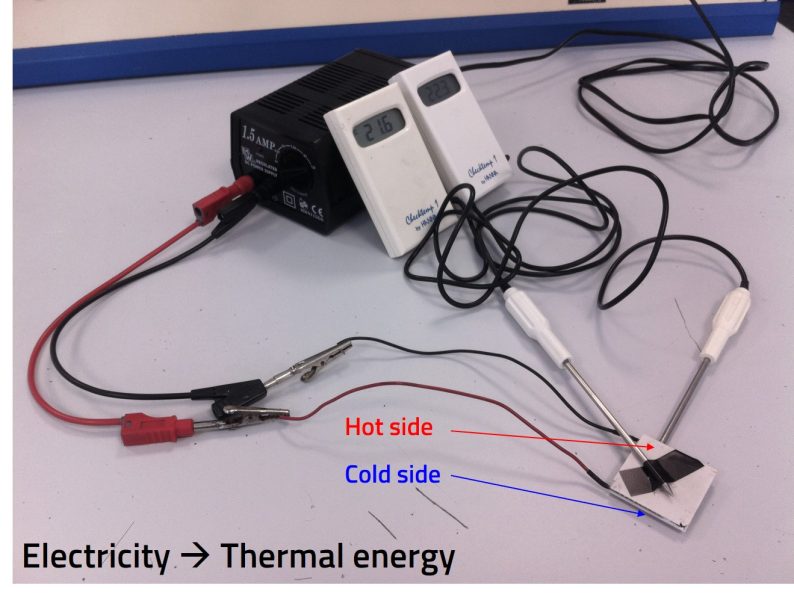
Such a module, powered by a current, will have a temperature difference between its two sides; one side will be cold side and the other hot. This is the Peltier effect.
The opposite application can also be achieved with this type of module: a difference in temperature between the two sides will generate electricity. This is the Seebeck effect.
Students can experiment with these two effects (Activity 3) and use the Peltier effect to power a device.
See the Resources section for more information about Peltier modules and how they work.
In the following activities, the students work towards replacing the wood-fired cooking method with a solar cooking method, so this activity helps to set a target based on a commercial Peltier charger module. If the introductory activity is skipped because the devices are not available, the following values can be used: P = 2 W and U = 5 V.
Like engineers, the first task for students is to study different existing phone chargers. Students can compare the charging characteristics of different phone chargers: a solar charger,[2] a Peltier module charger using wood combustion,[3] and a mains charger. This activity should take around 90 min, and students will have made the first approach towards a thermoelectric converter with the Peltier module charger.
Full details for the introductory activity can be found in the additional material
This activity involves brainstorming sessions related to solar cookers and then building a solar cooker. It should take around 180 min spread over several lessons.
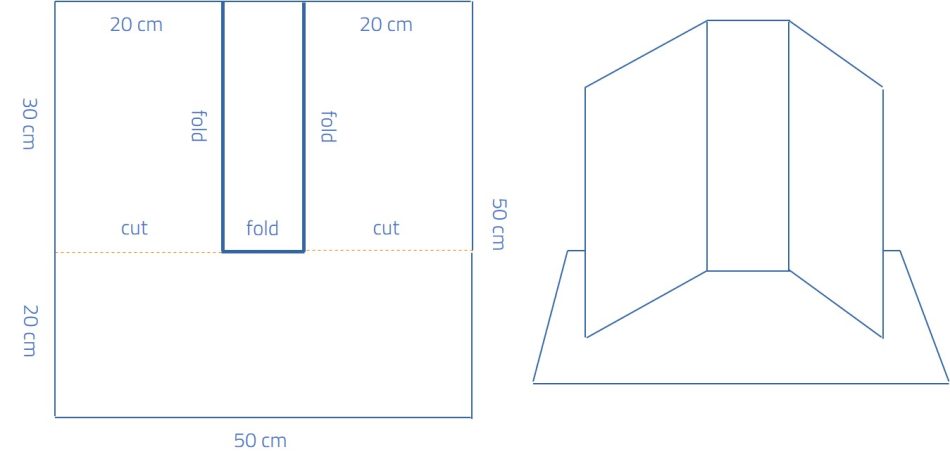
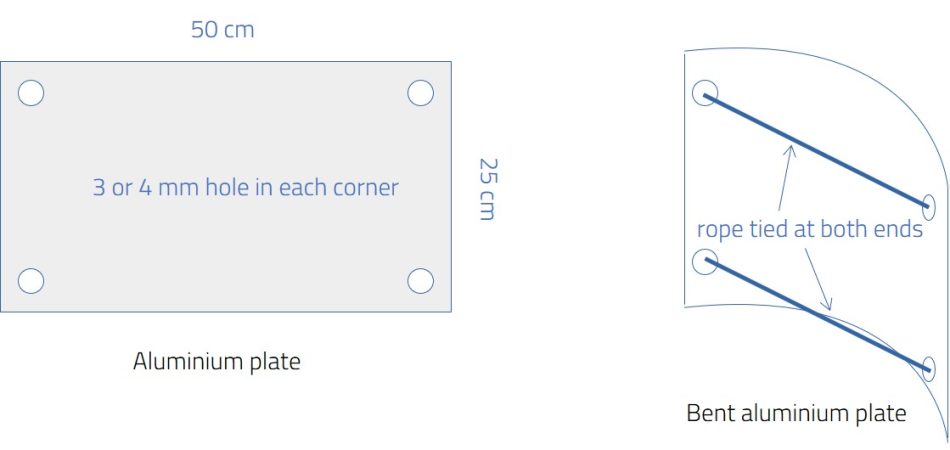
Students build two different solar cookers (flat[1] and cyclindroparabolic) and compare their performances by measuring the temperature in a food container, the absorber. They then compare the cookers by measuring the temperature increase in a black absorber container in each cooker.
Through this activity, students learn about energy conversion and transfer and draw energy diagrams. The mirror transfers light from the Sun to the food container, which converts light energy into thermal energy that is transferred to the food.
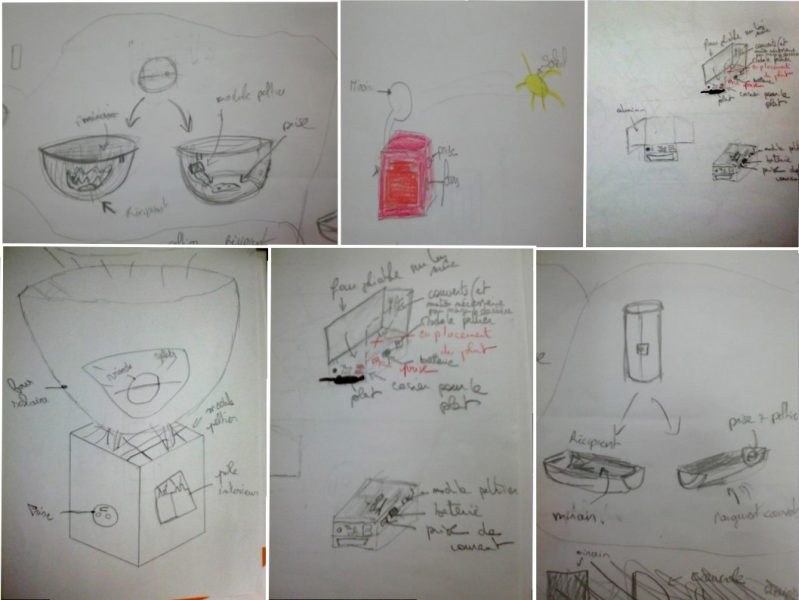
Students should first be introduced to the concept of thermal cookers. Some useful links are provided in the Resources section. This can be followed by brainstorming sessions to discuss the different elements required to design a solar cooker.
Before building the cooker, students can measure the temperature in different coloured containers in the Sun to find the best light absorber.
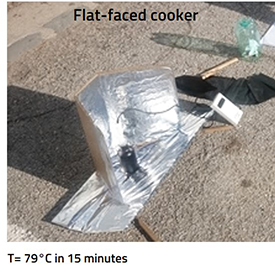
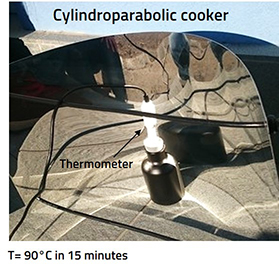
Students should discuss which cooker is most efficient based on their graphs. They can be asked about the differences between the two cookers to explain their results. The results should show that the most efficient cooker is the parabolic cooker, with a final temperature about 10°C higher, 90°C, in 15 min.
The parabolic shape of the oven makes it more efficient. The light focuses on the black container. However, one can observe that the aluminium plate is slightly crumpled, and therefore, assume that it scatters light more. It would be interesting to use smooth aluminium plates for this type of cooker.
Ask the students where the energy comes from. They should discover that, thanks to the parabolic shape of the mirror, the light is focused on the container. Light is then absorbed by the container and is converted into thermal energy. Students then complete an energy diagram.
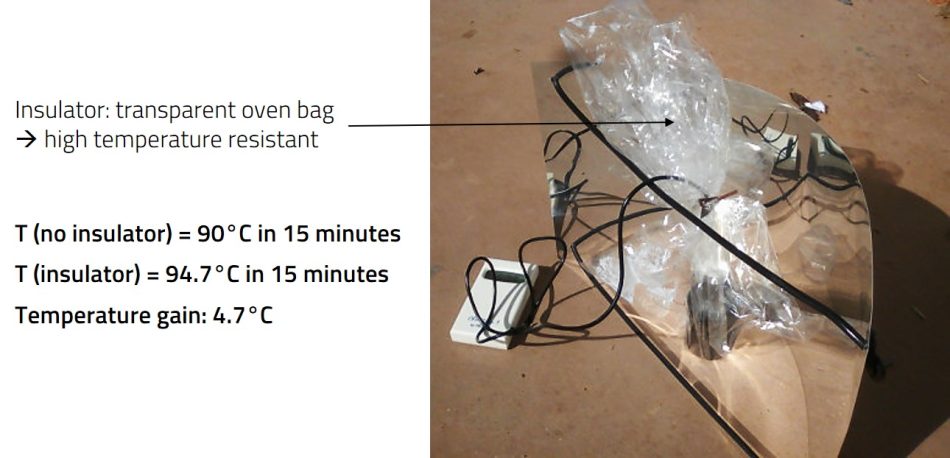
Ask students what could improve the performance of the cooker. If necessary, ask where the heat goes. They should realise that an insulator would help to retain heat in the cooking area.
This can be accomplished with an oven bag, a transparent plastic bag that can resist high temperatures.
As an engaging extension, students can come up with ideas for something to cook with their solar cooker and try it out. Some ideas can be found in the Resources section. Ideally, the recipes chosen should not contain ingredients (like chicken) that can be unsafe if not thoroughly heated.
To include IT skills, students can create a 3D image of their cooker design using SketchUp[2] and draw a 3D model of the device they propose. They can also be creative and design a logo!
In this activity, students use a Peltier module in some simple experiments to understand the principles of this device. This activity should take around 90 min.
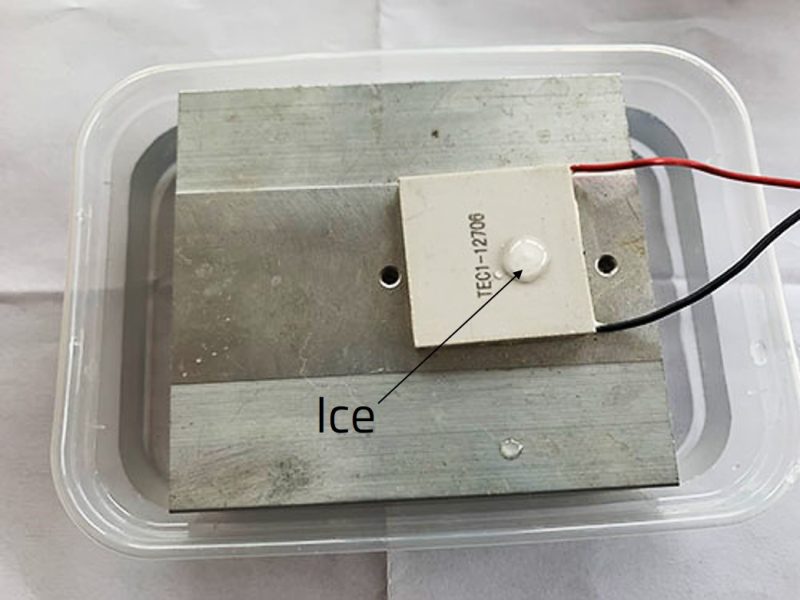
Through these experiments, students can observe that, when using the device for thermal to electrical conversion, the voltage decreases or the temperature equilibrates after a while.
Students can discuss how to prevent this from happening, and how this effect may limit the uses of the device.
They can use an existing device, such as one from BioLite,[3] to understand that a heat sink is necessary on the cold side to maintain the temperature difference for as long as possible. BioLite uses a fan for this.
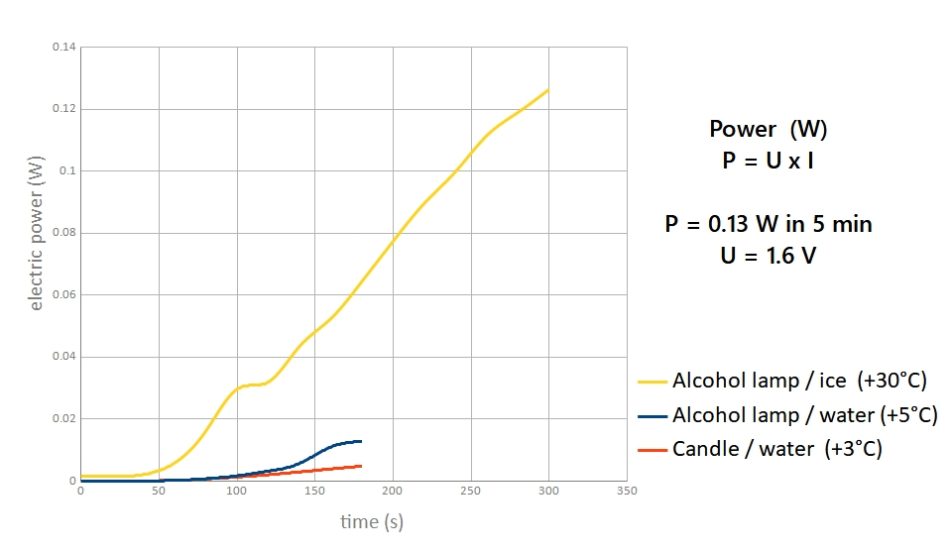
As an extension activity, students can build a setup to compare the performance of three different pairs of heat/cold sources. See Extension activity 4 in the additional material for full details.
In this activity, students apply what they’ve learned to use their parabolic solar cooker and a Peltier module to generate electricity. This activity should take around 60 min.
Note: Thermal conductive paste can be replaced with vegetable oil. A heat sink and thermal paste are useful to avoid the thermal equilibrium between the two sides of the Peltier module.
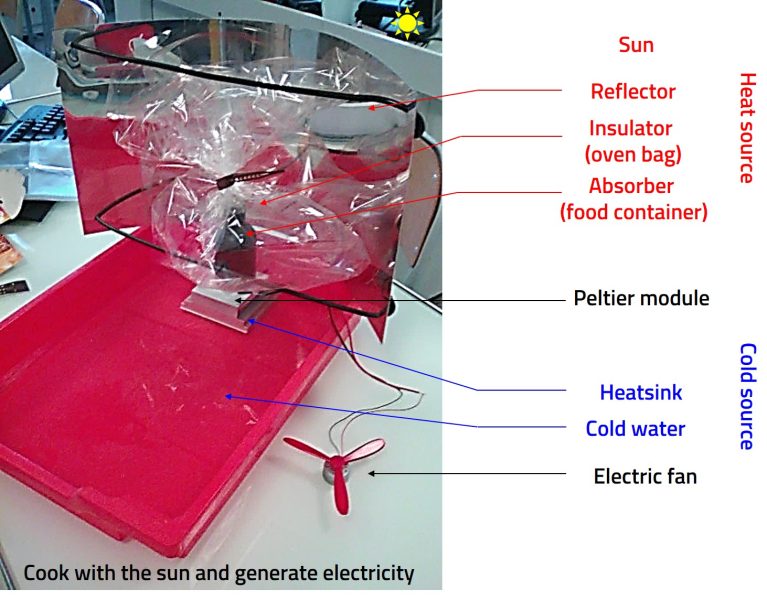
The device can cook food using energy from the Sun and produce electricity at the same time. However, the electrical power is not sufficient to charge a phone.
The students can investigate and suggest ways to improve this, e.g.:
You can then discuss the following questions:
Through this project, students apply engineering and experimental approaches. In the context of sustainability concerns, they implement experimental protocols to investigate the concepts of energy transfer and electric power. Students also learn about 3D design and use communication tools.
This is a project made in cooperation with Gilles Avakian, a CEA engineer. He provided different commercial chargers and invited students to visit the solar thermal plant at the CEA Center of Cadarache (France).
[1] Instructions (in French) on how to build the flat solar cooker from the Le Loubatas website: https://www.loubatas.org/wp-content/uploads/6-fichepeda-ENR-foursolaire.pdf
[2] Details on the SketchUp tool: https://www.sketchup.com/plans-and-pricing/sketchup-free
[3] An example of a camping stove that uses combustion to produce electricity: https://eu.bioliteenergy.com/products/campstove-2-plus
Download this article as a PDF