


Creating eclipses in the classroom Teach article
During an eclipse, the Sun or the Moon seems to disappear. What is happening? Why not explore this fascinating phenomenon in the classroom, with an easy to build model?

glow of the solar corona, as
seen during the total eclipse
of the Sun on 7 March 1970.
The corona is visible to the
naked eye only during an
eclipse.
Image courtesy of NSO /
AURA / NSF
Solar and lunar eclipses are astronomical phenomena that have been shrouded in myth and legend throughout history. The ancient Chinese, for example, believed that solar eclipses occurred when a celestial dragon devoured the Sun. The Chinese word for an eclipse, ‘chih’, even means ‘to eat’.
Because eclipses are frequent and can be observed without a telescope, they are an excellent topic for introducing astronomy at school. This article describes a simple activity to help students aged 6-14 to understand eclipses, our Solar System and the motion of Earth and the Moon within it. The students begin by building and using their own model of the Sun, Moon and Earth. To consolidate and expand on what they have learned, the UNAWE projectw1 – an astronomy programme that fosters universe awareness – then enables the students to work with other schoolchildren around the globe. What time of day is it for them? What season? What can they see in the sky at a particular moment?
Lunar eclipses
Although the Moon appears brightly in the night sky, it does not in fact shine but simply reflects the light from the Sun. The shape of the Moon that you see depends on both where you are on Earth and where the Moon is in its orbit around Earth. Every month the Moon completes a cycle, starting as a complete circle (at full moon), shrinking to become almost invisible (at new moon), then swelling to a full circle again; these stages are called the phases of the Moon (figure 1). To learn more, see Mitchell et al., 2008.

A: At this stage of the Moon’s orbit around Earth, if it is night-time for you on Earth, you can see only half of the illuminated (day) side of the Moon. Thus the Moon appears as a semi-circle
B: At this stage of the Moon’s orbit around Earth, if it is night-time for you on Earth, you can see the whole of the illuminated (day) side of the Moon. Thus the Moon appears as a complete circle (full moon).
Images courtesy of Marissa Rosenberg (diagrams) and NASA (Moon images)
Usually, when the Moon is on the far side of Earth from the Sun (figure 1B), the three bodies do not lie in a straight line; instead, the Moon is slightly above Earth and is still illuminated, so we see a full moon. Occasionally, however, Earth passes directly between the Sun and Moon, and the Moon is completely in the Earth’s shadow – we call this a lunar eclipse. You can see it with the naked eye, as the Moon enters the Earth’s shadow (the umbra) and travels across it, taking on a beautiful dim red gloww2. As the Moon crosses in or out of the umbra, you can even see the curve of Earth partially shadowing the Moon. This partial shadow is called the penumbra.

Image courtesy of Dylan O’Donnell / deography.com
Solar eclipses

occurs when only a tiny
sliver of the Sun is visible
around the Moon during a
total solar eclipse.
Image courtesy of Bill
Livingston, NSO / AURA / NSF
Unlike lunar eclipses, solar eclipses are very rare. Most people will never see one because solar eclipses are only visible from relatively small areas of Earth at any one time. Solar and lunar eclipses have somewhat different causes: during a solar eclipse, we are in shadow. When the Moon passes exactly in front of the Sun, it casts a shadow on Earth. Because the apparent size of the Moon is so much less than that of the Sun, this shadow will only be seen in a small area of Earth.
To understand this, hold your thumb in front of the Sun so that it is completely covered. Your eyes are in the shadow of your thumb, but it does not affect the person standing next to you, as they are not in the same shadow. They see the Sun as normal. Once the Moon moves directly between Earth and the Sunw3, the sky takes on a spooky twilight, which causes animals to become confused. The air cools and, during a total eclipse, the Moon appears as a black disk in the sky surrounded by a crown of fire. That fire is actually the Sun behind the Moon; as the Moon passes, the full burning light of the Sun returns.
Eclipses in the classroom
Building the Sun-Earth-Moon system described below will allow your class to discover how and why eclipses happen. They will be able to understand exactly what they are seeing if ever they see a real eclipse. Building the model, which is not to scale, takes about 45 minutes.

support Earth.
Image courtesy of Marissa
Rosenberg
Materials
For each model, you will need:
- Adhesive tape
- Glue
- Two cardboard tubes (e.g. empty toilet rolls)
- Torch
- Scissors (suitable for cutting cardboard)
- Aluminium foil
- Sturdy but bendable wire (35-50 cm long)
- Styrofoam ball the size of a large orange

base.
Image courtesy of Marissa
Rosenberg
- Ping pong ball (or a Styrofoam ball of a similar size)
- Large strip of cardboard (about 60 cm in length and no less than 20 cm in width)
- Stack of books or magazines
Method
- Divide the class into groups of three or four. Give each group their own materials to make the model.
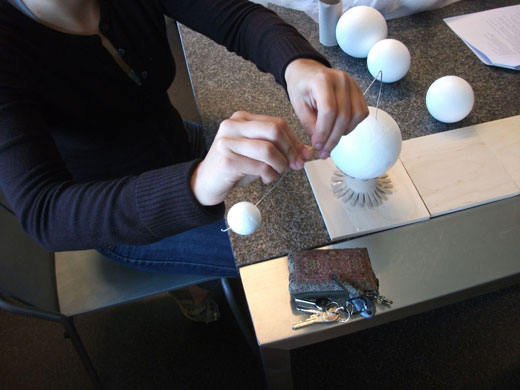
- Take one cardboard tube and make a series of small (2 cm) even, vertical cuts around the circumference of each end.
- At each end, bend the cut pieces out, then stand the tube upright. At the top, the cut edges should fan out like a flower (see image).
- Using adhesive tape, fasten one end of the cardboard tube to the strip of cardboard; this is the base of the model. The tube should be at least 30 cm from one end of the cardboard strip.
- Using tape or glue, attach the larger ball to the open flower of the tube. This ball is the Earth.
-

Step 10: Bending the wire so
that the equators of the
Moon and Earth are at the
same height. Click on image
to enlarge.
Image courtesy of Marissa
RosenbergCover the smaller ball with aluminium foil, shiny side out. This is the Moon.
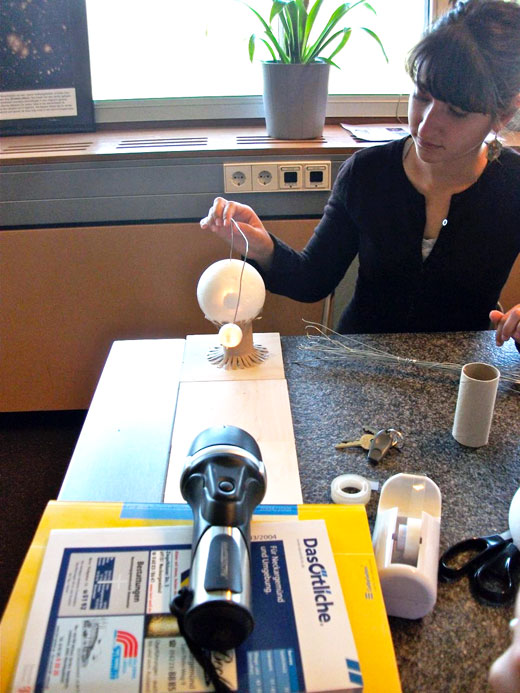
- Insert one end of the wire into the top of Earth, so that the wire is vertical.
- Measure a finger’s length along the wire. Bend the wire at a right angle to give a horizontal arm.
- Insert the other end of the wire into the Moon.
- About halfway between Earth and the far end of the cardboard strip, measure a finger’s length along the wire and bend it downwards at a right angle, toward the cardboard base. The Moon’s equator should be at the same height as Earth’s equator.
- Balance the torch on a stack of books or magazines at the other end of the cardboard strip from Earth. Make sure the height is correct: the middle of the torch beam should hit Earth’s equator. If the beam is too diffuse, attach the second cardboard tube to the end of the torch to direct the light horizontally. Ensure the beam hits the nearest half of Earth and the Moon directly. If the beam is not bright enough, move the stack of books closer.

and Sun so that the light
from the Sun hits Earth’s
equator and the Moon can
directly block the Sun’s rays
from reaching Earth.
Image courtesy of Marissa
Rosenberg
Using the model
Duration: 30-45 minutes.
Click on image to enlarge.
Image courtesy of Marissa
Rosenberg
- Ask your students if they have ever seen an eclipse. Was it a solar or a lunar eclipsew4? Explain that solar eclipses are much rarer but today they will be lucky enough to see both.
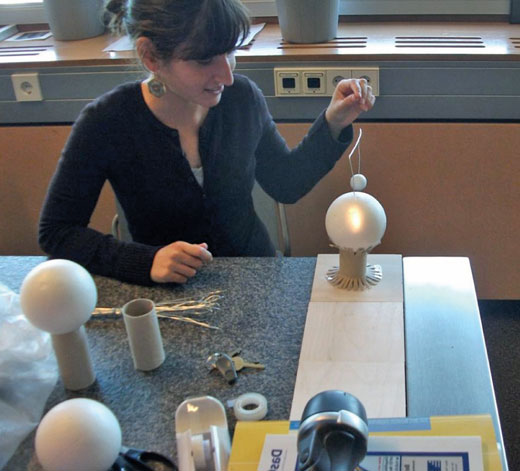
- Create a solar eclipse. Stand facing the torch and swing the wire around until the Moon casts a shadow on Earth; if necessary, dim the lights. The Moon is now between Earth and the Sun and is blocking the sunshine for some people on Earth. Point out that only people directly in the shadow see a complete eclipse of the Sun. You can show how the shadow moves by slowly rotating the wire.
- Now create a lunar eclipse. Stand facing the torch and swing the wire so that the Moon is behind Earth. No light should be hitting the Moon: Earth is between the Sun and the Moon, casting a shadow over the entire Moon. Explain that unlike during the solar eclipse, the entire ‘night side’ of Earth can see the lunar eclipse.
International collaboration
Click on image to enlarge.
Image courtesy of Marissa
Rosenberg
Collaborating with other schools worldwide can help your students to understand the subject even better.
- Contact UNAWEw1 to facilitate a Skype session with a school class in another part of the world. UNAWE will strive to connect schools that speak the same language.
- Put the students in your class in pairs; they will speak to a pair of students from the partner class.
- Ask each pair of students to make a list of five relevant questions to ask their international partners. The first two questions could be: Ages 6-10:
- What does the sky look like to you right now? What time is it?
- Do you know any stories or legends about why eclipses happen?
Ages 10-14:
- Are there any superstitions in your culture about eclipses?
- If there was a lunar eclipse, could we both see it at the same time? What about a solar eclipse? [The answers will depend on the location of the two countries involved.]
- During the Skype session, the pairs of students can take turns to ask each other their questions and record the answers.
- After the Skype session, your students can present their international partners and their answers to the rest of the class.
Discussion

observed at the Kitt Peak
Vacuum Telescope on 10
June 2002.
Image courtesy of Bill
Livingston, NSO / AURA / NSF
Ages 6-10:
During a lunar eclipse:
- Which bright object is in shadow? Which object is casting the shadow?
- Does everyone in the world see it? Who can’t see a lunar eclipse?
During a solar eclipse:
- Which bright object is covered up? Which object is blocking the sunlight?
- Does everyone in the world see it? Who can’t see a solar eclipse?
- Draw a picture showing the positions of the Moon, Earth and Sun during a lunar and a solar eclipse. (Use the model to help.)
- Do you see lunar eclipses at night or during the day? What about solar eclipses?
- Why are solar eclipses so much rarer than lunar eclipses?
Ages 10-14:
- During a solar eclipse, what would you see if you stood on the Moon and looked at Earth?
- What is the phase of the moon during a solar eclipse? And during a lunar eclipse?
- Why don’t we see a lunar eclipse during every full moon?
- Do other planets have eclipses?
References
- Mitchell WA et al. (2008) Science for the Next Generation: activities for primary school. Science in School 10: 64-69.
Web References
- w1 – UNAWE is an astronomy programme to educate and inspire young children around the world
- w2 – The BBC news website has a video explanation of why the Moon looks red during a lunar eclipse
- w3 – More information about how solar eclipses occur
- w4 – A comparison of lunar and solar eclipses
Resources
- See the website of the Lunar and Planetary Institute for another classroom activity to model an eclipse
- On the NASA Science website is Lunar Eclipse 2105: a fun, scientifically accurate story of an eclipse being viewed from our Moon by a young boy. It could be a good starting point for other lunar eclipse activities.
- For photographs and information about the lunar eclipse of 15 June 2011, which could be seen all over Europe
- To find out how two school students investigated and observed an eclipse in a prize-winning project, see:
- Pathmanathan P (2007) Students Catch a Star: researching and observing a solar eclipse. Science in School 7: 39-44.
Review
Eclipses provide an excellent opportunity for students to understand how day, night and the seasons are affected by our position on Earth relative to the positions of the Sun and Moon. This article describes hands-on activities in which the students build a model of Earth, Moon and Sun to show lunar and solar eclipses. Models of heavenly objects serve to bring fascinating phenomena closer to the learner and enable students to make sense of an otherwise mysterious sky.
The article also raises the possibility for students in different countries to link via video conferencing with other classes around the world and thus better understand how what we see in the sky at any one point is affected by where we are on Earth. Students learn best when they feel that they own the experience. In this way both the receiver and transmitter experience the learning in context.
Angela Charles, Malta