Supporting materials
Heater meal worksheet (Word document)
Heater-meal science TV show worksheet (Word document)
Download
Download this article as a PDF

Have you ever longed for a hot drink or meal but had no fire or stove to hand? Marlene Rau presents two activities from the Lebensnaher Chemieunterricht portal that use chemical reactions to heat food – and to introduce the topic of exothermic reactions.

Heater meals – originally developed for military use – are ready-made self-heating meal packs. They can be heated in many ways – by pressing a button on the packaging, unwrapping and shaking the pack, or pouring the contents of one bag into another and waiting for a few minutes – all of which use exothermic chemical reactions. These meals can be used to motivate students to study such reactions relatively safely and without the use of a burner. Plus there is the added value of discussing the negative ecological aspects of disposable meals.
For the following experiment, we use the Crosse & Blackwell heater-meal system, which relies on the reaction of magnesium and salt water to produce hydrogen:

Mg (s) + 2H2O (l) -> Mg2+ (aq) + H2 (g) ↑ + 2OH– (aq)
s: solid; l: liquid; g: gaseous; aq: in solution; the vertical arrow indicates that gas is released.
This reaction is very slow, due to passivation, so to speed it up, iron and salt are added. Passivation is the process by which a material is made less reactive, usually by the deposition of a layer of oxide on its surface: if you place a strip of magnesium into cold water, its surface will oxidise to magnesium hydroxide (Mg(OH)2), and this coating will prevent further reaction.
Therefore, in the heater meal, iron is added to the magnesium, leading to the production of a local cell – small-scale corrosion that happens where two metals of different reactivity are in contact under humid conditions – which speeds up the exothermic reaction. Because the electron potential of magnesium is lower than that of iron (the less reactive metal), electrons will pass from the magnesium to the iron, and only from there into the water. Although magnesium cations (Mg2+) and hydroxide anions (OH–) continue to be formed, they are separated by the iron and cannot combine to form magnesium hydroxide. As a result, the magnesium does not become passivated by a coating of magnesium hydroxide, which would lower the reactivity.
Because the differently charged magnesium and hydroxide ions are mobile, in pure water they would soon form magnesium hydroxide, the charge would be equilibrated and the reaction would slow down again. To prevent this, sodium chloride is added to the water, so that the sodium (Na+) and chloride (Cl–) ions from the salt can move to the magnesium and hydroxide ions instead, equilibrating the charge.
The experiment can be used to introduce and discuss the topics of electron transfer, local cell, passivation, sacrificial anodes, corrosion and the composition of water (covalent bonds, polarity and oxidation numbers). It takes about 45 minutes plus discussion time and has been successfully tested with 14-year-olds to study electron transfer reactions and corrosion, as well as with older students to work on electrochemistry.
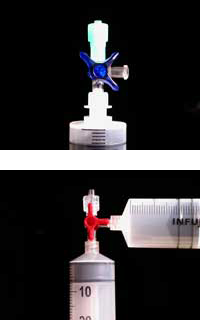
The plastic materials required for the experiment can be ordered as part of the ChemZw2 kits, which were developed in collaboration with the Lebensnaher Chemieunterricht (LNCU)w3 project, but are also available from most medical and chemical lab suppliers.
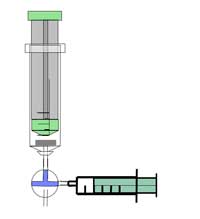
Safety note: Wear safety goggles. The reaction creates highly flammable gas – be careful. See also the general safety note.
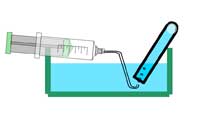
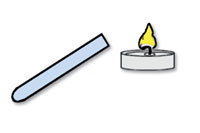
Optional: add one droplet of phenolphthalein solution to the water you collected in the beaker. What happens? Why?
Health and safety note: the remaining liquids can be disposed of in the sink. Clean the plastic materials with water and leave them to dry.
Other reactions commonly used in heater meals include the oxidisation of iron, the reaction of anhydrous calcium chloride with water (see below) or, for cooling, the reaction of ammonium nitrate fertiliser with water.
Further experiments such as making your own heat and cold packs, or determining the oxygen content in the air with the aid of the iron oxidation reaction used in heat packs, are described on the LNCU websitew3.
This activity can also form part of a lesson in which the students develop a script for a TV science programme to answer a viewer’s question on the function of heater meals. The English version of this worksheet is available on the Science in School websitew5, the German one on the LNCU websitew3.
In this activity, students heat coffee using anhydrous calcium chloride and water. The activity works well as part of a teaching unit on dissolving salts in water, to introduce the energetic aspects of this process. Students should already be familiar with ionic and covalent bonds. The activity works well with groups of three students aged 14 and over.
One possibility is to discuss lattice energy, using as an example from everyday life cold packs that rely on an endothermic reaction triggered by bending a metal plate. The following activity can then be used to introduce the notion of hydration energy and to demonstrate that the reaction by which some salts dissolve is an exothermic reaction.
The activity is relatively safe – the most dangerous aspect is the possibility of breaking glass by not handling it carefully.
Safety note: Wear safety goggles; do not drink the coffee.
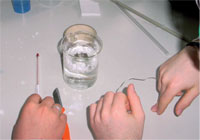
Two problems the students often face are adding too little calcium chloride to the water (the more they use, the more heat will be produced) and forgetting to insulate their beakers.
A common solution to the task is to improvise a small water bath by placing water and calcium chloride in a large beaker, and fixing styrofoam around the beaker with sticky tape. The coffee can then be heated in a smaller beaker in the improvised water bath.
The best result within the context of the LNCU project (see box) was achieved by filling a small beaker with water and placing it in a larger beaker with a layer of styrofoam in-between for insulation. The students then placed the calcium chloride, to which they had added very little water, in a small film canister. Attaching a string to it and a stone for weight, they let it hang into the water. The temperature of 50 ml of coffee changed from 20 to 44 °C in less than a minute.
Discuss the apparent contradiction between the behaviour of cold packs in previous experiments and the experiment you have just performed – in this case, the solution process is not endothermic. In the cold packs, more energy is required to destroy the salt’s molecular lattice (lattice energy) than is released when water molecules surround the ions (hydration energy). The required energy is drawn from the surroundings, so the solution cools down. In the coffee experiment, in contrast, the hydration energy is higher than the lattice energy, so the process as a whole is exothermic. Hydration and lattice energy are fixed characteristics of an individual salt.
To follow this up, the students could try to achieve the lowest possible temperature using anhydrous calcium chloride, sodium chloride and ice. They may be surprised to find that the addition of anhydrous calcium chloride to ice (rather than water) does not increase the temperature. This is because the hydrogen bonds in the ice crystals first have to be broken, which requires energy, so that the full process is endothermic.
In 2003, four German chemistry teachers joined forces to create a web portal to share their best teaching ideas: Lebensnaher Chemieunterrichtw3 (LNCU, chemistry lessons relevant to everyday life). Their collection has grown steadily, and they offer a wide selection of activities for all age ranges from primary to upper-secondary school, linking to major curricular topics in chemistry, such as the periodic table, titration, and air and water, plus biology and physics activities for the youngest students.
Their German-language materials are freely available as downloadable PDFs and Word® documents, with both instructions for teachers and worksheets for students. In addition, the website offers a range of videos on the activities and a list of more (German and English) websites with teaching ideas and relevant materials for the science classroom.
This article allows students to discover the link between classroom science and the real world. With experiments that have a wow factor – often missing from practical lessons – students can develop and build skills and knowledge.
The main subject addressed is chemistry, but the teacher could adapt the lesson to include discussions of energy from other subjects, for example keeping warm, survival in cold climates, and treatment of sports injuries. The experiments could also be used to trigger a discussion of how science works.
Nick Parmar, UK
Heater meal worksheet (Word document)
Heater-meal science TV show worksheet (Word document)
Download this article as a PDF