


Little wonder: microscale chemistry in the classroom Inspire article
Good things come in small packages: discover how microscale experiments can have a big impact in STEM teaching
Classroom experiments are necessary to engage students’ attention and illustrate key chemical principles. However, traditional methods often require large amounts of hazardous reagents, complex equipment, and quite a lot of work for the teacher or students in terms of setup and cleanup. Many of these experiments can easily be adapted to be performed on a small scale, without detracting from the effect demonstrated. In fact, microscale (sometimes called small-scale) experiments can even highlight effects that are not apparent when carrying out similar experiments on a larger scale. This article will introduce the principle of microscale classroom experiments and the reasons you should give it a try in your classroom.
What is microscale chemistry?
I developed microscale procedures at CLEAPSS[1] in the UK to address concerns by school employers about exposing students and teachers to hazardous reagents.
Very often, microscale chemistry refers to carrying out reactions in droplet amounts. This can conveniently be done by dispensing droplets (0.2 to 0.5 ml) of solutions onto a template worksheet that is encased in a transparent plastic sleeve or folder (preferred) or laminated (corrections and improvements require more lamination).
Figure 1 shows a demonstration involving pH indicators and solutions of different pH values. This is used by CLEAPSS in its Health and Safety courses for UK teachers and technicians, and the beautiful colours and speed at which it can be done enthuses the participants to take the ideas back to their schools.

Image courtesy of Bob Worley
Other reactions, including precipitation (Figure 2) and displacement reactions can be carried out in a similar way. The reagents can conveniently be applied using a small dropper or pipette, which allows various designs to be set up to illustrate different patterns or trends. The sheets can then easily be wiped clean. Another approach is to place droplets of reagents on Petri dishes (see Figure 5).
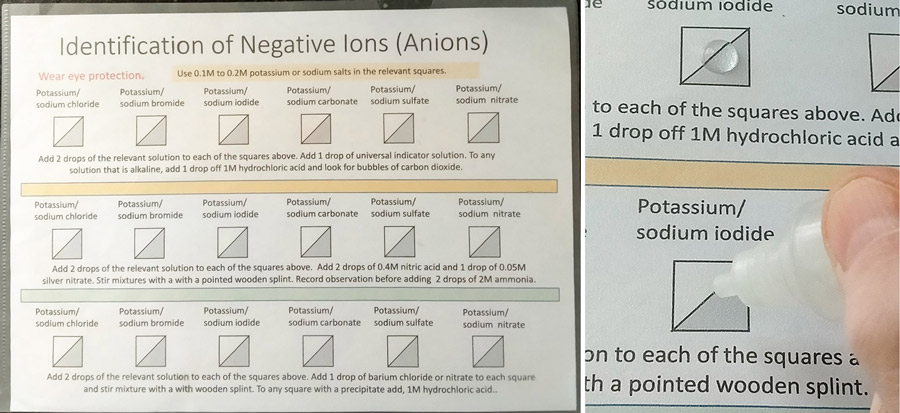
Image courtesy of Bob Worley
In addition to adding drops of solutions or liquid reagents, students can make the solution in situ by adding grains of a salt to a solvent with a toothpick or wooden splint. Due the small volume, dissolving and mixing is very rapid, and this in itself can be an excellent demonstration of dissolving, solvation, and diffusion.
Figure 3 shows what happens when tiny grains of copper(II) sulfate and sodium carbonate are added to each side of a drop of distilled water. The two ionic solids dissolve and diffuse through the water, and a line of basic copper carbonate precipitate forms in the centre of the drop where the copper and carbonate ions meet.
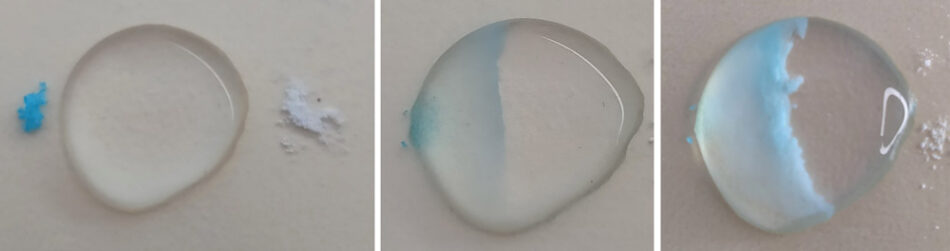
Image courtesy of Bob Worley
A conductivity indicator can be also used on the drops to detect the presence of ions and show electrolysis (Figure 4).
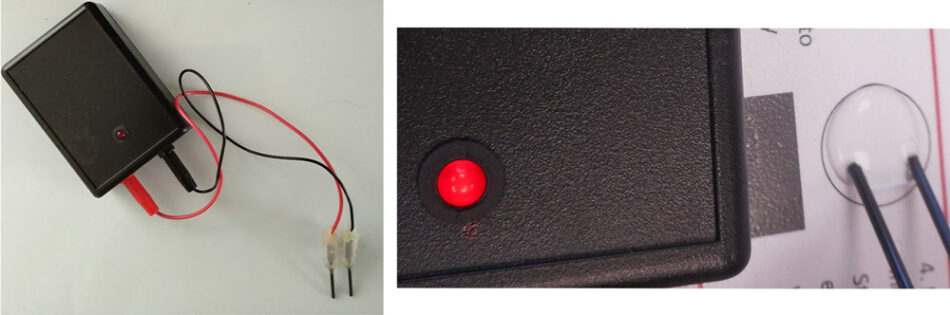
Image courtesy of Bob Worley
How to adapt experiment for the microscale approach?
Ideally, the microscale version should elucidate more information for teaching purposes than the traditional form of the activity.
The process of using drops of liquid on a plastic surface relies on surface tension, which is fine with aqueous solutions but won’t work with organic liquids. Additionally, many plastics are softened by organic solvents such as ketones and esters. Thus, for organic solvents, small glass vials, porcelain spot plates, or test tubes are needed.
Heating can be an issue, but liquids can be placed in a glass vial surrounded with boiling water from a kettle or placed on a hot plate or a specially designed heater.[2]
Why should I use microscale chemistry in my classroom?
There are many advantages to this approach, with the main ones summarized below.
Benefits of the Microscale approach
- Improves safety
- Reduces waste (better for the environment)
- Reduces equipment/material costs
- Suitable for use in resource-limited settings, as exemplified by the RADMASTE project[3]
- Easier setup/cleanup
- Experiments quicker and easier to do:
- Teachers have more time to teach.
- Students can focus on the key principles.
- Improves understanding of difficult chemical concepts by challenging students’ misconceptions
- Encourages new experiments, e.g., hydrogenation of alkenes and liquefying gases
- Facilitates STEM initiatives with modern materials and methods, e.g., carbon-fibre electrodes, Nd magnets, LEDs, Arduino microelectronics, 3D Printing, and laser cutting
In terms of safety, the benefits of using smaller amounts of reagents are obvious. This is especially relevant with volatile chemicals, where the levels of toxic gases in the air will be much lower if students are only using droplet amounts. An excellent demonstration of this is the electrolysis of sodium chloride or copper(II) chloride, which produces toxic chlorine gas that can trigger breathing difficulties. Some employers wanted this activity removed even though it was specified in exam syllabuses. However, CLEAPSS was able to design equipment for carrying out this experiment on a smaller scale (Figure 5), and in this case just 5 to 6 cm3 of chlorine gas are produced.
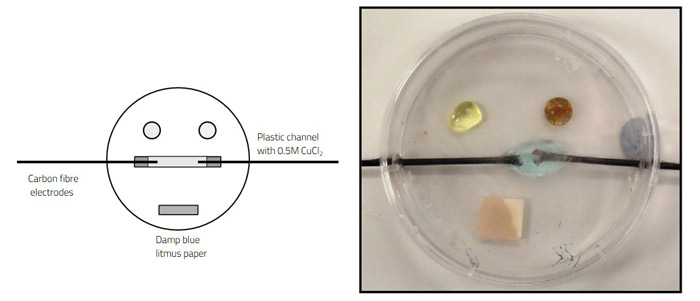
Image courtesy of Bob Worley
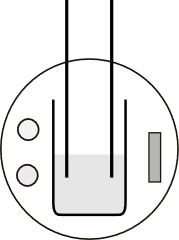
Image courtesy of
Bob Worley
Some teachers are concerned that students will be disadvantaged if the experimental setup used doesn’t match that used in the exams. However, this can usually be solved by providing a diagram that makes clear the equivalence with the classical larger-scale experiments. For example, for the electrolysis experiment described above, one teacher agreed the microelectrolysis was good but was concerned that the design did not reflect the apparatus as shown in textbooks and exam questions. The quick-thinking technician drew a “horizontal beaker” on paper and repositioned the electrodes, and the teacher was satisfied.
Perhaps less obvious than the practical advantages in terms of convenience and safety are the advantages of experiments that are quick and easy to carry out. This reduces the load on the students’ short-term working memory and allows them to better engage with both the excitement of the experiment and the science behind it. The nature of the microscale experiment can also make the scientific principles easier to understand. For example, in the copper carbonate precipitation experiment shown above, the students see the solids being added and understand how they are dissolving and then meeting in the middle. Whereas when mixing two solutions prepared by the teacher, it can seem like magic when a solid precipitate suddenly appears.
Summary
There is so much more. If this article has sparked your interest, I encourage you watch the recent lecture that Adrian Allan and I did with Science on Stage,[4] along with the other video in the resource section. In subsequent issues of Science in School, additional Teach articles will be published with step-by-step instructions on how to run some of these microscale experiments, along with printable resources.
References
[1] An introduction to CLEAPSS: http://science.cleapss.org.uk/Policies/What-Is-Cleapss.aspx
[2] Allan A, Worley B, Owen M (2018) Perfumes with a pop: aroma chemistry with essential oils. Science in School 44:40–46.
[3] More information on the RADMASTE Microscience project: https://www.radmaste.org.za/
[4] Science on Stage brings together STEM teachers with outstanding teaching ideas: https://www.science-on-stage.eu/
Resources
- Watch a recent Science on Stage lecture demonstrating some fantastic microscale chemistry experiments.
- Watch this great introduction to microscale chemistry techniques.
- See an experiment with liquifying gases.
- Learn how to isolate essential oils from fragrant plants: Allan A, Worley B, Owen M (2018) Perfumes with a pop: aroma chemistry with essential oils. Science in School 44:40–46.
- Try your hand at doing experiments in hydrogel spheres: Tarai ED (2017) Small is beautiful: microscale chemistry in the classroom. Science in School 39:31–35.
- Teach about pH chemistry using microscale methods: Worley B, Allan A (2021) Little wonder: pH experiments the microscale way. Science in School 54.
- Introduce your students to the chemistry of precipitation using microscale chemistry methods Worley B, Allan A (2021) Pleasing precipitation performances – the microscale way. Science in School 56.