


Seeing is believing: 3D illusions Teach article
To make the two-dimensional images that we see in print and on screen appear more real, we can hijack our brains to create the illusion of a third dimension, depth. These activities explore the physics that make this possible.

for free.com
Look around you. How many dimensions can you see? As a three-dimensional being living in a three-dimensional world, surely you see three dimensions: height, width and depth? Not so. In fact you see only two dimensions. This is because what we see is merely 2D images, even of 3D objects, projected onto the backs of our eyes. What we perceive is entirely different: our brains process those 2D images into something that appears to have not only height and width but also depth – three dimensions. Thus, the brain uses 2D images from the eyes to create an illusion of 3D.
source: Wikimedia Commons
The four activities in this article, suitable for 11- to 19-year-old physics students, investigate how we can hijack the workings of the brain to make an object that is genuinely 2D to begin with – such as a drawing, painting or movie – appear 3D.
Activities 1, 2 and 3 take about 20 minutes each, and activity 4 takes about 30 minutes. The materials required are inexpensive but will require sourcing in advance. Although this article mainly covers physics topics, it could also be adapted for use in biology lessons because it deals with vision and the brain.
Adding another dimension
First, how does the brain allow us to perceive truly 3D objects in three dimensions?
We use this ability every time we do something as simple as pouring a drink. Cover one eye, keep your head still and your eyes level with the top of the glass, then try to pour the water into the glass. It’s difficult. Now open both eyes and try again. This time, your brain receives two slightly different images of the same objects, which it uses to perceive depth. As a result, you should be able to pour the water accurately into the glass.

for free.com
We can exploit this ability of the brain in order to enhance the realism of a 2D picture. We do this by presenting each of our eyes with a slightly different image, mimicking what happens when we look at a 3D object. The brain combines these two images, convincing us that there is depth in what is actually a 2D picture.
Three strategies are used to create these 3D illusions. The first strategy (covered in activity 1) directs a different image into each eye using refraction, whereas the other two strategies (activities 2 and 3) use different types of special glasses. In activity 4, students use what they have learned to make their own 3D image.
Activity 1: 3D lenticular images
Your students may have seen designs on postcards, DVD covers or the cards you find in cereal packets that seem to have an amazing sense of depth. If so, they’ve already encountered 3D lenticular pictures. In the following activity we will investigate how they work.
Materials
image source: Wikimedia
Commons
Per student or pair of students:
- A 3D lenticular picture
Procedure
- Cover your left eye and look at the picture. Then cover your right eye instead and look again.
- Look at the picture with both eyes. What do you notice?
What happens?
When you view the picture with both eyes it looks 3D, but when you view it with only one eye it looks 2D.
How does it work?
The simplest 3D lenticular pictures are created from two separate images, which are offset from one another laterally. Let’s take as an example a composite picture made of picture A and picture B. Both pictures are cut into vertical strips and reassembled alternately into what is called an interlaced image (figure 1a), making the order of strips: A-B-A-B-A…. The interlaced image is printed onto paper and overlain by a sheet of lenticular plastic, which consists of a series of long, thin lenses (figure 1b). The lenses are aligned with the underlying strips in such a way that light reflected off strips of A will be sent in one direction, to the left eye, and light reflected from strips of B is sent in another direction, to the right eye (figure 1c).
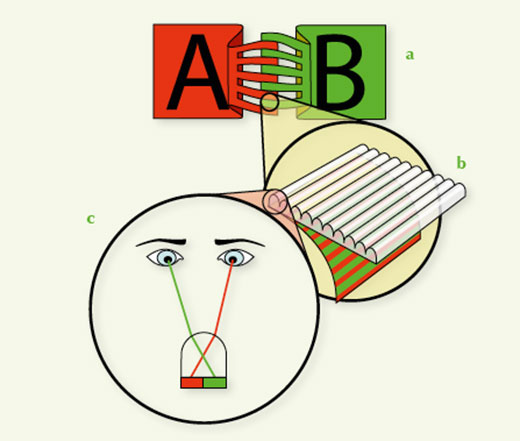
a) Two separate images, A and B, are cut into strips and then reassembled alternately, to form an interlaced image. The images are also offset from one another laterally.
b) The interlaced image is printed onto paper and overlain by a sheet of lenticular plastic consisting of plastic lenses.
c) The lenses send light reflected from strips of A to one eye and from strips of B to the other eye. The brain combines the images to create the illusion of depth
Click on image to enlarge
Image courtesy of Lenstar.org
In our experiment, your brain combines pictures A and B of the lenticular picture to give an illusion of depth. The illusion works because the two pictures are offset from one another, so the brain is combining two different images – just as it does when you look at a 3D object with two eyes. There is no such illusion of depth when you look through a single eye: either your left eye sees only picture A or your right eye sees only picture B.
Activity 2: anaglyphs
Whereas lenticular 3D pictures work when viewed with the naked eye, other ways of creating the illusion of depth require special glasses. Early 3D movies took advantage of colour to create the illusion of 3D. Watchers wore red / green glasses to view a projected picture composed of two offset pictures: one red and one green. Such pictures, called anaglyphs, are still used widely today in printed materials. In the following activity, your students will learn how anaglyphs work.
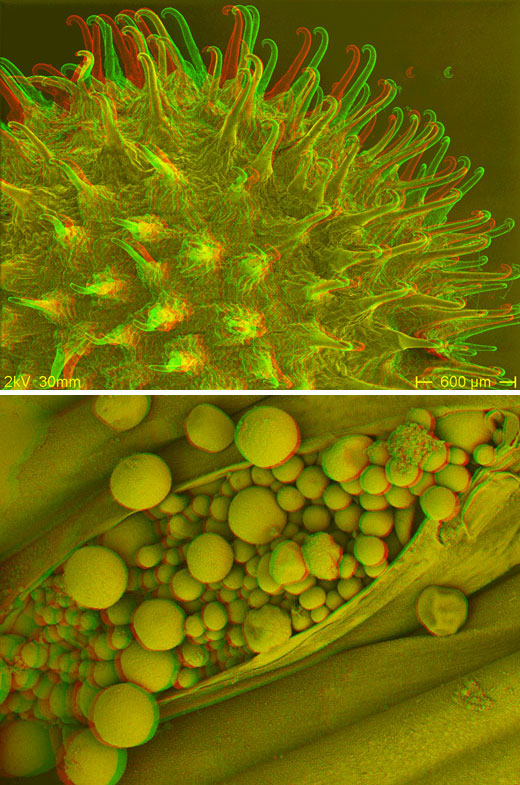
cleavers plant is covered in
tiny hooked hairs, which
cling to animals to enable
seed dispersal. These
anaglyphs were created from
images taken with a scanning
electron microscope. Use
your red / green glasses to
view them. Spores of a
pathogenic fungus (wheat
yellow rust) erupting through
the surface of a wheat leaf.
Click on image to enlarge
Images courtesy of Syngenta
Materials
Per pair of students:
- A pair of red / green glasses
Procedure
- Wear the red / green glasses with the red filter over your left eye and the green filter over your right eye
- Look at one of the anaglyphs below.
What happens?
The anaglyph appears to have depth: it looks 3D.
How does it work?
We can filter light based on its colour (wavelength). The red filter in your glasses absorbs all wavelengths of light apart from red, whereas the green filter absorbs all wavelengths apart from green.
To make the anaglyph, each of the two component pictures was taken from a slightly different position before being coloured: one in red and one in green.
When you look at the anaglyph with your red / green glasses on, your left eye receives the red image and your right eye, the green image. The illusion of depth is created when your brain combines the two offset images.
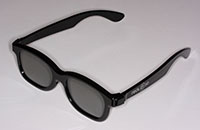
image source: Wikimedia
Commons
Activity 3: 3D polarising glasses
Most modern 3D movies use polarising glasses to achieve the illusion of depth. The following activity investigates how these glasses work.
Materials
Per pair of students:
- Two pairs of 3D polaroid glasses, such as those made by RealD™
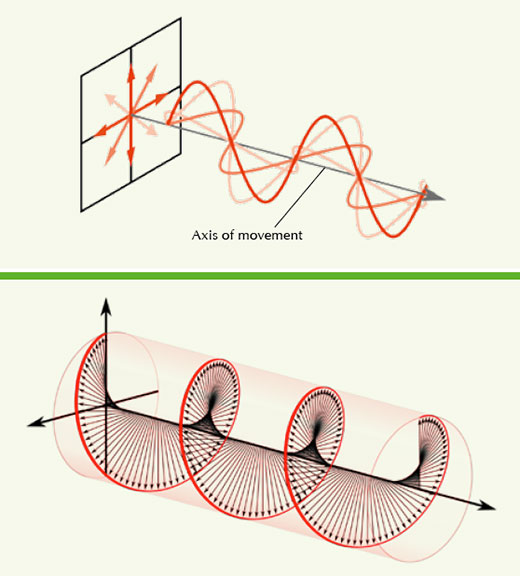
travels in waves can be
affected by polarising filters
Top: Un-polarised light:
normally, the peaks and
troughs of a wave of light
point in random orientations
about the axis of its
movement
Bottom: Circularly polarised
light: circular polarising
filters cause the wave’s
oscillations to rotate about
its axis of movement, in
either a clockwise or an
anticlockwise direction,
depending on what kind of
filter is used. The wave
shown here is polarised in a
clockwise direction
Click on image to enlarge
Images courtesy of Bob Mellish
(top) and Dave3457 (bottom);
source: Wikimedia Commons
Procedure
In pairs:
- Wear your glasses and look at your partner.
- Cover the left lens and look at your partner, who should have both lenses uncovered. What do you see?
- Cover the right lens and look again. What has changed?
What happens?
When you look at your partner with both of your lenses uncovered, your partner’s lenses look transparent. When you cover one of your lenses, one of your partner’s lenses appears to darken. If you cover your other lens, your partner’s other lens appears to darken.
How does it work?
To understand your observations, and how modern 3D movies work, we need to remember that light travels in waves. We can influence the orientation of the waves’ oscillations by passing the light through a circular polarising filter, which makes the oscillations travel in spirals (figure 2).
The lenses in your 3D glasses contain circular polarising filtersw1: one polarises light in a clockwise direction and the other in an anticlockwise direction.
Let’s think about what happens when you look at your partner with both of your lenses uncovered (figure 3A). Your partner’s lenses appear transparent, because you are able to see the light that has passed through them: clockwise polarised light from your partner’s clockwise polarising lens reaches one of your eyes, while anticlockwise polarised light from your partner’s anticlockwise polarising lens reaches your other eye.
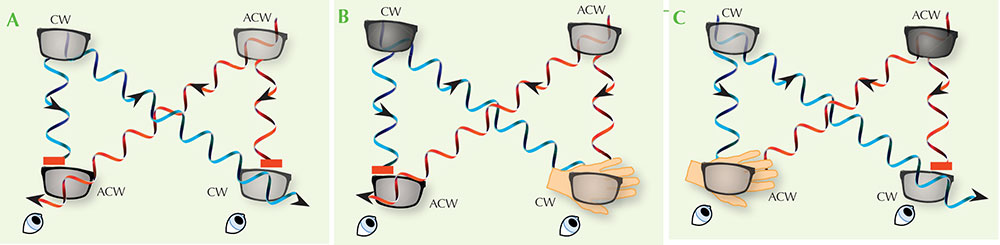
A) Your partner’s lenses appear transparent when both your clockwise (CW) and anticlockwise (ACW) lenses are uncovered. CW polarised light (blue) coming from your partner’s glasses reaches one of your eyes, while ACW polarised light (red) from your partner’s glasses reaches your other eye
B) When your CW lens is covered, your partner’s CW lens appears darker. This is because you are no longer able to see the light that passed through your partner’s CW polarising lens
C) When your ACW lens is covered, your partner’s ACW lens appears darker
Click on image to enlarge
Images courtesy of Nicola Graf (diagram) and D-Kuru (glasses). Image source for glasses: Wikimedia Commons
Now think about what happens when you cover your clockwise polarising lens (figure 3B). Your partner’s clockwise polarising lens appears darker, because you no longer receive the light that has passed though it. Why not? Because your anticlockwise polarising lens (the only lens through which you can now see) blocks the clockwise polarised light. When you cover your other lens (figure 3C), the situation is reversed and your partner’s other lens appears darker.
image source: Flickr
The 3D movies for which your glasses were designed are filmed using two cameras mounted so that the distance between the cameras’ lenses is roughly equal to that between the average pair of human eyes. During the movie, the two moving pictures are circularly polarised in opposite directions and projected onto a screen. Your 3D glasses ensure your left eye receives one image, and your right eye the other. The two moving pictures are displayed alternately at an imperceptibly fast rate of 144 times per second. The brain combines the images it receives from both eyes to create the illusion of depth.
Activity 4: making your own 3D image
Once your students have understood the principles of 3D imaging, they can make their own anaglyph using a digital camera and a computer (figure 4).
Materials
- A digital camera
- A tripod or other type of support for the camera (e.g. a pile of books)
- A pair of red / green glasses
- A piece of software that can make an anaglyph, such as Anaglyph Workshopw2.
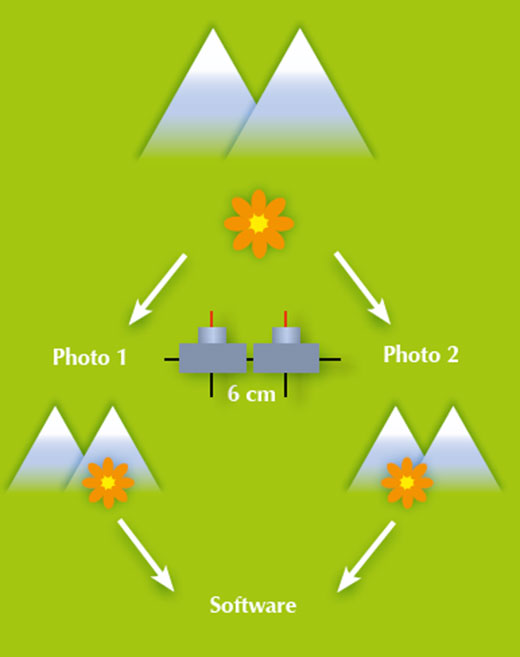
should be taken from a
position slightly to the right
of photo 1. The two images
are made into an anaglyph
using your chosen piece
of software. Click to enlarge
image
Image courtesy of Nicola Graf
Procedure
- Choose a stationary subject.
- Take a photo.
- Move to the right by about 6 cm (about the distance between our eyes), ensuring that the camera remains at the same level. Take a second photo.
- Follow the instructions of your chosen software to colour and superimpose the two photographs. You now have an anaglyph.
- Look at your anaglyph through your red / green glasses, either on a computer screen or a print-out. You may need to repeat the procedure a few times, adjusting the distance you move before taking the second photo, to refine the 3D effect.
Note: if you have a smart phone, you can simplify the procedure by using an app (e.g. 3D Photo Maker) to make your anaglyph directly, using images taken with your phone’s camera.
Acknowledgements
The activities in this article were devised by Alison Alexander, Cerian Angharard, Frances Green and Ruth Wiltsher, who are all physics-teacher network co-ordinators for the UK’s Institute of Physics (IOP)w3. These and other activities were originally part of a package of activities called ‘Lights, cameras, images’ that was used for a workshop for the IOP’s teacher network.
The worksheets for all of the ‘Lights, cameras, images’ activitiesw3 can be downloaded from the Talk Physics website.
Web References
- w1 – Circularly polarising 3D glasses are in fact slightly more complicated than described in this article, as they contain both a linearly and a circularly polarising filter. A more detailed explanation of how the glasses work.
- w2 – The Anaglyph Workshop software for Windows or Mac is freely available to download.
- w3 – The UK’s Institute of Physics (IOP) teacher network provides support for physics teachers across Great Britain and Ireland.
- The IOP website has an extensive collection of resources for physics teachers.
- The complete set of worksheets for the ‘Lights, cameras, images’activities are available on the Talk Physics website, a resource from the IOP for teachers of physics and their supporters.
Resources
- The highly praised animation ‘Imagining the Tenth Dimension’ includes an explanation of how to imagine the higher dimensions.
Review
The use of 3D illusions in the visual media is becoming increasingly popular. But how is it that we see a 2D picture in 3D? And how can we create our own 3D illusions? These questions and many more are answered in this novel article. The great thing is that it does not just give explanations, but also provides a number of activities to help the students understand what is going on. It is very useful as a way of linking theory to real-life applications.
Suitable for teachers of physics (optics) and general science, this article would also be good background reading for biology (vision) and art teachers.
Paul Xuereb, Malta