


Running one of the world’s largest telescopes Understand article
Ever wondered what - and who - lies behind the beautiful and fascinating astronomical photographs and observations made with modern telescopes? Douglas Pierce-Price from ESO, the European Organisation for Astronomical Research in the Southern Hemisphere, describes a day in the life of the Very…

remnant of a supernova
explosion
In the past, the life of an astronomer may have been one of quiet nights spent peering through a telescope eyepiece. At the start of the 21st century, however, astronomy is an exciting, international endeavour. Modern astronomical research encompasses the greatest distances and masses, and the most extreme conditions, to be found in the universe.
Not everyone who is involved with astronomy is necessarily an astronomer, however. Research-class telescopes are the state of the art. Their advanced detectors are cryogenically cooled to temperatures close to absolute zero, the telescope systems use the latest optical techniques, and the whole structure is a complex feat of engineering. Sophisticated computer systems are needed to handle the flow of data. To support this technology, a modern observatory also employs engineers, technicians, computer specialists, and a host of support staff.
Let’s take a look at a day in the life of the Very Large Telescope (VLT), operated in Chile by ESO . You’ll see how people with many different skills work together to keep the telescopes running throughout the year. Observations with research-class telescopes are in such high demand that every night is precious, and every day is filled with activity.
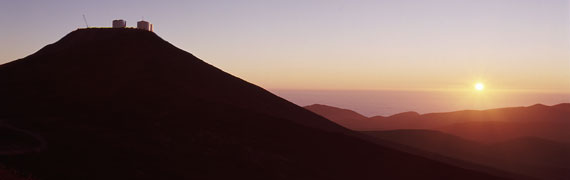
The VLT is situated on Cerro Paranal in Chile, a 2635-metre-high mountain in the Atacama Desert, thought to be the driest place on earth. There are parts of this region where no rain has ever been recorded. The high-altitude site and extreme dryness make excellent conditions for astronomical observations.
We begin our day at the VLT in the afternoon, before the sun begins to set. In the Paranal Residencia, the team who will operate the telescope tonight get ready for work.
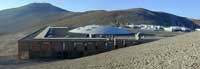
The Residencia is a futuristic building where the observatory staff live and work, built partly underground and with a 35-metre-wide glass dome in the roof. It is part of the VLT’s ‘base camp’ facility, situated a short distance below the summit of Cerro Paranal.
The excellent astronomical conditions at Paranal come at a price. In this forbidding desert environment, virtually nothing can grow outside. The humidity can be as low as 10%, there are intense ultraviolet rays from the sun, and the high altitude can leave people short of breath. The nearest town is two hours away, so there is a small paramedic clinic at the base camp. Living in this extremely isolated place feels like visiting another planet.
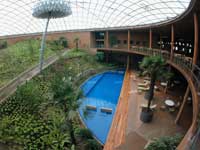
Residencia
Within the Residencia, a small garden and a swimming pool are designed to increase the humidity inside. The building provides visitors and staff with some relief from the harsh conditions outside: there are about 100 rooms for astronomers and other staff, as well as offices, a library, cinema, gymnasium, and a cafeteria. The building has four levels, although due to its subterranean construction, the entrance is at the top.
From the Residencia, the visiting astronomer and the night-time astronomer drive the four kilometres along a specially constructed, paved road to the telescope platform. Here, on the flat summit region of Cerro Paranal, are the telescopes of the world’s most powerful optical and infrared observatory.
The astronomers prepare the computer systems for their night’s observations, and then step out onto the platform to enjoy the Chilean sunset. A ‘Star Trail’, which also runs between the Residencia and the summit, is a popular recreational walking route for VLT staff and visitors.
start-up sequence
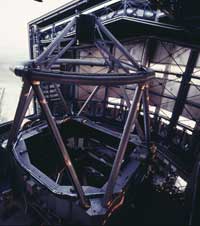
Despite its name, the Very Large Telescope is really a collection of several telescopes. The four-unit telescopes of the VLT each have single mirrors 8.2 metres in diameter. They are joined by several smaller, movable auxiliary telescopes, two of which are currently operational, with a third being commissioned and a fourth to follow. The unit telescopes are named Antu (the Sun), Kueyen (the Moon), Melipal (the Southern Cross), and Yepun (Venus, the Evening Star), in the local indigenous Mapudungun language.
One of the most important measures of a telescope is its size – specifically, its diameter. This governs both the amount of light it can collect (to see fainter objects) and the angular resolution it can measure (to see more detail in objects). The individual unit telescopes, with their 8.2-metre mirrors, are already among the largest visible-light telescopes on the planet. Their size means they can detect objects billions of times fainter than those visible with the naked eye. With its adaptive optics systems, which remove much of the blurring effect of the earth’s atmosphere, the VLT’s vision is sharp enough to allow someone, theoretically, to read a newspaper headline at a distance of over 10 kilometres.
The light from the unit telescopes can also be combined with that from the auxiliary telescopes, using a technique called interferometry, to give the effect of a single telescope as large as the entire array of individual telescopes. This allows the combined system, known as the VLT interferometer, to behave like a telescope with a diameter of up to 200 metres. With this angular resolution, the VLT interferometer could theoretically see an astronaut on the surface of the moon.
Just before sunset, the astronomers are joined by the telescope and instrument operator (TIO). These highly skilled technicians handle the actual operation of the telescope and instruments. As part of their role is to look after the telescope and the observers, it is perhaps no coincidence that ‘tio’ is Spanish for ‘uncle’.
The TIO and the ESO astronomers usually live in Santiago or Antofagasta, but come to Paranal for duty shifts. The journey takes about two hours by aeroplane followed by another two hours in a bus, over a partially unpaved road. ESO astronomers spend part of their time performing duties at the telescopes, and part pursuing their own astronomical research.
The visiting astronomer, on the other hand, could have come from anywhere in the world. Although most applications come from the ESO member nations, researchers from any institution worldwide can apply to use the telescopes. This is a competitive process, as the VLT is significantly oversubscribed – the amount of time requested is three or four times more than is actually available.
About half the observing time at the VLT is allocated to projects with visiting astronomers, and about half to ‘service observing’, where the TIO and ESO astronomer make observations on behalf of researchers who therefore do not need to leave their home institutions.
Now that the sun has set on Cerro Paranal, observations can begin. The giant building has already been opened, allowing the telescope to look out into the night sky. The visiting astronomer does not control the telescope directly, leaving that to the TIO. The visiting astronomer need only describe the observations he or she wants to make.
Although the excellent atmospheric conditions at Paranal are one of the reasons why the site was chosen, one cannot always rely on the weather. Sometimes it is not good enough for the planned observations, and the astronomer gets ‘weathered out’. If this happens, then they may be able to switch to one of their backup projects or to one of the stock of ‘service observing’ projects.

with the naked eye, the Orion
nebula is a complex of gas
and dust several tens of
light-years wide
Since 1998, when Antu, the first of the unit telescopes, saw its first light, the VLT has been at the forefront of astronomical research. It has been used to look at objects in our own solar system, and beautiful nebulae and supernova remnants in the Milky Way. Astronomers have watched stars orbit in the gravitational pull of the supermassive black hole at our galaxy’s heart, and have found distant galaxies far beyond our own. VLT observations have shed new light on the mysterious cosmic explosions known as gamma-ray bursts, which are the most powerful blasts in the universe. And astronomers using the VLT were the first to make an image of an ‘exoplanet’: a world outside our solar system.
Throughout the night, the team may make long observations of a few astronomical objects, or they may move from target to target, always trying to make the best possible use of the time and weather conditions. But all nights must come to an end, and as the sun rises over Cerro Paranal, the observations are completed. The TIO puts the giant telescope into standby position, closes the building, and the TIO and astronomers return to the Residencia to rest and sleep.
The VLT stands empty on the mountain for a short time, until a different group of workers arrives. The day crew of engineers and technicians, joined by daytime duty astronomers, are responsible for telescope maintenance. The engineers typically live in Antofagasta, but may work shifts of one week at the VLT, and one week off. They could be working to fix problems that occurred during the night, or to upgrade the facilities. Some work is done at the VLT itself, but there are also laboratories and workshops in the base camp, near the Residencia.
When the sun starts to set, the day crew make radio contact with the TIO, who is driving back up to the summit. They prepare the telescope hardware, and open up the building again, ready for the arrival of the TIO and astronomers. Once the telescope is handed over, and perhaps after watching the sunset, the day crew drive back to the Residencia. As one day comes to an end, a new night of discovery begins.
Institutions

Review
This article describes how scientists and engineers work at a modern telescope and would serve to inform teachers about what astronomers actually do at these telescopes. The article is of special interest to physics teachers, although those teaching general scientific subjects may also be interested.
The diary style makes it very readable even for those who are not familiar with astronomy. Although this article does not contain any direct teaching materials, science teachers and their students may find it interesting to hear about scientists at work.
Although this article gives a rather idealistic picture of astronomers’ lives at the Very Large Telescope (VLT), it also raises all sorts of questions and awakens interest in the subject.
Roeland van der Rijst, the Netherlands