Plastics, naturally Understand article
We sit on them, wear them and cook with them: plastics are everywhere. Yet this very versatility makes it difficult to produce and dispose of plastics in environmentally friendly ways. David Bradley explains how researchers at the University of Manchester, UK, are working on a solution.

Image courtesy of The
University of Manchester
The cheap plastic toy in your morning cereal box is a well-worn breakfast cliché. However, the disposal of millions of tonnes of scrapped plastics each year is a growing problem requiring more serious discussion than a chat over the cornflakes. Work by team leader Colin Webb and his colleagues Ruohang Wang and Apostolis Koutinas, in the Satake Centre for Grain Process Engineering at the University of Manchester, will yield a fantastic plastic solution that not only promises to solve the problem of disposal but also opens up a new sustainable future across manufacturing.
With the support of the Engineering and Physical Sciences Research Council (EPSRC)w1, the researchers are combining process engineering and biotechnology with cereal chemistry to develop a novel and highly efficient way of converting cereal grains into biodegradable bioplastics. They are also extending processing techniques for removing grain bran – so-called ‘pearling’ – that will work as a general tool for extracting useful compounds from a wide range of cereals and allow them to be used as precursors for new materials.

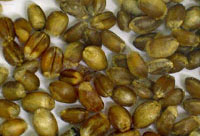
as ‘pearling’ grain the
researchers aim to strip off
the outer layers of the seeds
that can then be ground into
flour – producing a starting
material packed with
nutrients and enzymes that
the appropriate
microorganisms can feed on
to produce bioplastics
Image courtesy of The
University of Manchester
These might include short-chain sugars for other fermentations, arabinoxylans for medical applications, the antioxidant ferulic acid (a precursor to aromatic compounds such as vanillin), as well as functional foods.
Avoiding landfill
Plastics have revolutionised modern life, giving us everything from nylon stockings to PVC teething rings and hypoallergenic synthetic rubber condoms. Plastics are petrochemical products, however, and with annual production at half a billion tonnes we rely on fossilised hydrocarbons for their manufacture. Moreover, the throwaway nature of many plastics means that they are a serious environmental problem because petrochemical products do not degrade naturally. Waste plastics can be disposed of by incineration, but that produces pollutants.
They can be recycled, but that brings its own problems of cleaning, sorting, and finding applications for lower-grade materials. Unfortunately, landfill is currently the safest and least expensive method of disposal. But, with 40% of plastics produced being dumped in landfills, they are quickly filling up. “Environmental issues, the growing demand for energy, political concerns and the medium-term depletion of petroleum has created the need for development of sustainable technologies based on renewable raw materials,” says Colin. Along with his colleagues, he hopes to address this concern through the development of an alternative feedstock for the plastics industry based on renewable cereal crops, rather than our limited supplies of crude oil. “Selection of the appropriate raw material to supply sustainable processes is dependent on infrastructural, economical and technological factors such as availability, skilled workforce, pre-treatment technology and costs, and transportation,” explains Apostolis. “Cereals belong to those few renewable raw materials that currently meet most of these prerequisites.” Cereal grains are nutritious enough to sustain a host of microorganisms, such as the fungus Aspergillus awamori, and this can be exploited by developing a generic method for refining grain into a feedstock using microbial fermentation that can then be converted chemically or through further fermentation into biofuels, chemicals and bioplastics (plastics derived from plant sources, rather than petroleum).

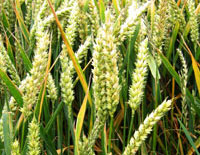
of Manchester believe that,
with the use of plastic-
producing microbes, fields of
wheat could replace
fossilised hydrocarbons as
the source for many plastics
Image courtesy of David
Bradley
The idea has many advantages, not least of which are that crops are a renewable resource and using them is essentially carbon neutral. Additionally, the products of cereal chemistry, including bioplastics, will be biodegradable, ultimately rotting to nothing more than water and carbon dioxide in the soil: a sharp contrast to the 10 000-year lifespan of polythene and PVC products. There are also many socioeconomic advantages to developing cereals as an industry feedstock, including a reduced reliance on dwindling crude-oil supplies and benefits to farmers from the increased cultivation of cereal grains.
Currently, there are three ways to make bioplastics. The first involves intracellular production by the fermentation of a feedstock derived from a cereal or other crop. This approach requires extraction and purification steps. The second method involves engineering a crop to ‘grow’ the plastic within the plant itself, which then requires harvesting and purification. Finally, cereals could be made to produce various precursors, again through fermentation, which could then be processed into bioplastics. If natural microorganisms cannot produce the desired bioplastic, then they too could be genetically engineered for the job.
Clever microbes
Plastic-producing microbes use simple sugars, such as glucose, as their carbon source and organic nitrogen compounds, such as amino acids and short peptides, for their nitrogen. All these nutrients are present in cereal grains. Moreover, the grain also contains the vitamins and minerals essential to microbial growth. Some grains have great potential for producing functional chemical sources. Wheat, for example, shreds the opposition because it contains useful agglutinin and lipids, arabinoxylan, phytic acid and vitamins, and short-chain sugars. ‘Pearling’ grain to strip off the outer layers of the seeds and then milling into flour produces a starting material packed with nutrients and enzymes that the appropriate microorganisms can feed on to produce bioplastics. “This biorefining strategy provides a complete feedstock for subsequent microbial fermentations for the production of bioplastics and other chemicals,” says Colin.

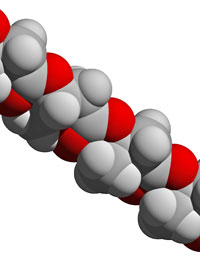
biodegradable polymers such
as PHB (polyhydroxybutyrate
– whose structure is shown
here) are expensive to
produce and not suitable for
many applications. EPSRC
researchers hope to find an
inexpensive route to versatile
‘green’ plastics
Image courtesy of David
Bradley
“Microbial bioplastics will find many applications as disposable plastics, such as food packaging, that cannot be recycled.”
Professor Colin Webb
It will not be possible to develop processing methods to produce bioplastics for all applications, but researchers are hoping to cover most bases. “Microbial bioplastics will find many applications as disposable plastics, such as food packaging, that cannot be recycled. It is also possible to blend bioplastics with other materials to make bioplastics resistant to biodegradation. Additionally, recycling could be developed as a generic methodology for the reproduction of longer-lasting items,” adds Colin. Conventional grain processing for the manufacture of corn syrup and other food and animal feed products produces a lot of waste and waste water, is expensive, and does not fully utilise the rich chemistry of these natural products – including invaluable nutrients and enzymes. In their new process, the Manchester team has attempted to exploit the full potential of whole cereal grains in order to create viable biorefineries for the production of bioplastics as well as other value-added products. Their approach investigates new market applications.
“Gluten, for instance, could be used as a bioplastic with many potential applications,” says Apostolis, “while arabinoxylans could be used in medical applications so that none of the cereal grain by-products are wasted.” Colin adds: “The current industry producing plastics will have to gradually switch from using petrochemical processing into renewable biomass-based feedstocks. The imminent depletion of petroleum resources will force this change,” he says, “making cereals the most important candidates as the raw materials for bioplastic production.” According to Colin, the success of this endeavour will depend on collaborations with industrial or other academic partners who can provide expertise in market needs, industrial scale processing, chemistry, cultivation of cereal grains and life-cycle analysis. Colin comments: “The way that this project has been approached targets the improvement of economics for the production of bioplastics via microbial fermentation, which is one of the most important impediments in this process.” If they are successful, then the plastic toy in your cereal box may one day be as sustainable as the cereal itself.
Web References
- w1 – The EPSRC funds research and post-graduate training in engineering and the physical sciences at universities and other organisations throughout the UK.
Review
Plastic manufacturing is not generally included in science lessons, but this article explores one of those fringe-science fields that is relevant to the central problems of human societies’ development.
These days, sustainability of natural resources and human-powered global warming are the main limiting factors for any model of social development. While some groups argue for the convenience of nuclear power or develop alternative sources of energy, Bradley demonstrates that advances in efficient management of renewable resources could have a positive effect.
The article is about efficiency, sustainability, reduction of our carbon footprint, natural resources and social structure. In addition, it shows how scientific specialisation (so often criticised) makes possible advances in very small areas of knowledge that can be useful in a very wide sense.
Within the classroom, the article has an interdisciplinary application. Environmental science and environmental education teachers, at secondary school or early college levels, can use it to illustrate and work with several basic concepts such as sustainability, carbon cycle processes and human influence, social structure changes or the importance of agriculture and soil conservation.
Some possible activities related to the article are:
- Students can work out a simple sustainability index for different resources (conventional plastics, bioplastics, agricultural soil, nitrate-based fertilisers, wood and forestry, oil, biofuels, and so forth) and use it to discuss its environmental consequences.S = NGa x (1 +RCr +RUr)
HUa + DaWhere: NGa =Natural genesis amount (mass/time)
RCr =Recycling rate (dimensionless, 0 to 1)
RUr =Re-use rate (dimensionless, 0 to 1)
HUa =Human use amount (mass/time)
Da =Degradation amount (mass/time) - Students can work out simple carbon-cycle models introducing the effects of bioplastics or biofuels.
- The article mentions the influence of bioplastics on the relationship between agricultural and industrial structures. Teachers can connect the concepts of biodiversity and social diversity with their influence on ecosystems’ and societies’ stability or survival.
- Bioplastics (and biofuels) need agriculture and soil. Teachers can explore the importance of soil conservation, erosion or contamination.>
- Students can evaluate the rate or amount of plastic disposal in their classroom and the group’s carbon footprint. Then, students can estimate the effect on their carbon footprint of shifting from conventional plastic to bioplastic.
- Teachers can help their students to draw parallel flow diagrams for the processes involved in the production and disposal of several products: bioplastic or petroplastic bottles, wood or metal tables, diesel or biofuels.
- Teachers can also use several indirect questions to work out how bioplastics can influence our lives. The following are just some examples: How can bioplastics help to save Antarctic glaciers? How can bioplastics help to avoid sea-level changes? How can bioplastics save birds that live in your town rubbish dump
Juan de Dios Centeno Carrillo, Spain


