


Modelling the DNA double helix using recycled materials Teach article
Dionisios Karounias, Evanthia Papanikolaou and Athanasios Psarreas, from Greece, describe their innovative model of the DNA double helix – using empty bottles and cans!

This project to construct a 3D model of a DNA molecule, using everyday materials, stimulated the students’ interest, encouraged teamwork, dexterity and the investigation of the properties of materials, and allowed the students to express their own opinions and solve problems. More specifically, students learned the basic structural elements of DNA and their 3D molecular organisation.
Molecular structure of DNA

The basic unit of DNA is the nucleotide, consisting of a phosphate group, a sugar molecule (deoxyribose) and one of four nucleobases (also known as bases): adenine (A), thymine (T), guanine (G) or cytosine (C).
The DNA molecule consists of successive nucleotides arranged in a double helix – a spiral ladder – the sides of which are formed from sugar and phosphate groups, with each step consisting of a pair of bases. The base pairs are formed from complementary nucleotides: adenine pairs with thymine, while guanine pairs with cytosine
The model
Each of the three constituents of the nucleotide were represented with 3D objects (see Table 1) which were connected to form a double helix with ten steps (base pairs). See below.
| DNA molecule | Model |
|---|---|
| Phosphate group | Coca Cola® can |
| Deoxyribose molecule | Sprite® can |
| Base | Plastic bottle |
Materials
Recycled materials
Our choice of materials reflected their abundance in the school recycling bins.
- 20 aluminium Coca Cola® cans
- 20 aluminium Sprite® cans
- 20 plastic Coca Cola bottles (500 ml)
- 60 red caps from Coca Cola bottles
- 10 plastic Fanta® bottles (500 ml)
- 20 orange caps from Fanta bottles
- a thin piece of paper or plastic, approximately 1 m long.
Additional materials
- 6 m thin rope
- 20 plastic drinking straws
- 20 nuts and thin double-threaded bolts
- 4 sheets of coloured confectionery cellophane (blue, green, red and yellow).
Tools
- Scalpel or sharp knife for cutting the plastic bottles
- Thick nail for the making holes in plastic and aluminium
- Small pliers
- Stapler
- Two pieces of thin telephone cable, about 40 cm long, for passing the rope through the straws.
Method
First, each of the three nucleotide constituents (deoxyribose, phosphate and base) are modelled, reflecting the geometry of the molecule as far as possible. Next, the components are assembled to form nucleotides and the DNA helix is constructed.
Puncture the aluminium cans and the bottle caps with the same nail. Heating the nail will enable the caps to be more easily pierced. Choose a suitable thickness of nail to enable the plastic drinking straws to pass through the holes and fit firmly, creating a stable link between the structural elements.
Deoxyribose
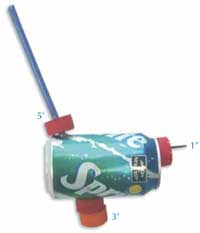
Deoxyribose is modelled with a Sprite can with three red bottle caps attached, representing the carbon atoms at the 1’, 3’ and 5’ positions. An orange bottle cap at position 3’ represents the hydroxide that will be connected to the next nucleotide.
- Puncture the can in positions 1’, 3’ and 5’, as shown below.
- Puncture four bottle caps (three red and one orange) in the centre.
- Using a nut and bolt, attach a red cap firmly in position 1’ so that a bottle can be screwed on.
- Firmly attach two caps, one red and one orange, to one end of a straw (first the red, then the orange).
- Pass the straw through the can, using holes 3’ and 5’.
- Fix the can to the straw, threading another red cap to the side of the can in position 5’. The final result can be seen to the left.
Phosphate group

Using the same nail, puncture the centre of the Coca Cola can base, which represents the phosphate group. Thread the straw attached to the Sprite can (deoxyribose) through the Coca Cola can (phosphate group), with the top of the Coca Cola can closest to the Sprite can. The phosphate group is now attached to the deoxyribose in position 5’ (see left).
The straw connects the two cans, and also makes it easy to pass the thin rope through both cans, connecting the nucleotides into a molecule chain (see below). For this reason, it is important not to bend the straw. To maintain the correct scale between the molecule and the model, the distance from the base of the Coca Cola can to the orange cap should be 23 cm.
Complementary base pairs
Next, plastic bottles representing the bases are modelled so that they can only be connected to their complementary base (adenine to thymine, and guanine to cytosine).
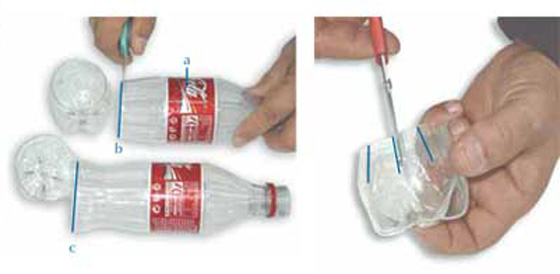
To construct two complementary base pairs, cut two Fanta bottles and three Coca Cola bottles in cross-section, using the scalpel and scissors. Take care!
- Remove the base of two Coca Cola bottles (incision c below)
- From the third Coca Cola bottle, remove
- the neck, cutting 10 cm below the mouth (incision a) and
- the lower part of the bottle, cutting 4 cm above the base (incision b).
Using scissors, make five to six incisions, 2 cm long, in the neck and the base of the third Coca Cola bottle. These can then open to allow other bottles in (see below).
Using these building blocks and the coloured cellophane, the structural elements that represent the bases can be created.

Thymine (T)
Place green cellophane in a Coca Cola bottle without a base.
Adenine (A)
To the base of a Fanta bottle, attach the neck of a Coca Cola bottle. Place blue cellophane inside both parts.
Thymine (T), represented by the colour green, is connected by two hydrogen bonds to adenine (A), represented by the colour blue. To model this, push the blue neck firmly into the green bottle without the base.
Guanine (G)
Place red cellophane in a Fanta bottle.
Cytosine (C)
Place yellow cellophane in a Coca Cola bottle without a base. Firmly attach the base of another Coca Cola bottle, upside down.
Guanine (G), represented by the colour red, is connected by three hydrogen bonds to cytosine (C), represented by the colour yellow. To model this, open the base of the yellow bottle (cytosine) along the incisions to allow the base of the red bottle (guanine) to enter and lock firmly.
For symmetry and the scale of the model, the two pairs of linked complementary bases should be 42 cm long. Each coloured bottle is screwed into the bottle cap (carbon) at position 1’ of a deoxyribose molecule, forming four different nucleotides (see below).

This representation of the hydrogen bonds enables the easy connection and detachment of complementary bases. This, in turn, facilitates not only the separation of the DNA strands but also the change in position of bases for teaching purposes.
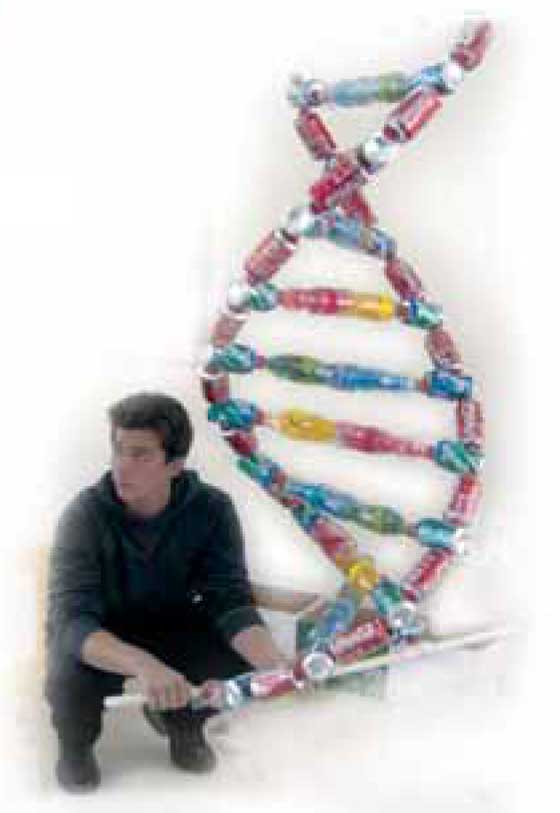
Constructing the DNA molecule
Having constructed 20 nucleotides, we can build a double helix with 10 steps – two strands of 10 nucleotides each. Because the distance from the end of the Coca Cola can (phosphate group) to the orange cap (hydroxide linked with the next phosphate group) is 23 cm, the strand of 10 nucleotides will be 2.3 m long.
Attach the telephone cable to approximately 3 m of the thin rope and use the stiff cable to pass the rope through the straws of the nucleotides to form two strands of molecules, which are hung vertically 2 m high and 65 cm apart. The two strands of the DNA molecule are read in the direction 5’ to 3’ and are anti-parallel. In the model, the direction in which we read the word Coca Cola coincides with the direction 5’ to 3’. Thus, in one of the strands, the words Coca Cola can be read from top to bottom and in the other strand, from bottom to top. Our model DNA strands are thus also anti-parallel.
We must also make sure that the bases on one strand are complementary to those on the opposite strand. Adenine should be opposite thymine and cytosine opposite guanine.
If these criteria have been met, tie a paper roll at the end of each strand so that a thin bar can be passed through the roll and used to twist the linked strands clockwise, 360 degrees (see below).
Scale
The model represents a DNA molecule at a scale of 320 000 000:1, that is, 320 million times bigger than it really is. If we tried to represent an entire human DNA molecule with our model, we would need a double helix 640 000 km long, capable of wrapping around Earth’s equator 16 times.
| DNA molecule | Model | |
|---|---|---|
| Diameter | 2 nm | 0.65 m |
| Helix step | 3.4 nm | 1.1 m |
| Helix length | 7.14 nm | 2.30 m |
| Helix length: diameter | 3.57 | 3.53 |
| Helix step: diameter | 1.7 | 1.7 |

Using the model in class
The model was constructed and used in three phases over one to two weeks.
Phase 1: Constructing the model
Students aged 14 followed the construction directions with interest and were involved in resolving practical problems.
Phase 2: Representing a DNA molecule
In the appropriate unit of their biology course, students aged 15 were given a worksheet where they recognised and matched the prepared structural materials of the model with those of the DNA molecule as illustrated in their textbook. They composed and twisted the double chain of the model. They asked a lot of questions and had an intense and interesting discussion.
Phase 3: Copying a DNA molecule
In their free time and as a theatre game, the same 15-year-old students pretended to be suitable enzymes and, with the help of the model, performed the following steps:
- Splitting hydrogen bonds between the complementary bases, from the top of the molecule until the sixth base (bottle) pair on the model (enzyme: DNA helicase).
- Separating the two strands.
- Beginning to create daughter strands complementary to the parental strand (DNA polymerase).
- Splitting the rest of the hydrogen bonds.
- Creating daughter strands complementary to the parental strand (DNA polymerase).
- Checking for possible errors and correcting them if necessary.
Review
Students learn much more quickly and easily when they are actively involved in the lesson. Teaching the structure of DNA is made much easier if a 3D representation of the molecule is used. Jigsaw puzzle-type activities give a 2D picture, but it is difficult to visualise the shape of the molecule. This ingenious project describes how a scale model of DNA can be made using cans and bottles. It would be easy to collect the materials required to make this model, as students could recycle cans and bottles.
It may be a good idea for a technician or teacher to do some of the preparation work; this would decrease the amount of time needed in the lesson as well as addressing safety considerations with the use of a hot nail to puncture the bottle tops and a sharp implement to cut the plastic bottles. Alternatively, the model could be made in a design-technology class and then used in biology lessons. Group work could be designed so that teams race each other to prepare a DNA model. The model could be used as a teaching tool to demonstrate DNA replication, either in mitosis or in the polymerase chain reaction. The fact that the model is to scale will help the students appreciate the spatial relationship of the components of the DNA molecule. I feel that students will enjoy learning about DNA using this idea, which means that the lesson will be both understood and remembered.
Shelley Goodman, UK