


Primary circuses of experiments Teach article
Catch them young! Alex Griffin, Tim Harrison and Dudley Shallcross from the University of Bristol, UK, show how important it is to interest young children in science – and how much fun it can be!
Alex was in the final year of her chemistry PhD….
“The pressure is on: I’ve not finished the laboratory work yet and time is running out. I’ve got a million-page thesis to write and money is running out too. ‘How do you relieve this tension?’ I hear you ask. Well, I try and distract myself by ‘reaching out’.
It’s not some new-age relaxation technique but Bristol ChemLabSw1 – a programme run by the University of Bristol’s chemistry department to take science, chemistry in particular, to the masses. We want to dispel some myths about science being dull, boring, dangerous and/or harmful and also to let the general public see what we really get up to. One of the things we do is visit primary schools.
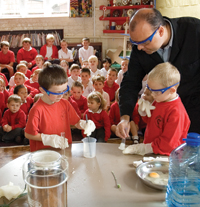
We start by loading all the equipment, including balloons filled with hydrogen and helium gas, into Tim Harrison’s fortunately large car. On arriving at the school, we unpack and commandeer the school hall for a full demonstration. The children (4-11 years old) file in, staring in wonder and excitement. Once they’ve settled down, with the front rows provided with safety glasses – for effect rather than necessity – Tim gets going. He tests their knowledge by asking the pupils which constituent gases are found in the air. Then he stuns them with liquid nitrogen experiments, dumbfounds them with colourful reactions, makes them giggle with a fountain of bubbles (thank goodness for washing-up liquid) and finishes by exploding the hydrogen balloons with a flame. Of course, we have audience participation for this part. The audience cheer for the fireball, when the hydrogen balloon is set alight, and boo for the boring inert helium balloon which just pops!
The excitement is over for the moment and we clear up the hall while Tim answers questions from staff and children. We have just enough time for a cup of tea and then it continues….
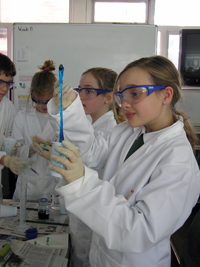
For two classes of 9- to 11-year-olds, we have a set of three experiments around which the children rotate, so everybody gets a chance to do all three. I kit the children out in children-sized lab-coats, safety glasses and disposable gloves (they love this!) and get them to team up and dissolve ribbons of magnesium in different concentrations of hydrochloric acid. They measure the time taken for the metal to dissolve, then collect the gas and ignite it so it makes a ‘pop’. The other experiments involve making a colourful polymer – also known as slime – and the iodine clock reaction (see below). The teachers don’t get off lightly either: we put them in lab coats make them join in all the experiments. It surprises me that the children are all so confident and inquisitive: I have to think long and hard when answering some of their questions.
These sessions are about having fun while learning a bit about chemistry, but we do introduce an element of competition. The team with the highest accuracy in the iodine clock experiment wins a Bristol ChemLabS Periodic Table mouse-mat or mug!
Exhausted but still buzzing, we pack up, drive back to the university and unload. What a way to relax!”
Primary school-university links: a win-win situation?
There are few reasons why chemistry or science workshops cannot be held for primary schools as long as funding and expertise are available. In many countries, primary schools have strong ties with higher educational establishments or their local secondary schools. It should be possible for individual or clusters of schools to seek grants for additional equipment to share or to pay for appropriate groups to come into schoolsw2. The necessary equipment for the most commonly used workshops is listed in the box.
University science departments have resources that primary schools could use, with minor adaptation. Although there is always a financial or time investment in building up a relationship between the university and a few local primary schools, we feel this has huge benefits for both parties. Postgraduate scientists, and even academics, get the opportunity to plan and deliver activities to engage the public in science. The primary schools are introduced to new resources and role models, which has many benefits for teachers as well as pupils. Indeed, in our experience there can even be a three-way benefit in cases where secondary schools host the workshop events for local primary pupils by using a mixture of university personnel and their equipment and involving several of the school’s senior science students.
“The pupils spent ages afterwards talking about their favourite demonstration (mainly the washing-up liquid foam one). They were very animated and clearly in awe of what they had seen. Even those younger children who cried [due to a minor – intended – explosion] thought it had been great.”
“[Tim] did some experiments with carbon dioxide and liquid nitrogen, eggs, flowers, gloves, rubber tubing, etc., which have converted … 240 children in half an hour – including all of the ‘uncool to learn’ crew! We are now changing our curriculum to include more of such activities. Schools need lots more of the same. It was wonderful to see the children so motivated.”
Two teachers
“I did not know that gases could freeze.”
“I really want to be a scientist when I am older.”
Year 3 pupils (ages 7-8)
“I had expected them to gasp in amazement at the pretty colours, steaming vacuum flasks and loud explosions that Tim created in the school hall but it was their reaction to the classroom experiments that impressed me most. Despite their obvious excitement, their behaviour was exemplary and they were a real credit to the school. Plus, by the end of the final 30-minute session, every pair in my group was able to predict to the nearest second a fairly complicated clock reaction! From the kids’ point of view, we definitely succeeded in making science ‘cool’!”
A postgraduate chemistry student, after helping out at a primary workshop for the first time
Necessary equipment
Bristol ChemLabS’s equipment for primary-school workshops includes:
- 60 lab coats in child, small adult and medium adult sizes
- 50 pairs of adult safety glasses and junior goggles
- 400 pairs of disposable rubber gloves in varying sizes
- Plastic beakers, measuring cylinders, stirring rods
- 250 disposable (non-brittle) plastic cups
- Stopwatches
- Laminated instruction sheets (wipe clean/dry)
- Glass boiling tubes and racks
- Mobile Bunsen burner (fuelled by butane), spills and matches
- Many rolls of laboratory roll or kitchen roll
- Large waste bags
- Electric kettles
- Eye wash bottle
The apparatus, storage boxes, chemicals, and other consumables for the day’s visit cost about UK£4000, including the equipment for the morning presentation to the whole school.
Practical details for the chemistry workshops
A classroom (with a sink) is easily converted into a temporary laboratory. Although we offer several experiments, the most popular ones are those designed to increase measurement, investigatory and cooperation skills and an increased awareness of chemical safety. These are described below.
Many secondary-school teachers may recognise the experiments, but the purpose of running them in primary schools is not to get the pupils to produce written records. They may do this later with their teachers, but the main point is to show the children how exciting and how much fun science can be.
Note: All chemical use should have a risk assessment made by the people conducting the experiment and must take into account local conditions. Primary teachers who do not have a background in chemistry may feel more comfortable obtaining the following solutions from colleagues in their local secondary school.
Investigating the properties of slime and polymorph
Slime is made by mixing borax and poly(vinyl alcohol) (PVA) solutions, then adding a few drops of food colouring. Changing the proportion of borax changes the physical properties of the slime. This (rather yucky) experiment is very popular with children.
Polymorph is a thermoplastic that can be moulded at the comparatively low temperature of 62°C.
Materials
For two classes of 35 pupils working in pairs, you will need 3 l of PVA solution and 2 l of borax solution.
To make 1 l of PVA solution:
- Take 40 g of poly(vinyl alcohol) and add water until the total volume is 1 l.
- Stir while heating from 40° to 90°C in water (allow 1 h).To speed up the process, cover the beaker in tin foil to keep the heat in.
To make 1 l of 4% borax solution:
- Take 40 g of borax and add water until the total volume is 1 l.
- Stir.
Note: Borax is also called sodium borate or sodium tetraborate, and is widely used in detergents, water softeners, soaps and disinfectants.
Polymorph can be bought from Middlesex University Teaching Resources, UK for about €30/kg. Allow 4-5 g per pupil (in individual tubes).
Method
Pupils should:
- Pour PVA solution to a depth of about 1 cm into a disposable plastic beaker (there is usually a convenient marking on the beakers we use: the PVA solution is too viscous to make sensible use of a measuring cylinder).
- Optional: add 3-5 drops of food colour and stir.
- Add a carefully measured volume of borax and stir it in.
Initially, tell each pair of pupils to use a fixed volume of borax – between 4 and 10 ml. - Wearing gloves, scoop out the slime and investigate its tactile properties by stretching it.
Introduce the pupils to the thermoplastic polymorph. This comes as colourless granules which, when put into hot water (over 62°C), can be moulded into interesting shapes such as fish, birds or – for the less imaginative – balls. The balls made from this material bounce differently depending on whether the polymer is still warm or has reformed its bonds in the coloured form.
The iodine clock experiment
With this experiment, the children investigate dilution and learn how to measure volume accurately to make the chemical reaction change colour after exactly 30 seconds. We run this activity as a competition, which adds to the fun.
The experiment uses two solutions referred to simply as solution A and solution B (see below). We do not confuse the issue with the names of the chemicals used. Students have three small beakers half-filled with solution A, solution B and water (W) and appropriately marked measuring cylinders to avoid contamination.
Materials
For two classes of 35 pupils, you will need 4 l of each solution.
To make 4 l of solution A, mix the following chemicals and add water until the total volume is 4 l:
- 0.2 g soluble starch
- 30 ml ethanoic acid (glacial acetic acid)
- 4.1 g sodium ethanoate (acetate)
- 50 g potassium iodide
- 9.4 g sodium thiosulphate
To make 4 l of solution B, take 200 ml (30%, also described as 100 Vol) hydrogen peroxide and add water until the total volume is 4 l.
Method
Make sure that each pair of students has the correct equipment and can operate a stopwatch, then demonstrate the reaction without dilution. Mix 15 ml of solution A and solution B together. The mixture will turn black after several seconds.
Discuss the effect of adding water to the mixture. Use terms such as ‘less concentrated’ and ‘more dilute’ in the explanation, to give the pupils a mental model of what is happening. Give all instructions verbally to maximise the time spent doing the practical.
Set the children the challenge of making the mixture turn black at a set time – set a target that is between 30 and 60 seconds. Give each pair of children a different time to achieve.
Although the experiment is not strictly a fair test, as both the volume and concentration of the mixture changes, it does excite the pupils as well as giving them practice in measuring, investigating and how to work in a team. If necessary, you could offer a reward to the best pair.
It can be made more complex for secondary-school students, for example by insisting that solution B is diluted such that the same volume of solution B is used each time – which is of course more scientifically appropriate.
After the experiment, carefully pour the iodine solution that has been produced into a sink and wash it away. Wipe and reuse the beakers. If you do not have a sink, use a waste bucket (containing sodium thiosulphate crystals to react with the iodine) and dispose of the solution in a toilet at intervals.
Acid dilution
The pupils enjoy investigating the effect of diluting an acid on its reaction with magnesium, especially because they get to collect the hydrogen and set it alight (with a loud pop) at the end.
Materials
- Magnesium ribbon cut into 2 cm strips. Each student will need 5 pieces.
- Approximately 2 l of each of four concentrations of hydrochloric acid (HCl), see below.
| Approximate concentration (molar, M) | Volume of 11 M hydrochloric acid (ml) | Volume of water (l) |
|---|---|---|
| 2.0 | 364 | 2 |
| 1.5 | 273 | 2 |
| 0.1 | 182 | 2 |
| 0.5 | 91 | 2 |
Method
Pupils should:
- Measure 10 ml of one of the acid solutions and put it into a boiling tube.
- Add a piece of magnesium, start a stopwatch and stop it when the fizzing stops.
- Tabulate their results and convert the times into seconds.
- Towards the end of the session, use the fifth pieces of magnesium and trap the liberated hydrogen gas in a second boiling tube, then use a lit wooden spill to ignite the gas safely.
- Compare the results of their experiment with the explosion of the hydrogen balloons in the school hall.
When we do the experiment, the postgraduate scientist shows the pupils how to ignite the gas and supervises them carefully while they do it themselves.
Web References
- w1 – For more information about Bristol ChemLabS, see: www.chemlabs.bristol.ac.uk
- w2 – A list of sources of potential funding for schools activities in the UK can be downloaded from the Bristol ChemLabS website: www.chemlabs.bristol.ac.uk/outreach/resources/
- Editor’s note: If you know of a similar list of funding sources that apply to other European countries, email the web link to editor@scienceinschool.org and we can include it on the Science in School website.
- w3 – Middlesex University Teaching Resources website: www.mutr.co.uk
Resources
Details of some of Bristol ChemLabS’s activities for secondary schools are described in:
- Harrison T, Shallcross D (2006) Perfume chemistry, sexual attraction and exploding balloons: university activities for school. Science in School 3: 48-51.
Review
This article describes visits by university students to primary schools to do chemical experiments, motivating the pupils, inspiring interest in chemistry, and provoking astonishment and joy.
There are detailed descriptions of the experiments, which could be used even by teachers without extensive experience in chemistry or access to a laboratory. I will definitely do the iodine clock experiment with my chemistry students.
Sølve Tegnér Stenmark, Norway