


Which laundry enzymes work best? Teach article
Investigate how enzymes in your laundry detergent get rid of stains – and which are most important for keeping clothes clean.
Supermarket shelves are stocked with an overwhelming variety of laundry detergents, with many products promoting the ‘powerful’ performance of enzymes for ‘superior’ stain removal. But beyond the eye-catching claims, how does one laundry detergent really differ from another? And is there an advantage to using those that contain enzymes?
The composition of laundry detergents
Detergents are made up of a mixture of substances, but most importantly contain chemicals called surfactants that break up and remove dirt. Surfactants – which include common hand soap – are usually amphiphilic, meaning that one end of the molecule is hydrophilic (it is attracted to water) and the other is hydrophobic (it repels water). The hydrophobic end sticks to the surface of oily dirt, while the hydrophilic end attaches to water. Water molecules pull the surfactant away from the clothes – taking the dirt with them – to be washed away at the end of the washing cycle.

break up and remove dirt.
Bowonpat Sakaew/
Shutterstock.com
Surfactants alone, however, are not enough to keep clothes clean and smelling fresh, so laundry detergents often contain a host of other ingredients, such as optical brighteners, perfumes and enzymes. To distinguish between a detergent that contains enzymes and one that does not, products use the terms ‘biological’ and ‘non-biological’ respectively. But do enzymes really improve cleaning power?
Enzymes provide extra help to break down stains that are otherwise hard to remove. The main advantage of using a biological detergent is that it is effective at lower temperatures and in quick washes, which saves time, energy, water – and money. There are four major classes of detergent enzymes, each with a different use: proteases remove protein stains; lipases break down fatty materials; amylases remove stains from starch-based food; and cellulases break down the small cotton fibres that form on the fabric surface during use, helping to release dirt and keep the fabric smooth. Most biological detergents combine enzyme types – often using proteases and lipases – to improve their overall performance.
If small amounts of biological detergent remain on clothing, however, they can irritate sensitive skin. For this reason, the use of non-biological detergent is preferred in some situations, particularly for washing clothes for babies. For tackling tough stains, however, non-biological detergents often need to be used at a higher temperature.
Investigating the effectiveness of enzymes
This activity helps students to learn about different enzymes and their properties, and encourages them to evaluate the use of enzymes in laundry detergents. By washing a variety of stains with detergents to which they have added different ‘mystery’ enzymes, students guess the enzyme type based on the effectiveness of the detergents they have created. In addition, students test their detergents at three different temperatures to examine how this affects the performance and to see that some enzymes are denatured (and therefore no longer work) at high temperatures.
For the enzymes, we suggest using protease, lipase, amylase and cellulase. The enzymes can be ordered from a scientific laboratory supply company. To keep the enzymes secret from your students, label them A–D before the lesson.
We recommend that students work in groups of eight. Within each group, students work mostly in pairs, with the group combining their results at the end of the activity to draw their conclusions. Students can check these conclusions by completing the extension activity (testing for the presence or absence of particular enzymes) or, if time is limited, you can simply reveal which enzymes are which.
Once you have introduced the investigation to your students, they can work through the instructions set out in the following activities.
Activity 1: Making the stains
Start by creating some stained samples of fabric. You will use these samples in activity 2 to test the effectiveness of various detergents. Ideas for staining substances include beetroot juice, coffee, lipstick, starch solution, paint, permanent marker, olive oil, egg, wine and melted chocolate. This part of the activity takes approximately 30 minutes.
Materials
- White cotton fabric (e.g. old white T-shirts or muslin cloths)
- Staining substances
- Scissors
- Pipette or dropper (optional)
Procedure
- Within your group, choose four different staining substances to test and assign each one to a pair of students. Make sure to include substances to test for protease, lipase and amylase, such as egg, olive oil and a starch solution, respectively.
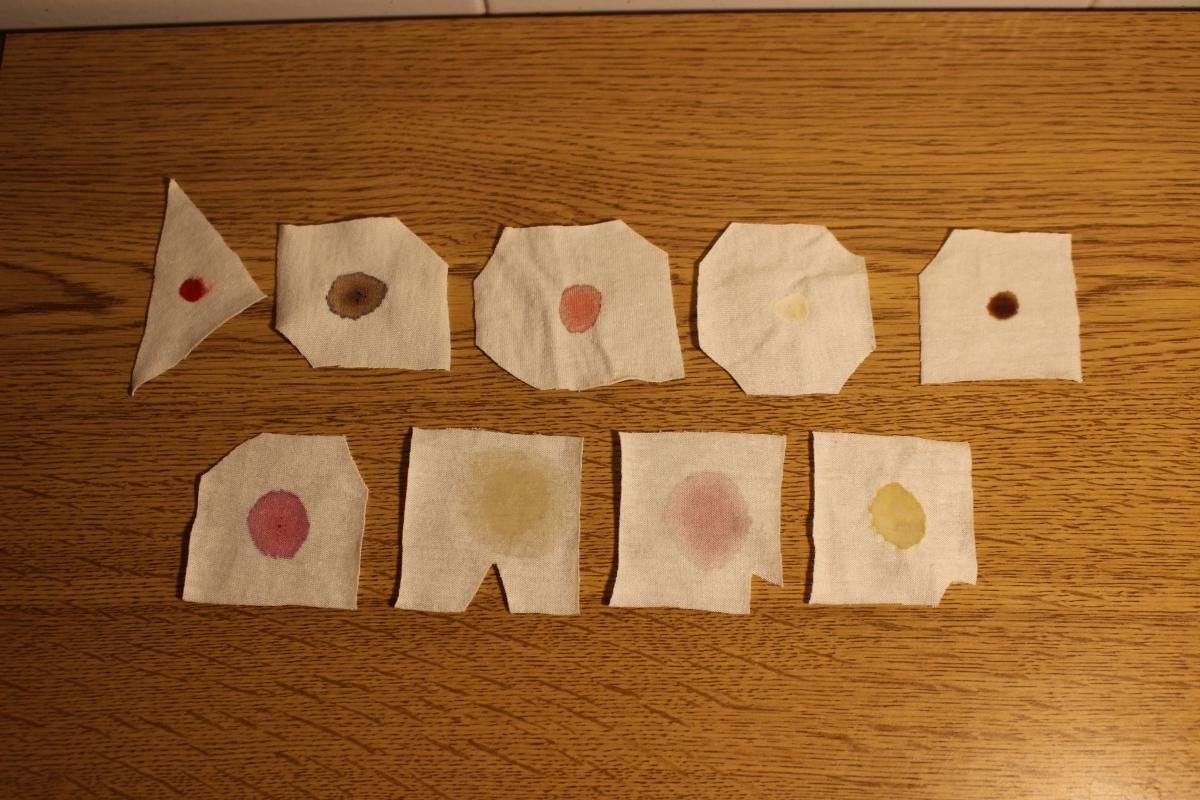
- In your pairs, cut up the cotton fabric to create 24 pieces. With these pieces, you will test four separate enzymes, two enzyme mixtures, and two control solutions, all at three different temperatures. Make each piece roughly 5 cm x 5 cm. To distinguish your samples from those of other pairs in your group, cut them into a distinct shape.
- In your pairs, stain all 24 pieces of fabric with your assigned staining substance. Your stains (and the stains of your whole group) should all be a similar size, using the same amount of each substance. For greater precision, use a pipette or dropper for liquid substances.
Mariona Lladonosa Soler
Activity 2: Testing the detergents
Within your group, create the biological detergents by mixing the enzymes with non-biological detergent and water. You should test each of the four enzymes separately (e.g. A only, B only, C only, D only), and also create two additional biological detergents by mixing enzymes together (e.g. A and B, or B and C).
To predict which enzyme is which, test the performance of each enzyme-containing detergent on each of the stained fabrics. Each detergent should be tested at room temperature (around 20°C), and at 40°C and 70°C. In addition, carry out two more tests to act as controls: one using only water, and one using a solution of water mixed with non-biological detergent (i.e. no enzymes). In total, this part of the activity takes approximately 1 hour.
Materials
- Stained fabric samples
- Non-biological detergent
- Enzymes A–D
- Water
- 1 litre beakers
- Weighing scales
- Stopwatch
- Water bath or hot plate
- Thermometer
- Glass stirring rod
- Magnetic stirrer (optional)
- Hair dryer (optional)
- Permanent marker
Safety note
A lab coat, gloves and goggles should be worn. Take care when handling the solutions at high temperatures.
Procedure
- Within your group, create three 1-litre solutions for your first biological detergent: mix 3 g of non-biological detergent and 1 g of enzyme A in a beaker of 1 litre of water. Also create three batches each of the control solutions: 1 litre of water with 3 g non-biological detergent; and 1 litre of plain water.
- Starting with a solution of enzyme A at room temperature, place one of each of the different stained fabric samples (e.g. four in total) into the beaker.
- Start the stopwatch, and stir the solution as consistently as possible with a glass stirring rod for 5 minutes. Alternatively, you could use a magnetic stirrer, if available.
- After 5 minutes, pour out the solution, squeeze any excess water out of the fabric samples and leave them to dry. If needed, use a hair dryer on the cool setting to speed up the process. Using a permanent marker, label each piece of fabric to indicate the detergent that was used (e.g. with the letter A), and note what temperature they were tested at (e.g. room temperature).
- Repeat the procedure at 40°C and 70°C by heating two other beakers of enzyme A solution in a water bath or using a hot plate. Check the temperature is correct using a thermometer before adding the stained fabrics and stirring. Remember to label the fabric samples accordingly.
- Repeat steps 1–5 for each of the detergents for enzymes B–D, your two control solutions, plus your two chosen enzyme ‘cocktails’.
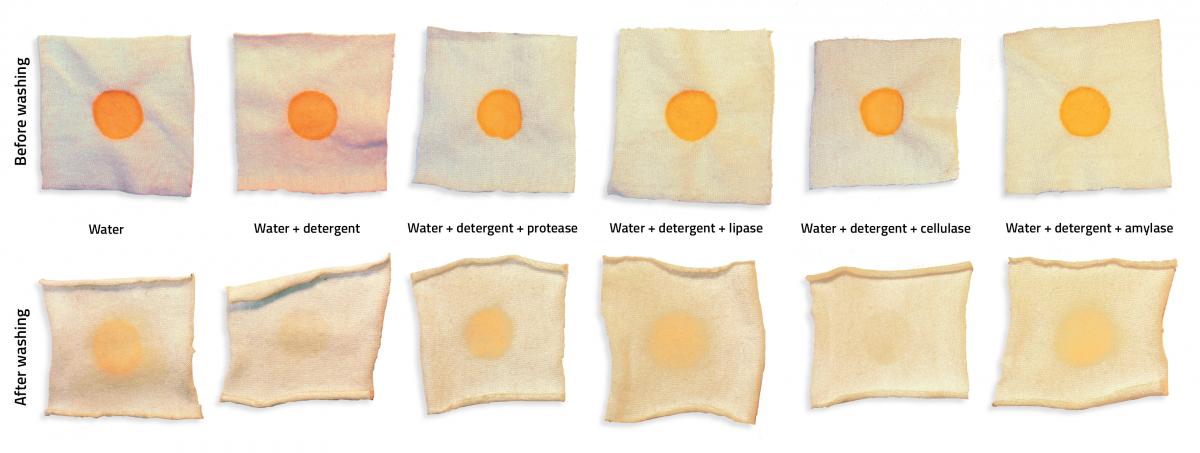
- Once you have tested all of the solutions, compare your results.
For each stain, which detergents work best? What does this tell you about the enzymes you used? Keep a note of which enzymes you think were in each detergent, so you can check against the answers later.
Discussion
Discuss some of the following questions in your groups:
- What is the effect of enzymes on the performance of laundry detergent?
- Is detergent more effective with or without enzymes?
- Why were some detergents not effective at removing the stains?
- Which stains were hardest to remove? Why might that be?
- How does water temperature affect the performance of detergents?
- What are the advantages of using enzymes in detergent?
- Why can biological detergents remove stains from fabric at lower temperatures than normally used with non-biological detergents?
- What are the advantages and disadvantages of using biological detergents?
Mariona Lladonosa Soler
Extension activity: Detecting enzymes
The following procedures can be used to test which enzyme is which. Each procedure takes approximately 15 minutes to prepare.
Method 1: Protease
Protease catalyses the breakdown of long protein molecules into shorter fragments called peptides. When protease is added to gelatine (a protein commonly used as a gelling agent in food), the protein molecules are broken up into peptides, so they no longer intertwine to create a semisolid structure.
Materials
- Enzyme solutions A–D (1 g of enzyme per 500 ml of water)
- Test tubes (one for each enzyme)
- Gelatine
- Water
- Permanent marker
Procedure
- Prepare the gelatine gel by mixing 50 g of gelatine with 500 ml of boiling water.
- Fill the test tubes each with 10 ml of the gel and place them in a fridge.
- When the gel has solidified (usually after approximately 2 hours), mark the level of the gel on the test tubes using a permanent marker.
- Add 5 ml of enzyme solution to the test tubes (one enzyme per tube) and label each test tube according to the enzyme (e.g. A, B, C and D).
- Return the test tubes to the fridge for 24 hours before marking the level of the gel again.
- Compare the levels before and after adding the enzymes to determine which one is protease. If protease is present, the level of gel in the test tube will decrease noticeably (see figure 1).
Mariona Lladonosa Soler
Method 2: Lipase
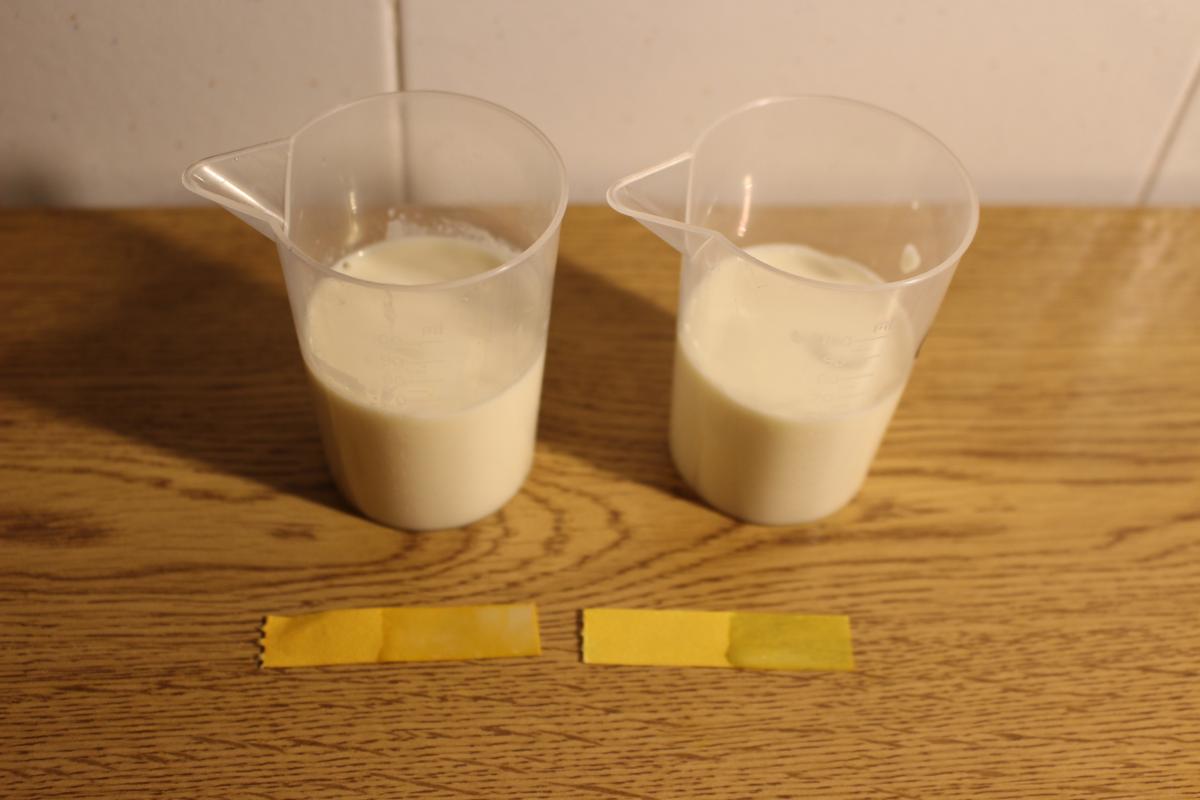
Lipase breaks up lipids into fatty acids and glycerine, which causes the pH of the solution to decrease. The easiest way to prove the presence of lipase is to identify this decrease using pH indicator strips.
Materials
- Enzyme solutions A–D (1 g of enzyme per 500 ml of water)
- Test tubes (one for each enzyme)
- pH indicator strips
- Double cream or whipping cream (a high fat content is best)
- Dropper
- Permanent marker
Procedure
- Add 10 ml of each enzyme solution to the test tubes and label them accordingly (e.g. A, B, C and D).
- Add 50 ml of cream to each test tube and mix well.
- Check the initial pH of each mixture with an indicator strip.
- Wait approximately 2 hours and check the pH again.
- Compare the before and after pH indicator strips for each enzyme to determine which one is lipase (see figure 2).
Mariona Lladonosa Soler
Method 3: Amylase
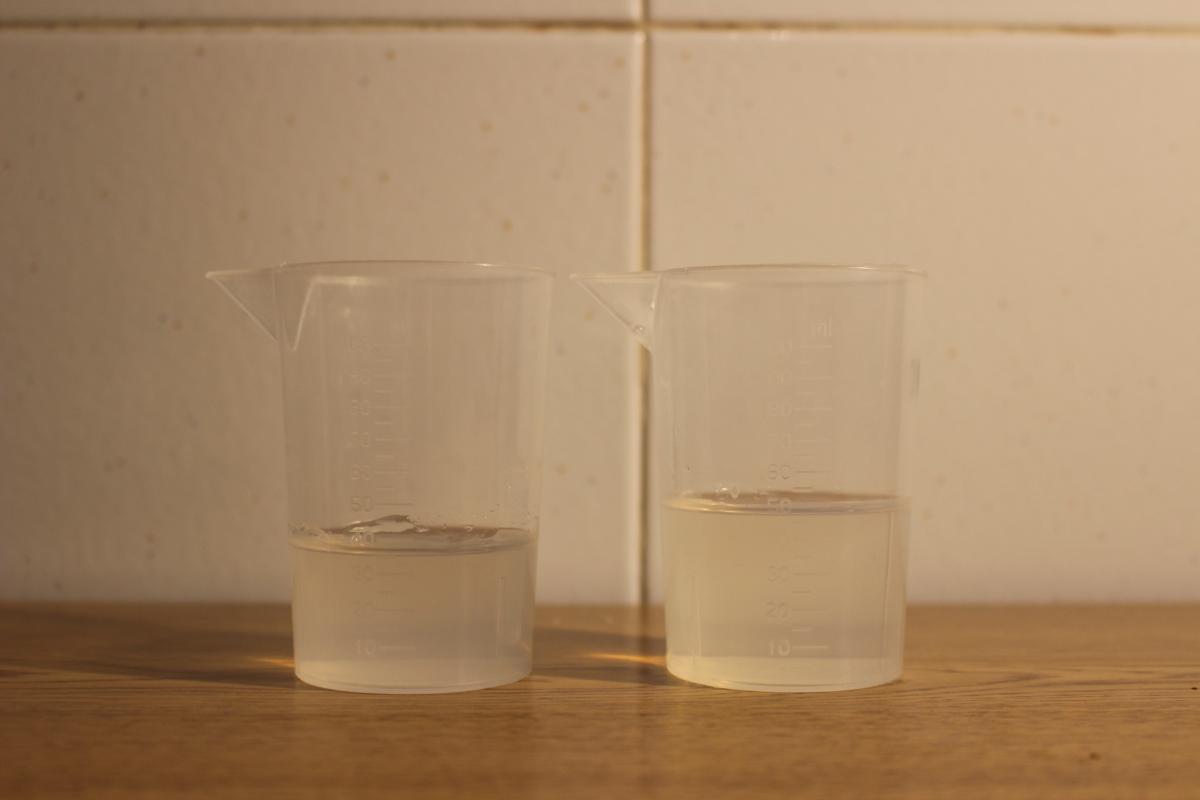
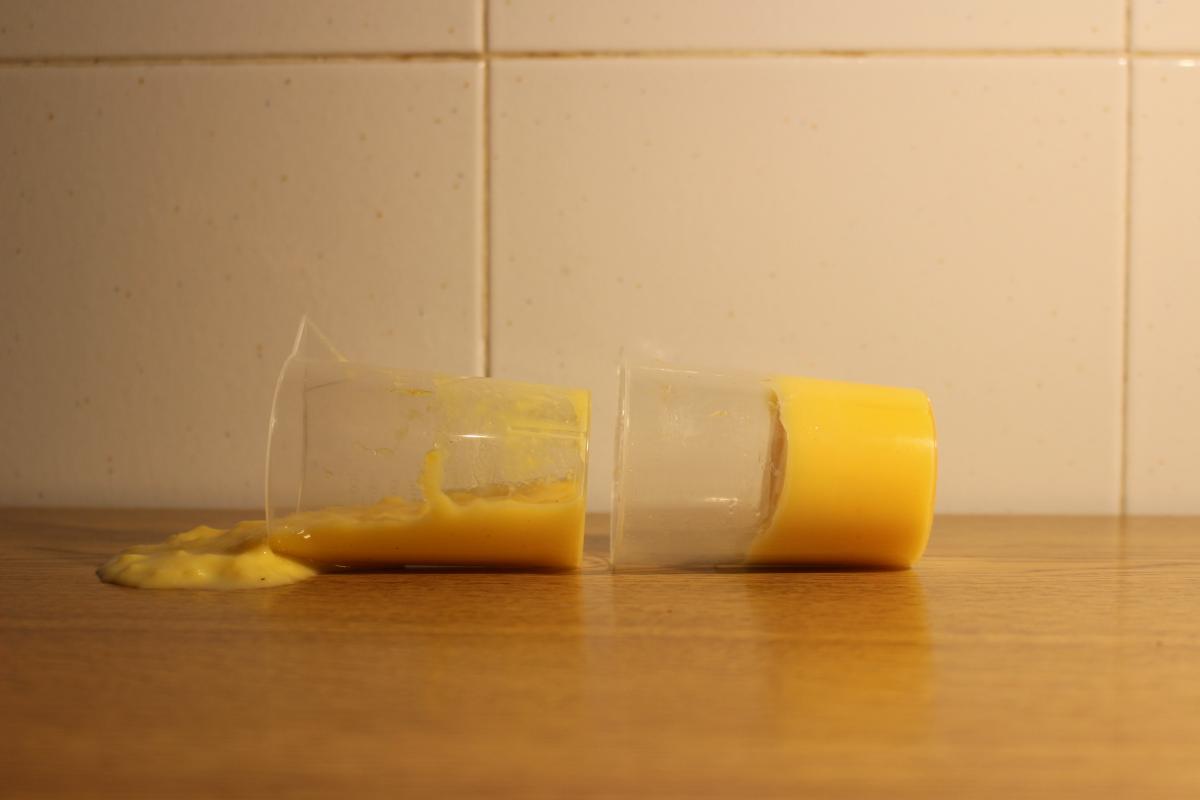
Amylase catalyses the hydrolysis of starch into sugars. You can test for the presence of amylase by adding the detergents to a creme caramel flan mix, which traditionally contains corn starch to act as a thickening agent. If amylase is present, the flan will remain liquid and not set, because the enzyme breaks down the starch, preventing the dessert from thickening.
Materials
- Enzyme solutions A–D (1 g of enzyme per 500 ml of water)
- Test tubes (one for each enzyme)
- Creme caramel flan mix (ensure that the ingredient list includes starch)
- Permanent marker
Procedure
- Prepare the dessert as per the flan mix instructions.
- Add 10 ml of each enzyme solution to the test tubes and label them accordingly (e.g. A, B, C and D).
- Add 50 ml of the flan mixture to each test tube and mix well.
- Leave the mixture in the fridge to set for approximately one day, or until a change is visible.
- Compare the test tubes to determine which enzyme is amylase (see figure 3).
Mariona Lladonosa Soler
Method 4: Cellulase
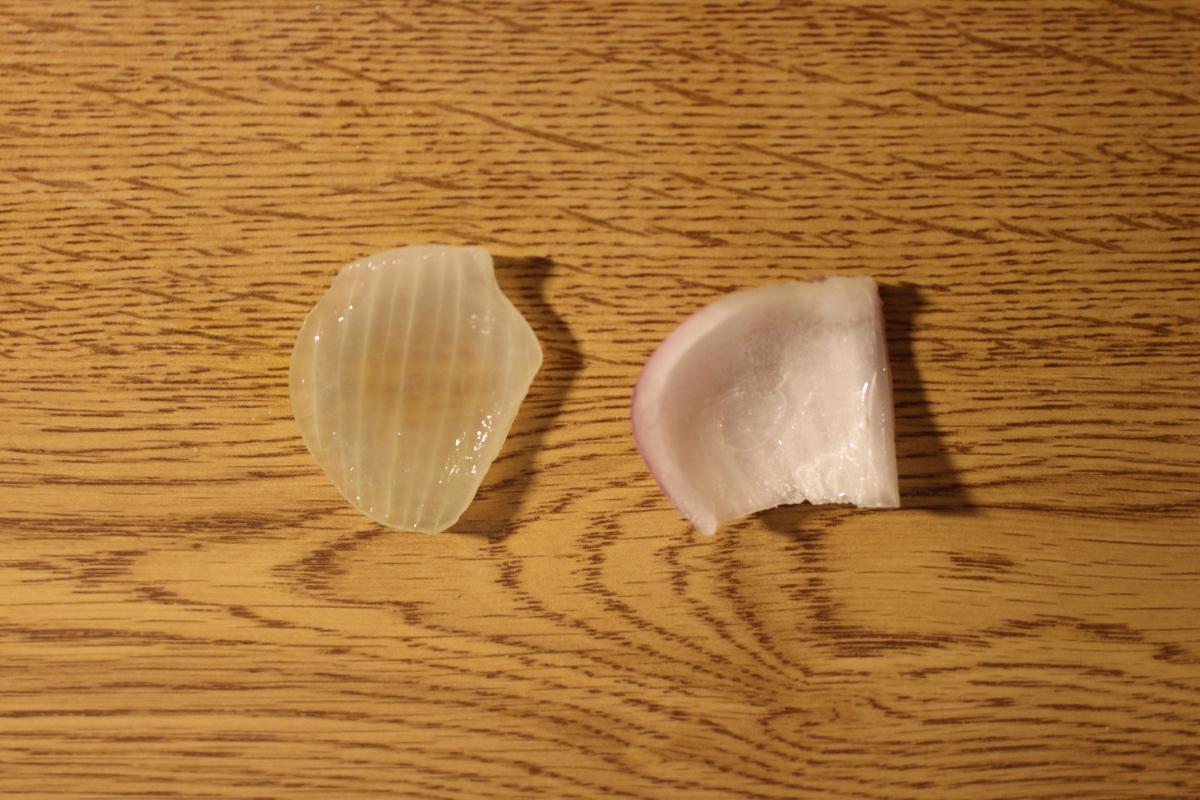
Cellulase catalyses the decomposition of cellulose into glucose monomers. One way to test for the presence of cellulase is using an onion. Since the cell walls of an onion are composed of cellulose, mixing the onion with detergents that contain cellulase will result in the walls decomposing, turning the onion transparent.
Materials
- Enzyme solutions A–D (1 g of enzyme per 500 ml of water)
- Test tubes (one for each enzyme)
- Onion
- Knife
- Water
- Permanent marker
Procedure
- Cut the onion into pieces, approximately 3 cm x 3 cm.
- Place one piece of onion into each test tube.
- Add 30 ml of each enzyme solution to the test tubes to cover the onion, and label them accordingly (e.g. A, B, C and D).
- Wait for at least 4 hours.
- Observe the appearance of the onion pieces to determine which enzyme is cellulase (see figure 4).
Mariona Lladonosa Soler
Resources
- To learn more about enzymes and for ideas of additional activities, see:
- Voak H (2016) Energising enzyme activities. Science in School 35.
- The EMBL-EBI enzyme portal integrates publicly available information about enzymes. Use the search function to find details about enzymes that are of interest to you.
Review
Enzymes are a key topic in both biology and chemistry lessons, but its complexity can mean that it is sometimes perceived as difficult or boring, especially if addressed with a traditional theoretical approach.
The activity outlined in this article, however, is quite the contrary. Using the simple everyday task of laundry washing, the author addresses the topic of enzymes in an engaging way, with students carrying out their own investigation into the action of enzymes on different substrates.
Teachers may be familiar with similar enzyme-based practical activities, but this article is comprehensive and well-structured, resulting in an activity that is perfectly suited for an enquiry-based approach to enzyme chemistry.
The activity uses simple laboratory equipment, but requires enzymes to be ordered from specialised supply companies. If your school does not have access to isolated enzymes, the activity could be adapted to use different store-bought detergents.
Giulia Realdon, natural sciences teacher and education researcher, Italy