Playing with fire: stoichiometric reactions and gas combustion Teach article
Author(s): Isabelle Paternotte and Philippe Wilock
This activity was presented at the Science on Stage Festival 2022
Great balls of fire: Try these dramatic experiments with gases to illustrate stoichiometric reactions and combustion.
Reactions with dramatic visual or auditory effects provide engaging examples to illustrate stoichiometric reactions.
The following activities are suitable for students encountered aged 14–16. After calculating the quantities of solids and solutions required, gas production can be observed in a syringe. Mixtures of dihydrogen and dioxygen can then be set on fire for fun and to observe their combustion reactions. Activities 1 and 2 can be carried out by the students. The other activities are done by the teacher as a demonstration first and then the students can try them for themselves under supervision if desired.
The activity takes around 50 minutes if the theory has been discussed previously; otherwise, the activity will take 1 hour and 40 minutes.
Goals
Understand some basic principles of chemical reactions: stoichiometry, reagent excess, states of matter.
Visualize gas production.
Bring excitement to the laboratory with a bang and a whoosh.
Visualize the chemical energy produced by explosive combustion and the kinetic energy produced by gas expansion.
Perceive the kinetic energy produced during an explosion by listening to the noise.
Gas evolution and testing setup
The basic experimental setup for gas evolution is the same for all the activities. The introduction of the reagents and the reaction itself take between 5 minutes (H2) and 15 minutes (O2).
Materials for gas evolution
Used for H2 and then O2 in these activities but can also be used for NO2, NH3, etc.[1]
Solid reagent + liquid reagent
Luer-lock syringe with cap
A small hollow vessel with a flat bottom that fits inside the syringe, for example a cap from a medicine tube
A small container that can hold at least 5 ml of liquid reagent or soap solution (bubbles), such as a plastic weighing boat
Dishwashing liquid and matches
2 cm long tube that fits on the ends of the syringes for gas transfer
Materials used for this experiment Image courtesy of Isabelle Paternotte and Philippe Wilock
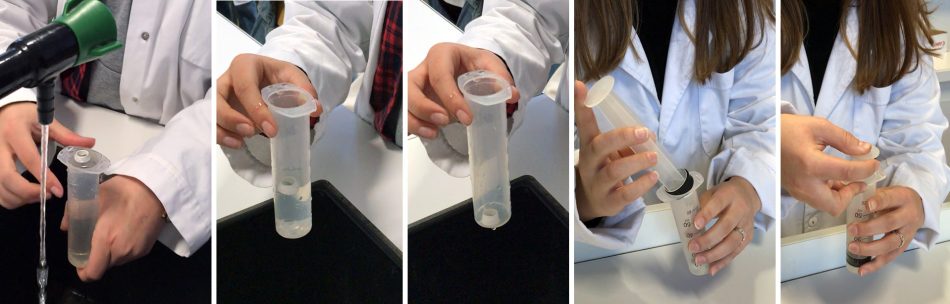
General procedure for gas evolution
Fill the small vessel with the solid reagent.
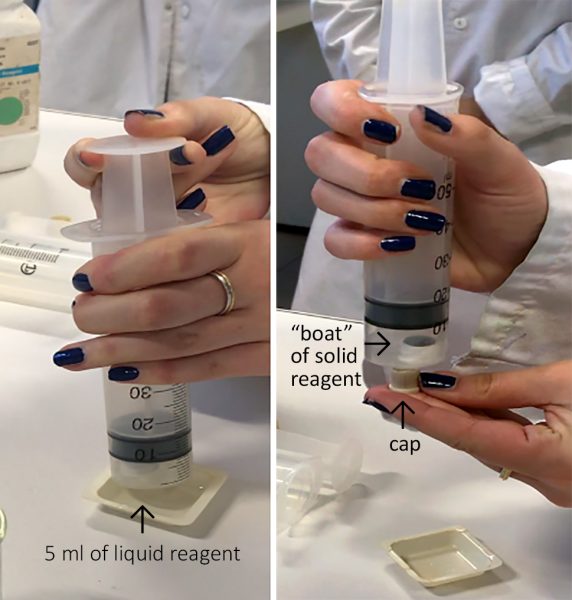
To introduce the solid reagent into the bottom of the syringe without spilling it, fill the syringe to the brim with water and block the opening at the bottom. Place the reagent ‘boat’ on the surface of the water and lower it by allowing the water to drain away.
Insert the plunger of the syringe as far as the small vessel without spilling the contents or jamming the syringe.
Image courtesy of Isabelle Paternotte and Philippe Wilock
Introduce 5 ml of the liquid reagent by drawing it up from a small container into the syringe.
Put the cap on the syringe.
Image courtesy of Isabelle Paternotte and Philippe Wilock
Caution: If solid reagent spills into the syringe before the liquid is introduced, bubbles will immediately form, and the liquid will come into contact with fingers when the cap is put on.
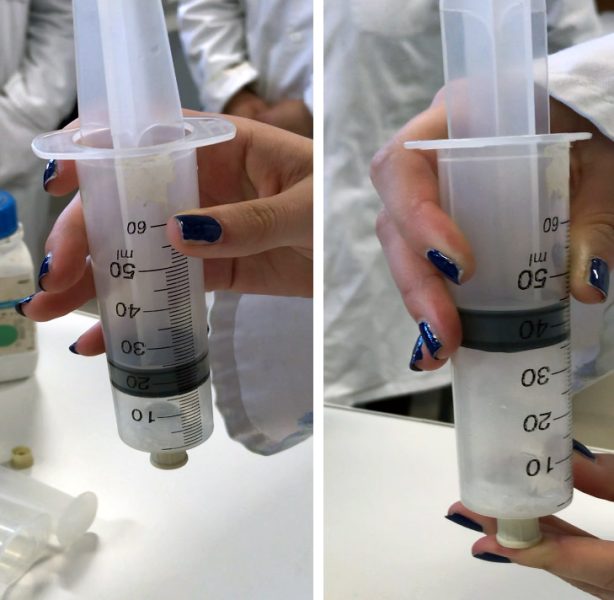
Shake the syringe to bring the solid and liquid into contact.
Observe the effervescence: gas is created and the plunger rises.
Image courtesy of Isabelle Paternotte and Philippe Wilock
At the end of the reaction (or if the maximum of the syringe is near), open the stopper with the syringe facing upwards, then quickly turn the syringe over and drain the liquid into a waste container.
Image courtesy of Isabelle Paternotte and Philippe Wilock
Rinse off the gas by sucking up a little water, plugging the syringe and shaking it, and then draining off the liquid.
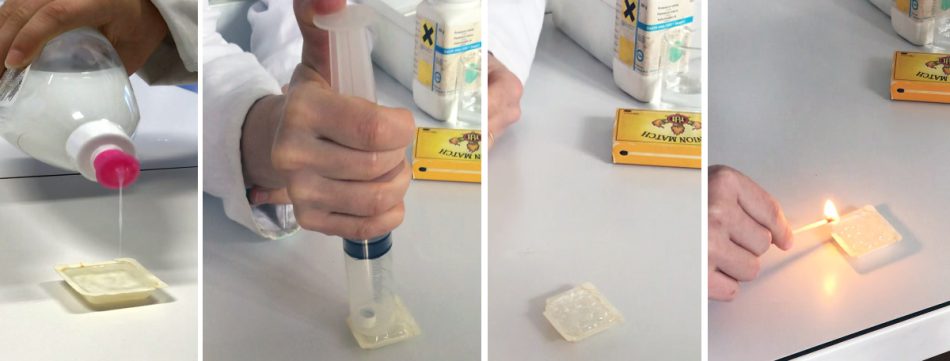
General procedure for gas ignition
Prepare a soap solution from water and dishwashing soap.
Check the foaming power of the solution with a syringe containing normal air and add more soap if it is inadequate.
Light the match just before making the bubbles and quickly bring the flame close to the bubbles.
Safety notes
Wear lab coats, safety glasses, and hair tied up.
Supervise the handling of the matches: nothing flammable nearby.
Since this is microchemistry, the amount of flammable gas produced is safe and it is trapped in the syringe.
Due to the surprising behaviour of the bubbles when ignited, the teacher should show the first ignition, and then the students can repeat the experiments.
The syringes should be kept pointing away from the students (especially faces) at all times.
Activity 1: Production of hydrogen
In this activity, we produce hydrogen gas using the setup described above. It should take around 3 minutes, assuming that the equipment is already set up.
Materials
Materials listed for the basic setup
Mg ribbon
2 mol l−1 HCl liquid reagent
Procedure
Have the students calculate the mass of magnesium required for 5 ml of 2 mol l−1 HCl to obtain 50 ml of H2 gas based on the following equation:
Answer: 0.05 g, which is about 1.5 cm of Mg ribbon.
Perform the gas evolution experiment as described for the main setup, using magnesium and 2 mol l−1 HCl as the solid and liquid reagents, respectively. The magnesium ribbon can be rolled to fit in the syringe float.
Keep the collected gas for the next activities.
Observations
Mg disappears gradually with the production of bubbles, the plunger rises within 1 min, and the syringe heats up.
Be careful with the H2 syringe: always keep it vertical when it is opened to make the bubbles or for gas transfers. If the syringe is tilted, H2, which is much lighter than air, leaves the syringe and rises to the ceiling.
Activity 2: Production of oxygen
In this activity, we produce oxygen gas using the setup described above. It should take just a few minutes, assuming that the equipment is already set up.
Materials
Materials listed for the basic setup
0.1 g KI solid reagent
0.8 mol l−1 H2O2 liquid reagent
Procedure
Have the students calculate the concentration of hydrogen peroxide required for 5 ml of the H2O2 solution to obtain 50 ml of O2 gas according to the following equation:
Perform the gas evolution experiment as described for the main setup, using KI and 0.8 mol l−1 H2O2 as the solid and liquid reagents, respectively.
Keep the collected gas for the next activities.
Observations
White KI solid forms a yellow solution with hydrogen peroxide. Bubbles form mainly around the rubber of the plunger. When the plunger is pulled back, more bubbles are formed. The reaction is slow and may take up to 5 minutes.
Activity 3: Lighting pure hydrogen
In this activity, we investigate what happens when we light bubbles of hydrogen gas. It should take just a few mins after producing the gas in Activity 1. The teacher should demonstrate the ignition and then the students can try it themselves with supervision afterwards.
Materials
Syringe of hydrogen gas produced in Activity 1
Small tub or container
Water
Dishwashing soap
Long-necked gas lighter (much safer!) or a match
Procedure
Prepare a soap solution in a small shallow container, as described in the general procedure. Check foaming power with air and add more soap if necessary.
Make sure the syringe of hydrogen and a lit lighter/match are to hand.
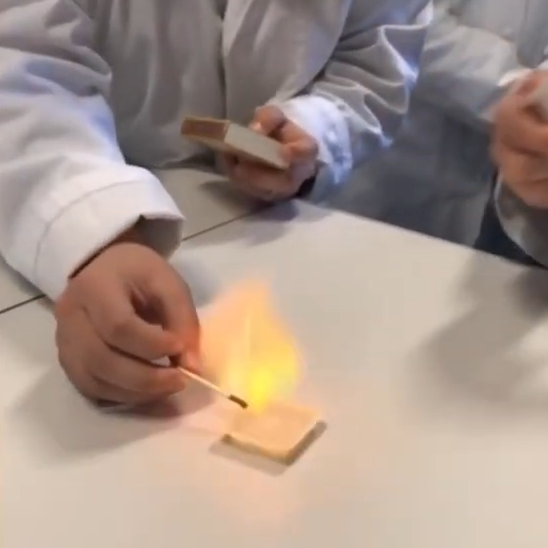
Light the flame, then quickly make bubbles of hydrogen by squeezing the syringe below the surface of the soap solution. As soon as the bubbles are formed, bring the flame (from the long-necked gas lighter or match) close to them.
Igniting bubbles Image courtesy of Isabelle Paternotte and Philippe Wilock
Observations
Hydrogen bubbles burn quietly, forming a fireball with a volume ten times that of the bubbles. To burn, hydrogen will take oxygen from the surrounding air.
Image courtesy of Isabelle Paternotte and Philippe Wilock
Activity 4: Lighting pure oxygen
In this activity, we investigate what happens when we try to light bubbles of oxygen gas. It should take just a few mins after producing the gas in Activity 2. The teacher should demonstrate the activity and then the students can try it themselves with supervision afterwards.
Materials
Syringe of oxygen gas produced in Activity 2
Container of soap solution from Activity 3
Long-necked gas lighter (safer) or a match
Procedure
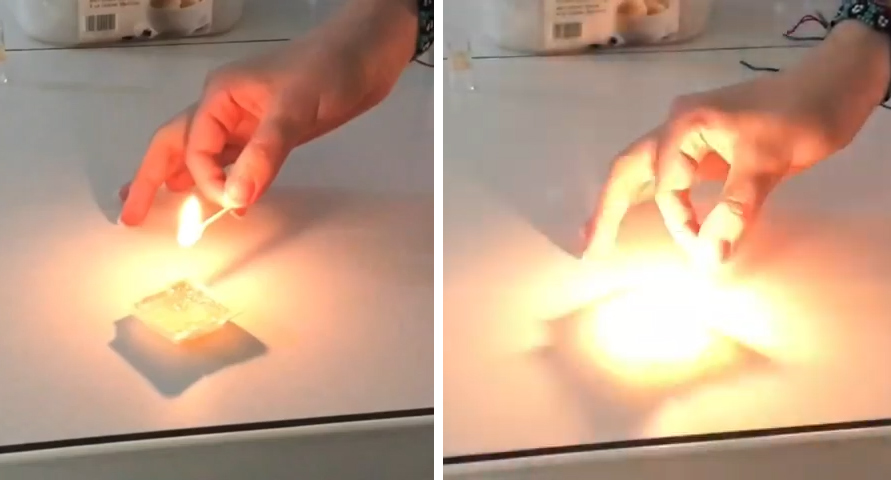
Check the foaming power of the soap solution with air and add more soap if necessary.
Make sure the syringe of oxygen and the lighter/match are to hand.
Light the flame and then quickly make bubbles of oxygen by squeezing the syringe below the surface of the soap solution. As soon as the bubbles are formed, bring the flame close to them.
Observations
The oxygen bubbles do not burn (oxygen is already fully oxidized), but the flame becomes brighter with each popped bubble.
Image courtesy of Isabelle Paternotte and Philippe Wilock
Activity 5: Lighting a mixture of hydrogen and oxygen
In this activity, a mixture of hydrogen and oxygen obtained by transferring precise amounts of O2 to the H2 syringes is ignited. It should take just a few mins after producing the gases in Activities 1 and 2. The teacher should demonstrate the ignition and then the students can try it themselves with supervision afterwards.
Materials
Syringes of hydrogen and oxygen gas from Activities 1 and 2
Tub of soap solution from Activity 3
Long-necked gas lighter (much safer!) or a match
Procedure
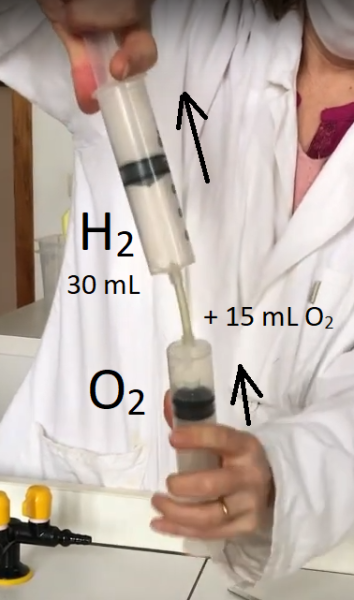
Fit a small connecting tube to the oxygen syringe.
Attach the tube to the hydrogen syringe. The latter must always remain vertical and at the top.
Push the desired amount of oxygen up into the hydrogen syringe by pushing and pulling on the two syringe plungers.
Image courtesy of Isabelle Paternotte and Philippe Wilock
Check the foaming power of the soap solution with air and add more soap if necessary.
Make sure the syringe containing the gas mixture and match are to hand.
Warn others about a sudden noise.
Make bubbles of the explosive mixture by squeezing the syringe below the surface of the soap solution. As soon as the bubbles are formed, bring the flame (from the long-necked gas lighter or match) close to them.
Observations
The bubbles burn instantly, making a firecracker noise. The best noise is obtained with the following stoichiometric mixture: 2 H2(g) + O2(g) → 2 H2O(g→l).
Activity 6: Minirocket launch
In this activity, we use the effect seen in Activity 5 to launch a minirocket. It should take around 10 minutes after producing the mixture of gases from Activity 5. This can be done as a teacher demonstration.
Materials
Syringe containing a mixture of H2 and O2 from Activity 5
5 ml plastic pipette cut to 1 cm as the rocket
12 cm long tube that fits on the end of the syringe
Tub half filled with water
Piezoelectric gas lighter modified to produce a spark at the end of soldered electrical wires
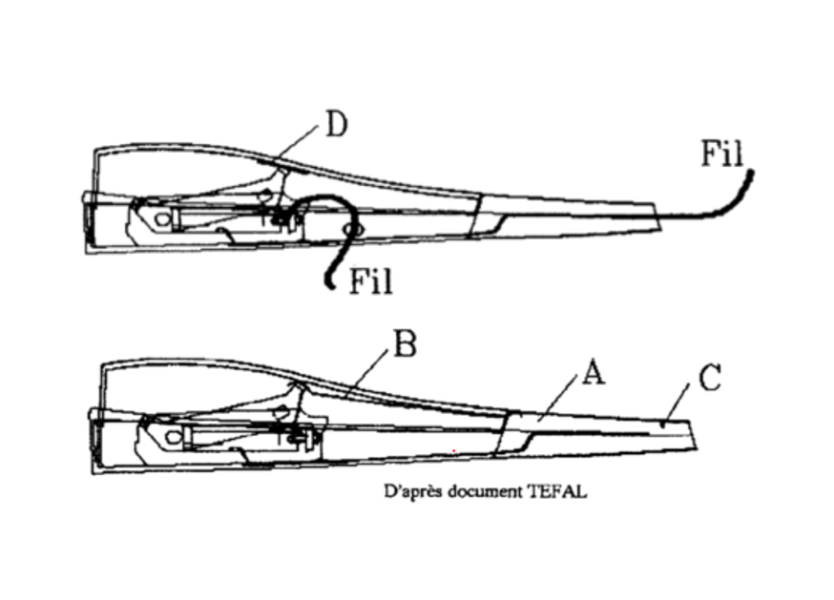
Modification of the piezoelectric gas lighter
Remove the nose of the device (part A) by pulling it slightly apart with a screwdriver. On this part, straighten the pin (C), which serves as an electrode.
Remove the metal tab (part B), which ensures the electrical connection between the generator and the nose of the device. Solder two wires: one to the end of the central electrode and the other to the generator screw. Be careful not to deform the central electrode: it is designed to leave a space of about 1 mm between it and the generator; this space is essential to ensure a spark when the piston moves back and forth.
Procedure
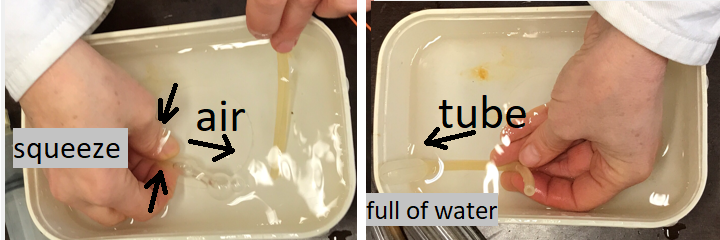
Fill the minirocket with water by pressing on the body of the pipette while holding the end under water. Insert the tube into the minirocket.
Image courtesy of Isabelle Paternotte and Philippe Wilock
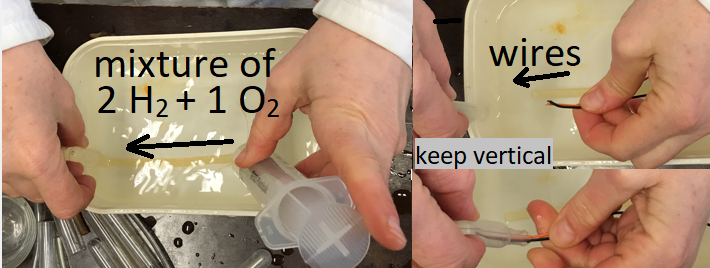
Connect the tube to the syringe containing the 2:1 mixture of H2 and O2 from Activity 5.
Use the syringe to fill the minirocket, keeping it vertical so that the mixture of gases remains inside.
Insert the wires into the bulb of the pipette (minirocket) for the spark.
Image courtesy of Isabelle Paternotte and Philippe Wilock
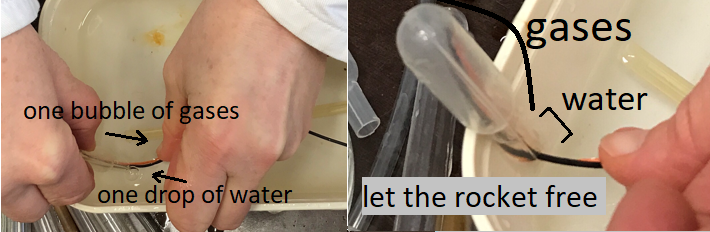
Suck a drop of water into the bottom of the minirocket by expelling one bubble of gas:
Without the water drop, the minirocket will not take off: the gases burn, and air enters the minirocket.
With the water drop, when the gases burn, the drop hits the top of the minirocket and causes it to lift off.
Do not hold the minirocket. Let it go just before creating the spark with the piezoelectric gas lighter.
Image courtesy of Isabelle Paternotte and Philippe Wilock
Observations
The minirocket takes off towards the ceiling!
References
[1] Mattson B, Mattson S, Anderson MP (2006) Microscale Gas Chemistry 4th edition. Educational Innovations, Norwalk. ISBN: 0-9701077-0-6
Learn some of the key principles of rocket science with fun hands-on activities: Ahlgren O (2019) Rocket science made easy. Science in School47: 36–41.
Try classroom activities on how using and controlling fire: Krzeczkowska M, Grygo-Szymanko E, Świt P (2016) Practical pyrotechnics. Science in School38: 46–51.
Dr Isabelle Paternotte teaches chemistry, biology, and physics at a secondary school in Belgium. She makes many videos to explain the theory of chemistry, biology, and physics through demonstrations on the YouTube channel chimie media (in French).
Philippe Wilock is an AESI Belgian teacher of sciences and administrator of Science on Stage Belgium.