


Cell spotting – let’s fight cancer together! Teach article
“Tell me and I forget, teach me and I may remember, involve me and I learn,” Benjamin Franklin once said. Make that quote yours and involve your students in a real cancer-research project that will teach them more than just genetics and cell death.
Efficient cancer drugs need to selectively destroy tumour cells without harming healthy cells. Existing chemotherapy treatments have failed to reach that ideal level of selectivity, but many research teams continue to look for compounds that could become the effective and side-effect-free drugs of tomorrow.
HeLa cells
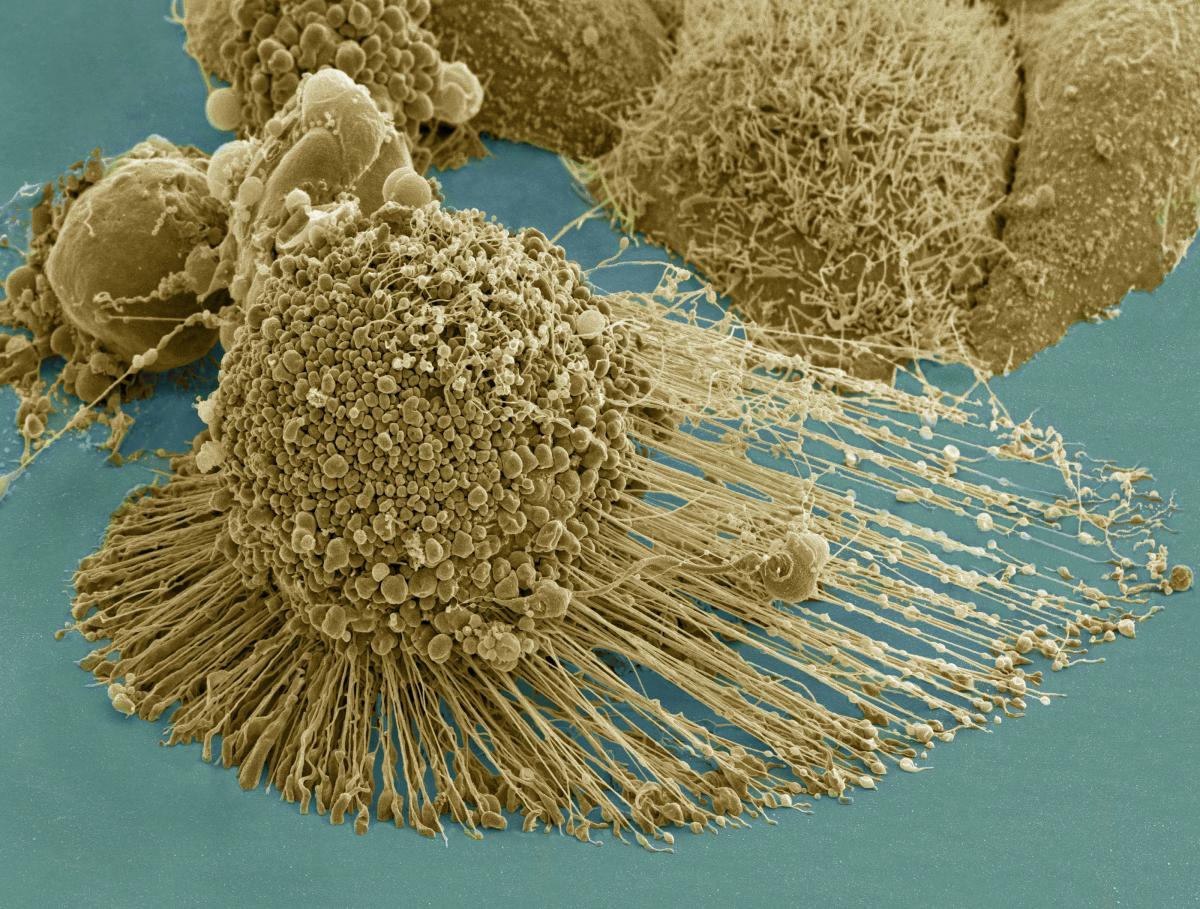
micrograph of an apoptotic
HeLa cell
Image courtesy of the National
Institutes of Health (NIH)
HeLa cells are a special human cell line. They originate from a woman called Henrietta Lacks, who died from cervical cancer in 1951. Her doctor took some cells from her tumour and managed to grow them in a culture medium, developing the first human cell line. HeLa cells are the most widely used human cells in biology labs across the world.
The search for suitable compounds is performed primarily by robotic systems that quickly test and identify millions of candidate chemical compounds: they put cancer cells together with potential drugs and observe whether the cells die or survive. Such experiments generate thousands or even millions of cell images that then need to be analysed according to several parameters – such as the cell’s status, the release of cellular content, the distribution of the mitochondria, or the shape of the nucleus – and classified to determine the cell’s response to each potential drug. The ideal solution to treat this huge amount of data would be to use computers. However, they are not good enough to recognise patterns: nothing beats the human eye for that task (Lostal et al, 2013a; 2013b)!
That is where you and your class step in. Researchers need help from as many volunteers as possible to support them with image analysis and to identify potential new drugs against cancer as rapidly as possible. Your students will learn about cell death by helping scientists to characterise the response of HeLa cells to different chemical compounds.
The Cell Spotting project
The Cell Spotting team is testing more than 14 000 chemical compounds in HeLa cells and observing their reaction using advanced optical microscopy techniques. HeLa cell cultures are being photographed every half hour in three different channels: normal light, blue and green fluorescence (Lostal et al, 2013a; 2013b). The normal light reveals the global shape of the cell membranes; the blue fluorescent channel is specifically for the observation of the cell nuclei (they are dyed with the fluorochrome Hoechst 33342, which emits blue light when bound to DNA); and the green light is for the observation of the cells’ mitochondria (which are dyed with the fluorochrome Mitotracker). By combining data acquired from the three channels, the scientists can generate images that contain detailed information about these three elements of the cells’ structure and also videos that show cell movements, division and death over time. More than 4000 images are taken per day and about 14112 images are produced in a single experiment.
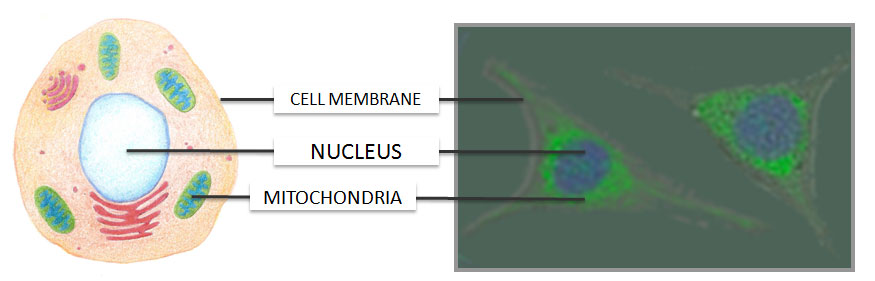
Image courtesy of Socientize
Spot cells and help fight cancer from your classroom
This activity is designed to be implemented in biology courses for students aged between 14 and 18 years old, however you can also adapt it for other groups. It explores themes such as cell division, cell death, genetic regulation, cancer and biotechnology.
The activity is divided into two parts:
A) Explore the Cell Spotting research project and understand its context, and
B) Play with the Cell Spotting application.
Materials
The resources available for this activity are:
- a videow1 that puts the Cell Spotting research project into context
- a didactic unitw2 that provides a potential lesson plan and activities to do with students
- a teacher’s packagew3 that contains a detailed document about the research, a PowerPoint presentation and three short clips about HeLa cells.
Procedure
A) Explore the Cell Spotting research project and understand its context.
In the first part of the activity, students should use enquiry-based thinking to learn about the research project and its methodology.
1) Watch the videow1 ‘Socientize: Cell Images Experiment’ to place the activity into the right context.
2) Go through the didactic unitw2 and find the answers to the following questions:
- What is José Villar doing in his research?
- What type of cells is he using?
- What methodology is he using to observe the cells?
- What results can he expect from different chemical com- pounds?
- What type of cell death does José Villar want to induce in cells? Why?
At this stage, it may be useful to build a simple diagram like the one shown in figure 2.
3) Show your students how to differentiate between apoptosis and necrosis and to identify healthy HeLa cells from dying cells:
- Ask your students to analyse figure 5 from the didactic unit and to build a table similar to table 1 to summarise the main morphological differences between the two types of death: cell volume differences, nucleus condensation and final reaction.
- Watch the three short clips showing HeLa cells in different states (healthy, in apoptosis, in necrosis) from the teacher ’s package. Ask students to identify which cell state is represented in each short clip based on the morphological differences.
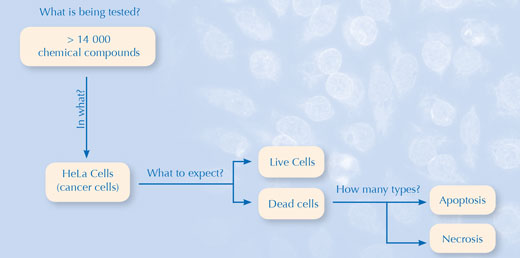
Image courtesy of Socientize
Now your students are ready to help José identify HeLa cell images!
| Apoptosis | Necrosis | |
|---|---|---|
| Cell volume | Decrease | Increase |
| Cell nucleus | Fragmentation after condensation | Volume increase |
| Content release | No (formation of apoptotic bodies) | Yes |
| Inflammatory response | No | Yes |
B) Play with the Cell Spotting application.
The Cell Spotting applicationw4 allows you and your students to analyse HeLa cell images and send your analysis to the research team. The application interface is very intuitive, user-friendly and self-contained, so everybody can easily access and contribute. When you access the application for the first time, we recommend that you follow the tutorial that explains its structure, objectives and resources. This will ensure that you have all the necessary details before you log in and start spotting and tagging cells with specific stamps.
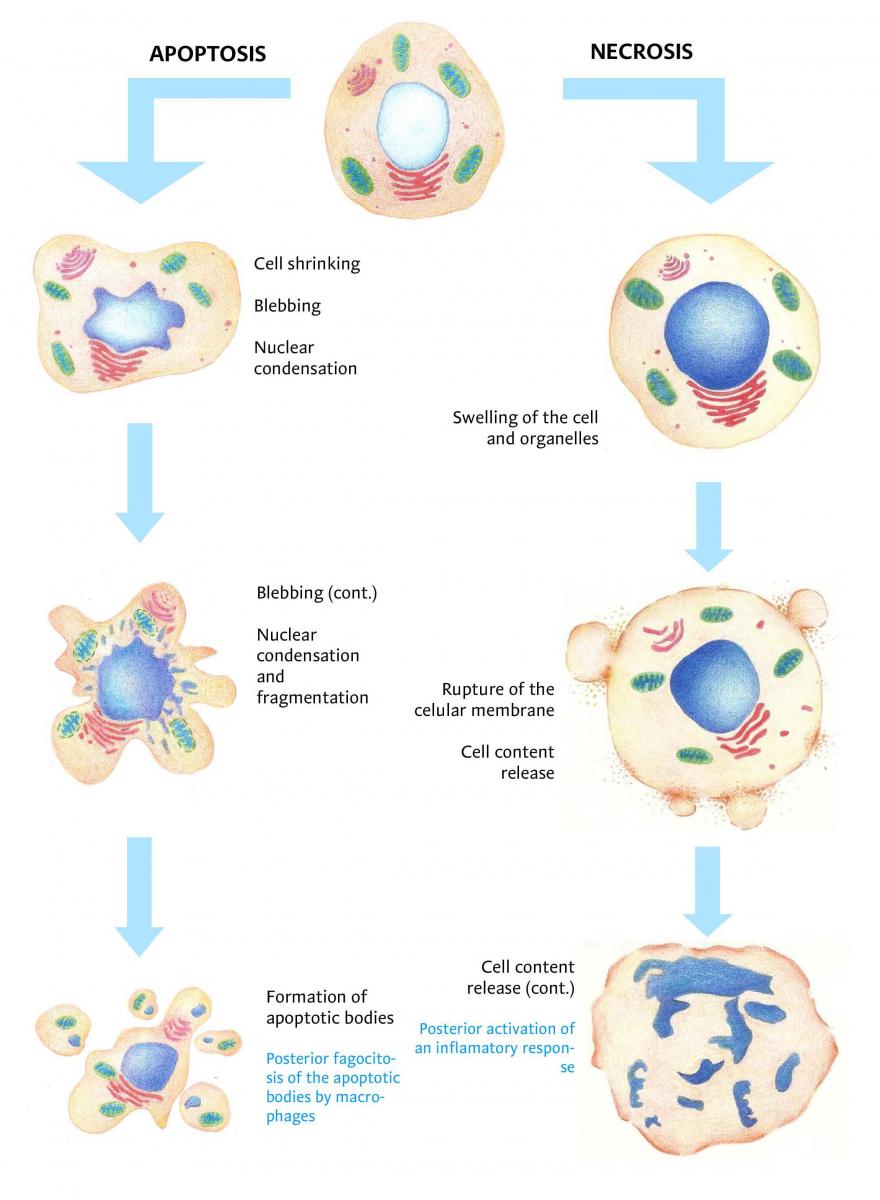
Image courtesy of Juliana Bortoletto
To complete each task, you need to analyse the same image according to four parameters:
- Current cell status (dead or alive)
- Cell content release (whether the cell releases material or not)
- Mitochondria distribution (whether the mitochondria are clustered or scattered inside the cell)
- Other remarks (e.g. multinucleated cell, abnormal sized cells and nuclei)
1) Ask your students to log in the application and register so their contributions do not remain anonymous.
2) Explore the application with your students and define exactly what they should do. If you have a projector, this can easily be achieved by doing a cell image analysis together while projecting it on a wall.
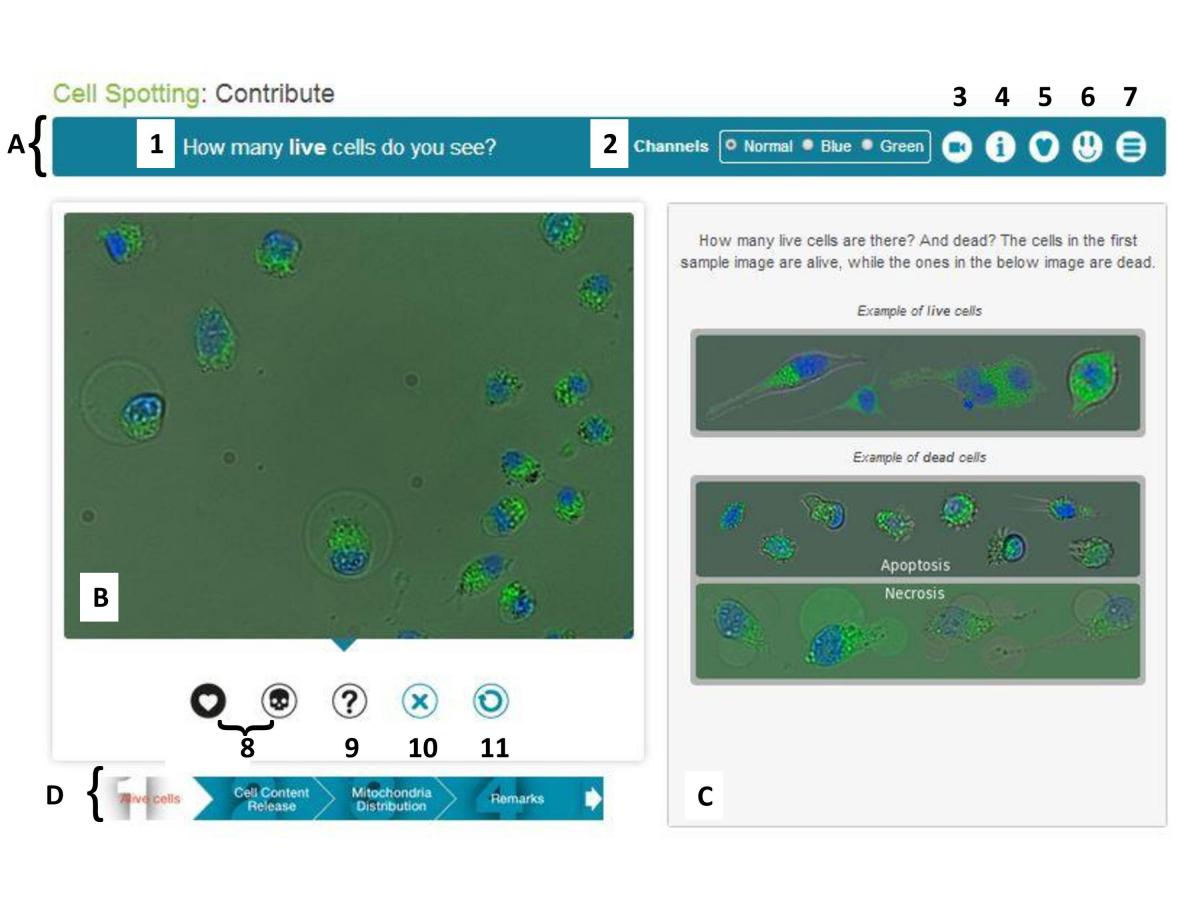
Image courtesy of Socientize
In a nutshell, the application includes:
- the blue bar (see A on the image) on the top, which summarises what you need to do and the resources to achieve that task, including:
- the specific question that you need to answer
- the three different light channels that you can use to visualise specific details on the image: blue to visualise the nucleus; green to view mitochondria; and normal, which is a result of the blue, green and bright white field images merged
- the video from which each image was extracted
- additional information on each step
- access to Vish, the Virtual Science Hub, an educational platform where you can virtually visit the lab where Cell Spotting takes place
- a feedback survey
- a direct link to the didactic unit
The image awaiting analysis is in box B (in figure 4). Below it you can find the various stamps to tag the cells and identify their state (see point 8 on Fig. 4). You can also remove the tags individually (see point 10 on Fig. 4) or start over (see point 11 on Fig. 4). If you are not sure how to classify the cells, you can use a specific tag with a question mark (see point 9 on Fig. 4). Box C provides you with a set of examples of the patterns that need to be identified.
Box C provides you with a set of examples of the patterns that need to be identified.
Finally, below the image for analysis, you will find a progress bar with the four parameters that you need to complete for each task (see box D in figure 4). Every time you finish analysing a parameter, you must click on the arrow to the right of the progress bar so you can move to the next parameter. When the four parameters have been analysed, an icon will appear so you can finish the task. After that, a new image will automatically appear and you can start the analysis all over.
NOTE: A guide to get started with Cell Spotting is available in the teacher ’s package. The analysis is very simple and your students will probably do it easily.
3) Let your students play with the programme and contribute freely. Let them know that they can also log in from home.
References
- Lostal E, Serrano F, Carrodeguas JA, Martínez P, Sanz F, Val C (2013a) Cell Images Analysis as a Case of Citizen Science for Advanced Education: Laboratory and School, Back and Forth. In Proceedings of the 7th International Technology, Education and Development Conference (INTED 2013) pp 2489–2496. Valencia, Spain: IATED
- Lostal E, Serrano F, Carrodeguas JA, Martínez P, Sanz F, Val C (2013b) A case of Citizen Science for Cell Biology Images Analysis. In Proceedings of the XXXIII Congresso da Sociedade Brasileira de Computação (CSBC 2013) pp 1855–1862. Maceió, Brazil: CSBC
Web References
- w1 – Watch the ‘Socientize: Cell Images Experiment’ video on Ibercivis Ciencia’s YouTube channel:
- in English
- in Portuguese
- w2 – Download the didactic unit for the Cell Spotting activity:
- in English
- in Spanish
- in Portuguese
- w3 – The teachers’ package for the Cell Spotting activity contains a detailed document about the research, the Cell Spotting guide, a version of the didactic unit with solutions, and three short videos of different health states of Hela cells. You can download it here:
- in English
- in Portuguese
- w4 – Start playing with the Cell Spotting application and, via the Socientize website.
Resources
- Find out more about the EU-funded project Socientize from its official website. You will also find other citizen science projects that you can get involved in.
- To keep track of citizen science projects promoted by Socientize, consult the official website of the Ibercivis project.
- For another cancer-related teaching activity, see:
- Communication and Public Engagement team (2010) Can you spot a cancer mutation? Science in School 16: 39-44.
Review
This article describes a student-centred activity that introduces the concept of efficient cancer drugs and how different compounds are tested to see if they are effective in killing cancer cells. Students are then led through an exercise in which they learn about HeLa cells and how these are cultured with isolated compounds to test the effect of that compound on cancer cells. They also learn about cell apoptosis and cell necrosis through visual examples.
Students are then introduced to the Cell Spotting research project, which allows participants to analyse cells and contribute to the project by uploading their analyses.
Each step of the project is supported by clear instructions and explanatory notes to help students use their knowledge and contribute to the project.
Dr Shaista Shirazi, UK