


Build your own microscope: following in Robert Hooke’s footsteps Teach article
Nektarios Tsagliotis explains how to build an effective microscope using simple materials – enabling your students to discover a hidden world, just as Robert Hooke did in 1665.
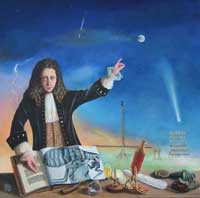
Hooke (2009), painted for
The Open University, UK.
Among the items in front of
him are his book,
Micrographia, and a
microscope
Image courtesy of Rita Greer;
image source: Wikimedia
Commons
Like the telescope, the microscope was made famous by the achievements of one of its earliest users. When we consider the telescope in history, we think of Galileo Galilei (1564–1642) and his pioneering observations of the Moon and planets. Similarly, the English scientist Robert Hooke (1635–1703) was one of the first to realise the potential of the microscope. In his book Micrographia, published in 1665, Hooke astonished the public with a fantastical world, where everyday objects such as needles and hairs, ants and spiders, were transformed by magnification.
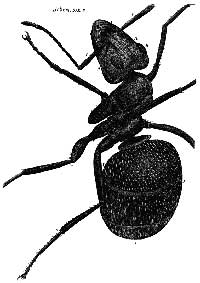
Hooke’s Micrographia
Image courtesy of the Project
Gutenberg
From a very early age, Robert Hooke’s curious mind drew him into many scientific fields (for this reason he has been called the ‘Leonardo of England’). In 1662, he was hired by England’s recently founded academy of science, The Royal Society, to carry out studies with the microscope. Three years later, he published these and many of his other studies in Micrographia.
This huge book is filled with descriptions of what Hooke saw under the microscope. He claimed that his goal was to use ‘a sincere hand, and a faithful eye, to examine, and record the things themselves as they appear’. Along with descriptions, Hooke included stunningly detailed drawings of the objects he viewed. His lively drawings of insects made them seem, as he remarked, ‘as if they were lions or elephants seen with the naked eye’. The book was a great success and is still considered a masterpiece of scientific literature.
Micrographia was the inspiration for my classroom project, which had two aims. First, to build a working microscope inspired by early models from inexpensive, easily obtainable modern materials that students could use in class; and second, for the students to investigate the microscopic world for themselves, taking Robert Hooke’s studies as a starting point and producing their own observations in the form of sketches and descriptions.
The microscope I built with my students is a modified version of one described by researchers at the Museo Galileo in Florence, Italyw1. It is similar in construction to those used by Hooke and other scientists during the late 16th and early 17th centuries and has the same essential elements: two lenses (objective and eyepiece), a microscope tube, and a diaphragm to reduce optical distortion. The modern materials we used include plastic lenses, each of which was extracted from a single-use disposable camera.
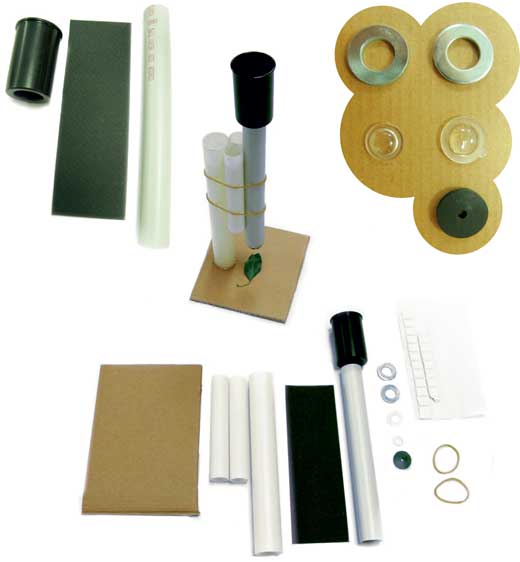
Image courtesy of Nektarios
Tsagliotis
Once built, the microscope has a magnification of approximately 20 times – quite sufficient to reveal the wonders of the microscopic world as Hooke saw them.
This microscope is durable and portable, and can be assembled quickly once the materials have been collected, cut and glued appropriately (see online videow2). It can be used repeatedly for microscope studies and / or observations, requiring minimal maintenance, such as lens cleaning and battery supply for the spotlight. Moreover, it can be stored easily in the classroom and laboratory, as it occupies a small space.
Materials
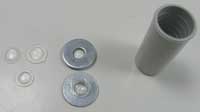
- 2 lenses with a focal length of 35 mm, each salvaged from a single-use disposable camera.
Make sure the flash has been discharged and remove the battery before you open the camera. Use insulated tools (like screwdriver and pliers). The students might need help extracting the lenses from of the cameras. - 2 metal washers with an external diameter of 2 cm and an inner hole of approximately 1 cm diameter
- 1 black cardboard or rubber disc with an external diameter slightly smaller than the washers (approximately 1.2 to 1.5 cm) and a small hole of approximately 2-3 mm diameter. This is the diaphragm: it ensures that the centre of the lens is used rather than the edges, as these can distort the image.
- 4 plastic tubes, to form the microscope body and support, with the following dimensions:
- Microscope body tube: 16.5 cm length of Ø18 (1.8 cm external diameter, internal diameter 1.6 cm)
- Main support tube: approximately 17 cm length of Ø23 (2.3 cm external diameter, internal diameter 2 cm)
- Two smaller support tubes: each an approximately 10 cm length of Ø16 (1.6 cm external diameter)
These are plastic tubes used for electrical home installation, obtainable from hardware stores and / or electrical supplies shops.
- 1 rigid base made from thick cardboard, wood or similar, approximately 10 x 10 cm
- 2 strong rubber bands (for a more stable construction, use 1 strong rubber band and 1 plastic cable tie)
- 1 piece of opaque black paper, approximately 15 x 5 cm
- 1 black plastic 35 mm film container or similar. Alternatively, a plastic connector for the Ø18 tube
- A reading spotlight, preferably with a clip for attaching it to the microscope base
- Blutack® (malleable stickyish plastic used for temporary fixing)
- Glue gun with hot silicone and instant glue
- Scissors
- Paper cutter
- Hacksaw
- Ruler
- Pen or pencil
Procedure
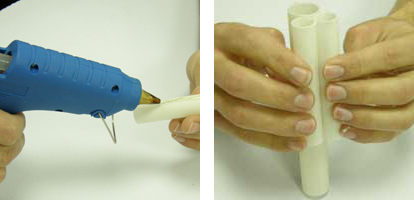
- Take the tube that will form the microscope body (Ø18). Roll the opaque black paper lengthways and insert it into the tube so that it forms a lining for the tube.

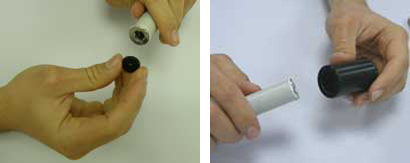
Images courtesy of Nektarios Tsagliotis - Attach each lens to a washer using Blutack or glue them carefully with instant glue. Then add a ring of Blutack around the edge of the lens and washer.
- Place one lens-and-washer unit at one end of the tube, with the washer on the outside, using the Blutack ring to hold it firmly in position. Then fix the other lens-and-washer unit at the other end in the same way.
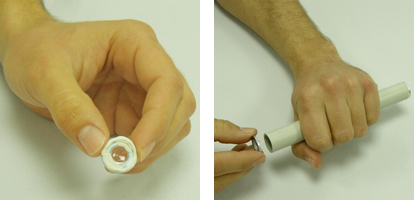
Images courtesy of Nektarios Tsagliotis - Place the black cardboard or rubber disc on top of one of the washers at the end of the tube and secure it with Blutack. The disc forms the microscope’s objective.
- Make the microscope eyepiece: in the bottom of the film container, cut a hole just large enough to fit the microscope body tube into (if you use a tube connector, see list of materials, you do not need to cut a hole). Push the tube (the end without the black disc) a short way inside the film container and secure it with glue if necessary.
- Now construct the support for the microscope body. Using the glue gun and hot silicone, fasten the two smaller tubes to the main support tube (the longest remaining tube) so that they lie alongside each other, touching, with all three tubes aligned at one end and the longest tube extending beyond the others at the other end.
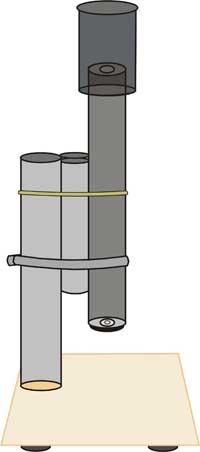
Images courtesy of Nektarios Tsagliotis - Then use the glue gun to attach the free end of the longest tube to the base, positioning it towards one end of the base. Hold the tube steady in a vertical position until the hot glue has cooled.
The finished microscope with
a cable tie and a rubber band
Image courtesy of Nektarios
Tsagliotis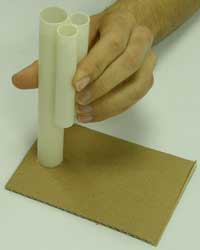
Image courtesy of Nektarios Tsagliotis - Complete the microscope by joining the microscope body to the support. Place the two rubber bands around the three support tubes, one near the top and one near the bottom. (Or use a plastic cable tie instead of the lower of the two rubber bands.) Then slide the microscope body under the bands, with the eyepiece at the top. Make sure the bands are tight enough to hold the body tube in position, but that it can still move up and down.
- Adjust the position so that the objective end is a few centimetres above the base. Your microscope is now ready!
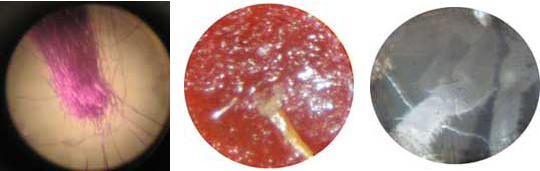
- To view an object under the microscope, place it on the base, under the objective. Bring it into focus by sliding the body tube up and down until you find the right position. (If you are using the cable-tie version, focus by turning the microscope tube gently and simultaneously moving it up and downw3.)
Shining a bright light, such as a desk lamp or a small torch or spotlight on the object will give you even better images.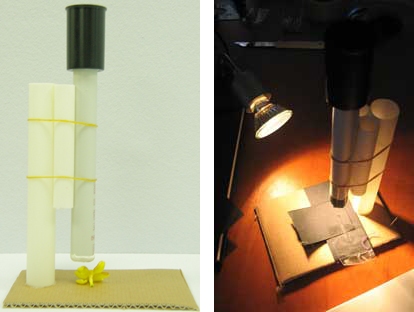
Images courtesy of Nektarios Tsagliotis
If you have a compact digital camera, you can even take photos of your magnified specimens. Hold the camera against the eyepiece lens, keep it steady and you will be surprised at the clarity of the images you produce.
Images courtesy of Nektarios Tsagliotis
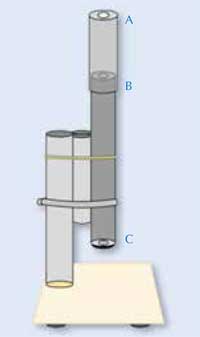
A: The new eyepiece; B: the
field lens, which was the
eyepiece of the original
microscope; C: the objective
lens
Improving the images
To achieve even sharper images, with less distortion, you can build a version with an additional lens (a field lens) between the eyepiece and the objective. For this you need to have used a tube connector rather than a film container for the eyepiece, since the film container’s diameter is too wide to hold the lens. Then all you have to do is add another lens-and-washer unit at the top of the connector: this is the new eyepiece. The eyepiece of the original model (described above) becomes the field lens of the three-lens model.
Images courtesy of Nektarios Tsagliotis
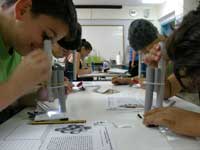
Classroom activity
The idea is for 10- to 14-year-old students to use the microscope in a similar way to Robert Hooke, recreating an authentic scientific method of discovery. The students view an object using the microscope and then produce a detailed sketch and a description. Afterwards, the class discusses their results.
in Hooke’s Micrographia
Image courtesy of the Project
Gutenberg
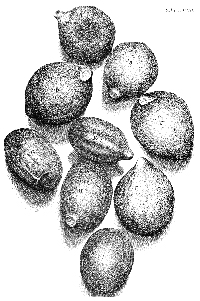
- Prepare some printouts of pages from Micrographia, including Hooke’s sketches of items similar to those the students will study with the microscope (see list below), paired with a simplified version of the text description in each casew4.
- Collect a selection of suitable objects for looking at under the microscope. You could try:
- A printed and a hand-written full stop (dot)
- The point of a needle
- Pieces of fabric
- Grains of sand, sugar and salt
- Plant seeds and other parts of plants
- Small insects (e.g. ants) or other arthropods (e.g. isopods – woodlice) anaesthetised by placing in alcohol solution (20-30%, e.g. an antiseptic solution) for around 15 min
-
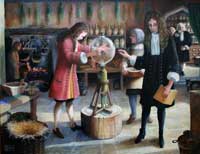
The Scientists, by Rita Greer
(2007). After Robert Hooke
finished his education and
secured his doctorate at
Christ Church, Oxford, UK, he
assisted Robert Boyle. Hooke
is shown in Dr Cross’s
apothecary’s shop in Oxford,
setting up an experiment
using the air pump that he
designed and made. Hooke is
attaching the glass globe
while Boyle supervises. The
artist used Hooke’s own
working drawing of the air
pump for accuracy.
Image courtesy of Rita Greer;
image source: Wikimedia
CommonsThen set up the microscopes (we made one per pair of students), ensuring that there is sufficient light for viewing (e.g. with a reading spotlight or a strong torch).
- Start the lesson with a brief account of who Robert Hooke was and his life story (I found this effective in engaging the students’ curiosity about his work). A series of paintings by historical artist Rita Greer, depicting Robert Hooke’s life from boyhood onwards, are a useful resourcew5.
- Divide the students into pairs, with pencils and paper for sketching and writing notes, plus a drawing and description from Micrographia as an example to follow. Each student in a pair should take a turn with the microscope, viewing and sketching the object, then writing a description.
As part of our project, I developed a set of seven worksheets for each type of specimen observed. These can be downloaded free of charge in English or Greekw6. - The students should discuss their observations, writings and drawings in pairs and / or in groups of four, before reporting to the whole class.
Tsagliotis
My students were enthusiastic about the activity, making a big effort to work in a ‘scientific’ way, like Hooke. Even those who complained that they could not draw tried hardw7 and attempted to describe the object verbally. The whole project encouraged my students to ‘do science’ themselves, demystifying it in the process: they were using an instrument that they had built themselves using simple materials.
Acknowledgments
This project is part of the research work undertaken by the Greek group for the ‘History and Philosophy of Science in Science Teaching’ (HIPST) projectw8, funded under the 7th Framework Program, Science in Society-2007-2.2.1.2 – teaching methods.
The author would like to thank the coordinator of the Greek research group of the HIPST project, Fanny Seroglou (associate professor at the Aristotle University of Thessaloniki) for her support on the project.
Web References
- w1 – To learn how to build the Museo Galileo version, see: http://brunelleschi.imss.fi.it/esplora/microscopio/dswmedia/risorse/erisorse.html
- This website also offers a collection of historical texts about 17thcentury microscopy.
- w2 – For a video of my students building the microscope, see: http://hipstwiki.wikifoundry.com/page/Videos
- w3 – To see some alternative suggestions for improving the stability of the microscope, see: http://hipstwiki.wikifoundry.com/page/constructing+the+microscope
- For a photographic account of how to construct our microscope, as well as a more advanced one with three lenses (objective, field lens and eyepiece), click on ‘constructing the microscope
 ’.
’.
- For a photographic account of how to construct our microscope, as well as a more advanced one with three lenses (objective, field lens and eyepiece), click on ‘constructing the microscope
- w4 – The original text and images of Micrographia can be downloaded from the Project Gutenberg website: www.gutenberg.org/ebooks/15491
- w5 – Rita Greer’s paintings of Robert Hooke’s life are freely available via Wikimedia Commons: http://commons.wikimedia.org/wiki/Category:Paintings_by_Rita_Greer
- w6 – To download the microscopy worksheets, visit http://hipstwiki.wikifoundry.com/page/study+worksheets_gr (Greek) or http://hipstwiki.wikifoundry.com/page/study+worksheets_en (English)
- w7 – For examples of my students’ work, see: http://hipstwiki.wikifoundry.com/page/children%27s+texts+%26+drawings
- w8 – To learn more about the HIPST project, see: http://hipstwiki.eled.auth.gr
Resources
- For a more detailed article about this project, see:
- Tsagliotis N (2010) Microscope studies in primary science: following the footsteps of R Hooke in Micrographia. In Kalogiannakis, M Stavrou D, Michaelidis P (eds) Proceedings of the 7th International Conference on Hands-on Science. 25-31 July 2010, Rethymno-Crete, pp. 212–221. www.clab.edc.uoc.gr/HSci2010
- For a description of a similar simply constructed microscope, see:
- Vannoni M, Buah-Bassuah PK, Molesini G (2007) Making a microscope with readily available materials. Physics Education 42(4): 385-390. doi: 10.1088/0031-9120/42/4/008
- For a detailed account of how to construct a somewhat more complex but more stable microscope, see: www.funsci.com/fun3_en/ucomp1/ucomp1.htm
Review
I would never have thought it was so easy and cheap to construct a light microscope. The activities in this article will surely help students to understand how a microscope works and appreciate their work once they get to use the microscope and see with their own eyes what set Robert Hooke on his fascinating journey. This is a very interesting project that could even be carried out as part of a school science exhibition – with a prize for the best, coolest microscope!
Although the author carried out the project with 10- to 14-year-old students, I would use it for older students (15-18), as in my experience younger students tend to lack the necessary dexterity and patience. For older students, the activity could be extended to investigate what happens if you use lenses of different sizes
Andrew Galea, Giovanni Curmi Higher Secondary School, Naxxar, Malta