Microscale chemistry: experiments for schools Teach article
Author(s): Elias Kalogirou, Eleni Nicas
Elias Kalogirou and Eleni Nicas introduce a selection of very small-scale chemistry experiments for school.
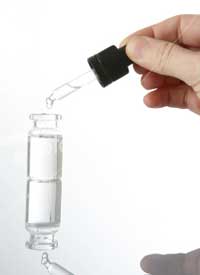
Image courtesy of tap10 /
iStockphoto
By industrial standards, all school chemistry is small-scale – 50 ml here, 1 g there. For the past three years, however, we have been doing microscale chemistry experiments at our school – using one or two drops of each reagent.
Working at this scale has many advantages. Using smaller amounts of reagent reduces the time, cost and waste involved, and encourages students to think about environmental protection. Although safety precautions are still necessary, the risk involved is lower with smaller volumes – and the students had no difficulties manipulating such small quantities. At this scale, the experiments do not need normal laboratory glassware but can be performed using simple household materials such as chewing-gum packets; these are cheap, can be reused several times and require little storage space.
Below are instructions for some microscale experiments that we perform with 14- to 15-year-old students. Our students carried out the experiments in groups of four. Alternatively, the teacher could demonstrate the experiments by placing the apparatus on an overhead projector.
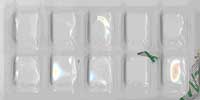
Our reaction vessel: a
chewing-gum packet
Image courtesy of Elias
Kalogirou and Eleni Nicas
The reactions are part of the usual Greek education curriculum for this age of students, but would normally be studied on a larger scale.
Experiments
Rather than using normal, full-scale laboratory equipment, these experiments are carried out in a chewing-gum blister packet, from which the foil and the gum have been removed (see image). Tablet packets would be fine too, if the tablets were large enough. Each experiment takes place in a separate well of the packet.
Safety notes:
Hydrochloric acid and sodium hydroxide, required for the majority of the experiments described in this article, should be used only when wearing gloves and safety glasses.
With such small quantities and low concentrations, any remaining reagents can simply be washed down the sink.
The tables (experimental procedures and results) for all the experiments can be downloaded as a Word® document from the Science in School websitew1.
Preparation
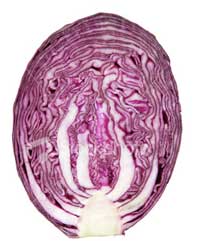
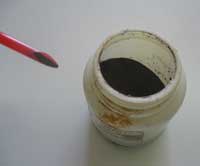
Red Cabbage
Image courtesy of Tamara
Kulikova / iStockphoto
To prepare the red cabbage indicator, cover 10 g fresh, chopped red cabbage leaves with 200 ml distilled water and bring to the boil. Boil until the liquid turns light purple. Leave it to cool and strain off the liquid, which is the indicator solution.
To prepare the sodium hydroxide (NaOH) solution, dissolve 0.4 g sodium hydroxide in 100 ml water.
To prepare the limewater (saturated calcium hydroxide solution), fill a 500 ml beaker one-third full with calcium hydroxide [Ca(OH)2] and add distilled water up to the 400 ml mark. Stir the mixture well and leave the resulting suspension to settle for several hours. The colourless, saturated solution (limewater) should be poured into a dropping bottle, taking care not to disturb the sediment.
Hydrochloric acid solution (15% w/w) can be bought in the supermarket in some countries. Alternatively, make a 1 M solution (approximately) in the laboratory.
(Note that the hydrochloric acid solution used is more concentrated than the sodium hydroxide solution, to ensure that the acid reactions can be observed with the naked eye, while the base reactions do not waste reagents.)
For the experiments, each of the solutions should be placed in a dropping bottle.
Aims
The purpose of Experiment 1 is for the students to realise both that acids and bases change the colour of pH indicators, and that the colour change is different between acids and bases.
In Experiment 2, the students observe how acids react with metals. They should observe the production of bubbles (effervescence) and also that magnesium reacts more strongly (producing more heat and more bubbles) with acid than iron does – although less acid is used. We explain to our students that the gas produced is hydrogen.
In Experiment 3, the students observe how acids react with carbonates. They should observe the production of bubbles (effervescence). We explain that the gas in the bubbles is carbon dioxide.
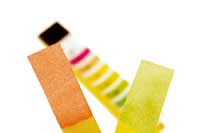
Experiment 4 gives the students the opportunity to practise using pH indicator paper. They should learn that the pH of a solution can be determined with indicator paper and the solutions classified as either acid or base.
In Experiment 5, the students investigate the conductivity of distilled water, hydrochloric acid and sodium hydroxide solution. They should learn that whereas distilled water does not conduct electricity, both acid and base solutions do.
Experiment 1: Colour change of indicators
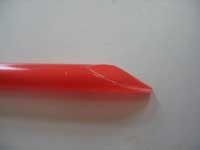
Cut the drinking straw
diagonally, so that it can be
used to measure out small
quantities of powder
Image courtesy of Elias
Kalogirou and Eleni Nicas
Place a layer of paper towels on the table and lay an A4 sheet of paper on top of it.
Cut five 4 cm strips of pH indicator paper and lay them, well spaced out, on the white sheet. (Alternatively, use five universal indicator strips.)
Onto each strip, pour two drops of a different test solution (e.g. vinegar or limewater).
Once the strips have changed colour, compare the colour to the colour chart for the indicator paper and determine the pH.
Using Table 5, record the pH of each solution and decide whether it is an acid or a base.
Table 5: Results of Experiment 4
Solution
Vinegar
Hydrochloric acid
Ammonia
Limewater
Distilled water
pH
Acid or base
Experiment 5: Conductivity of distilled water, acid and base solutions
Equipment
Chewing-gum blister packet
Scissors
Disposable gloves
Safety glasses
Aluminium foil
3 connecting cables with crocodile clips
Sticky tape
4.5 V battery
LED (5 mm in diameter)
Materials
Distilled water
Hydrochloric acid solution (15% w/w or 1 M)
Sodium hydroxide solution (0.1 M, prepared as above)
Method
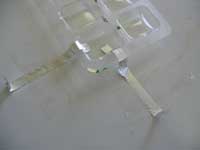
Attaching the electrodes
Cut four strips of aluminium foil, each 6 cm x 0.5 cm.
To form the electrodes, bend two strips of foil into Well 1 of the blister packet, then use sticky tape to attach the strips to the table to prevent them from moving (left).
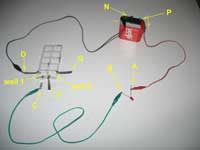
The next step is to construct the electric circuit (left).
Using one of the cables, connect the positive terminal of the battery (P) with the anode of the LED (A). With a second cable, connect the LED’s cathode (B) to one of the aluminium foil strips (C). Via a third cable, connect the other strip of foil (D) to the negative terminal of the battery (N).
Half-fill Well 1 with distilled water. This forms a complete circuit.
Assembling the electric
circuit
Images courtesy of Elias
Kalogirou and Eleni Nicas
Does the LED light up?
What can you conclude? Does distilled water conduct electricity?
Add 3 drops of hydrochloric acid to Well 1.
Does the LED light up now?
What can you conclude? Does hydrochloric acid solution conduct electricity?
Disconnect the cables from the two strips.
Bend two new strips into Well 2 and attach them to the table (as in step 2).
Connect the cables to the ends of the new strips (F and G).
Drop by drop, add sodium hydroxide solution to Well 2 until the ends of the aluminium strips are covered (we needed six drops).
Does the LED light up?
What can you conclude? Does sodium hydroxide solution conduct electricity?
Acknowledgement
The authors would like to thank Penelope Galanopoulou, who teaches English at the 3rd Pyrgos Lyceum Pierre de Coubertin, for translating this article from Greek into English.
Web References
w1 – The tables (experimental procedures and results) for all the experiments can be downloaded as a Word document here.
Resources
Williams KL, Little JG (1997) Microscale Experiments for General Chemistry. Boston, MA, USA: Houghton Mifflin. ISBN: 9780669416060
Zubrick JW (2003) The Organic Chem Lab Survival Manual: A Student’s Guide to Techniques 6th edition. New York, NY, USA: John Wiley & Sons. ISBN: 9780471215202
Skinner J (1998) Microscale Chemistry: Experiments in Miniature. Cambridge, UK: Royal Society of Chemistry. ISBN: 9781870343497
Greek speakers may find the following book useful:
Κ. Γιούρη – Τσοχατζή (2003) Σχολικά Πειράματα Χημείας, Από τη Μακρο- στη Μικροκλίμακα. Θεσσαλονίκη , Ελλάδα : Εκδόσεις Ζήτη . ΙSBN: 9604318608
For another activity using red cabbage indicator, see:
Elias Kalogirou is a secondary-school science teacher. He is responsible for the Laboratory Centre of Physical Sciences, which works with secondary-school science teachers to promote the use of experimental work in science teaching. In particular, he encourages the use of microscale experiments at school.
Eleni Nicas trained as a biologist and for the past six years has taught biology, chemistry and physics at middle school (ages 13-15), currently at the 4th Junior High School of Pyrgos. For the last three years, she has used microscale experiments in her chemistry lessons, in collaboration with the regional Laboratory Centre of Physical Sciences. She is currently studying for a postgraduate degree in physics education.
Review
An important part of the job of a science teacher is to teach not only scientific theory but also experimental skills. For this reason, traditional practical work cannot and should not be replaced. However, considerations such as economic factors and environmental awareness and protection are also valuable in this age of ‘green chemistry’. Integrating some microscale chemistry into traditional laboratory practical work will help develop these ideas. Working with microscale quantities is also appropriate for younger children.