


Rocket science made easy Teach article
Prepare for lift-off with these simple activities that demonstrate some of the key principles of space science.

The term ‘rocket science’ is often used to explain something that is difficult to understand. While designing and testing rockets is a complicated endeavour that requires skill and plenty of brainpower, it is possible – thanks to some simple activities – to explain some of this complex science to your students.
This article outlines a collection of activities suitable for students aged 8–14 years. They are designed to be carried out in a workshop, which can be completed in around 2 hours. If less time is available, however, some of the demonstrations can be omitted or can be spread out over successive lessons. The activities can be adapted for secondary school students, by including more theory and relevant formulas. Note that many of the activities are available to view in a videow1.
Activity 1: Launching a rocket balloon
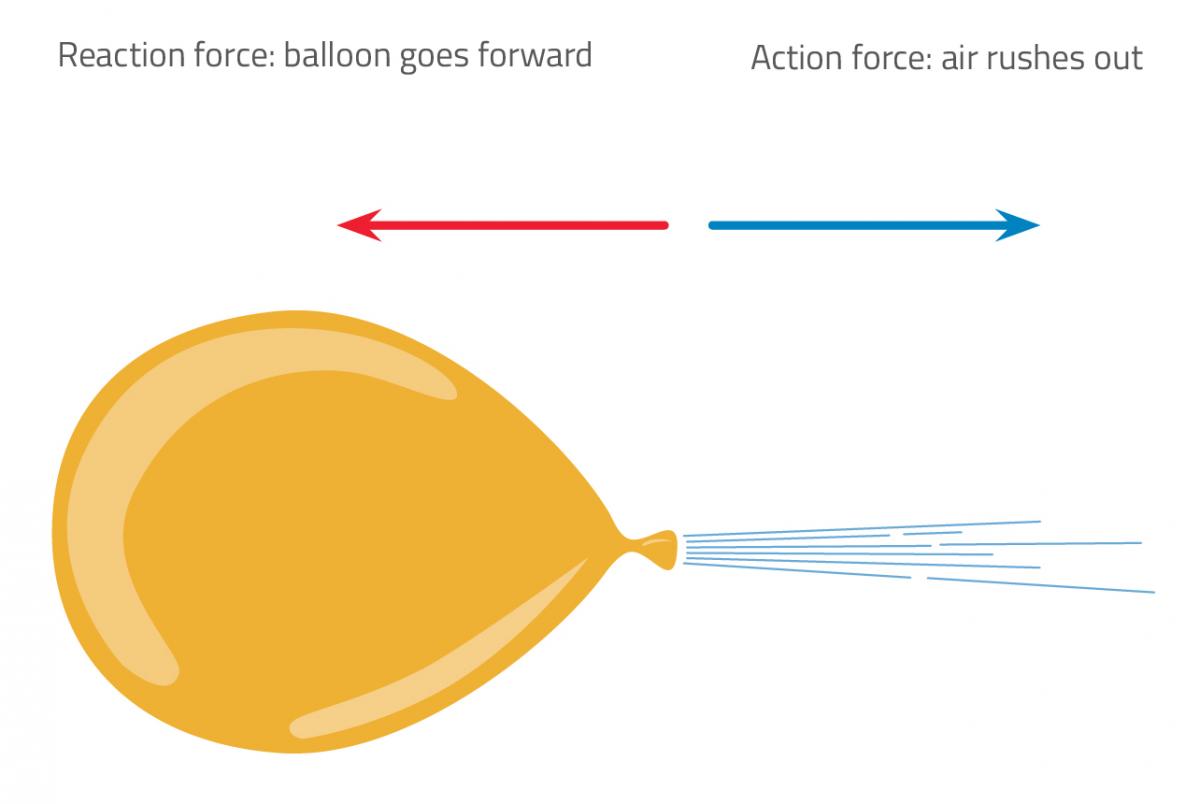
Rockets are a perfect example for learning about forces and Newton’s laws of motion. During lift-off, there are two forces acting on a rocket: thrust pushes it forwards by expelling gases in the opposite direction, and gravity pulls it downwards. Once a rocket is moving, drag acts on the rocket in the opposite direction to its motion. The rocket will continue to speed up as long as the force of thrust is greater than the combined forces of gravity and drag.
In this experiment, a rocket launch is illustrated by blowing up a balloon and letting it go. The escaping air exerts a force on the balloon, and the balloon reacts by pushing in the opposite direction with the same force, as described by Newton’s third law of motion (for every action, there is an equal and opposite reaction). The opposing force (as with rocket thrust) propels the balloon forward (figure 1). To make the demonstration more controlled, the balloon is attached to a line made from string.
Nicola Graf
Materials
- Balloon (ideally a long balloon)
- String (approximately 5 m in length)
- Clamp stands
- Straw
- Tape
- Scissors
Procedure
- Tie one end of the string to a clamp stand that is attached to a table.
- Cut the straw in half across the middle, and thread the two halves of the straw onto the free end of the string. If you use a regular balloon (rather than a long balloon) this is not necessary.
- Tie the end of the string onto another clamp stand, ensuring that the string is pulled tight.
- Inflate the balloon and hold the end closed – do not tie the balloon.
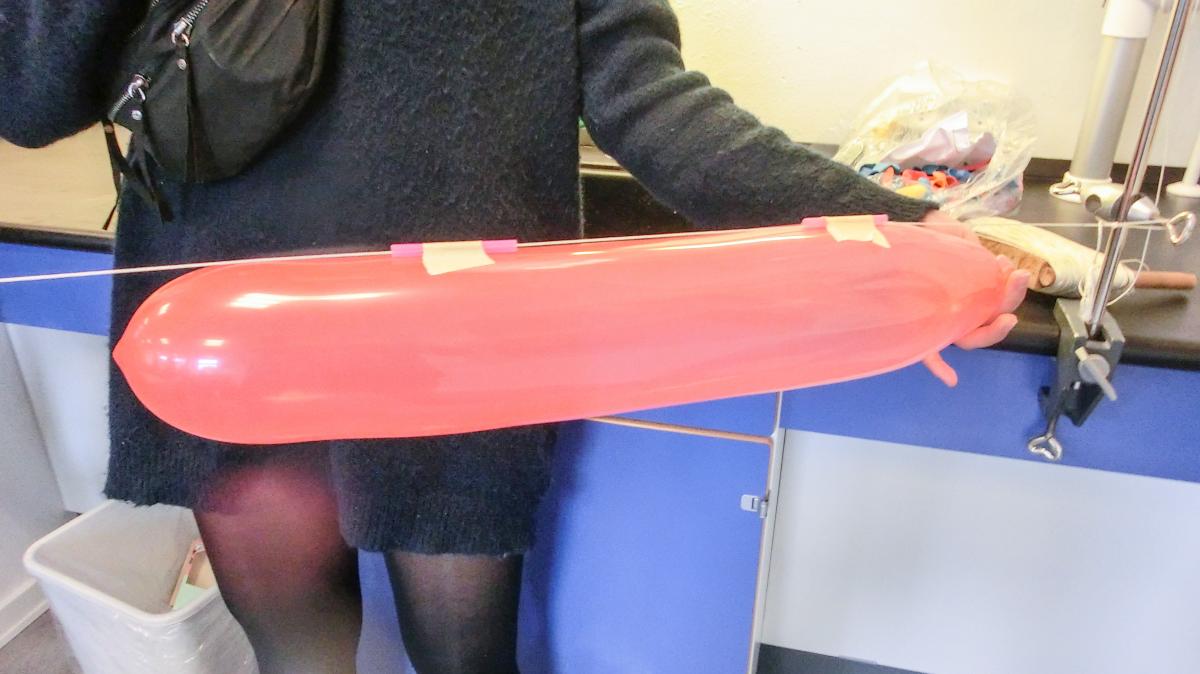
- Fasten the balloon to the straws using tape (figure 2). You may find it easier to do this in pairs.
- Pull the balloon to one end of the string. Release the balloon and watch it propel along the string. Who can launch their balloon the furthest?
Ole Ahlgren
Activity 2: Boiling water in a vacuum
The pressure inside the International Space Station (ISS) is similar to the pressure on Earth, which is 1 atm. Outside the ISS, however, the pressure is about 10-12 atm. If an astronaut were to travel outside the ISS without a space suit, any moisture – such as the saliva on their tongue or the water in their eyes – would begin to boil. This is because the lower pressure reduces the boiling point of water. A liquid boils when its vapour pressure (which increases with temperature) is equal to the external air pressure. The very low external pressure – close to a vacuum – would also make air flow out from the lungs, and the astronaut would lose consciousness from lack of oxygenw2.
One way to observe this effect for yourself is by placing a glass of room-temperature water inside a vacuum chamber. Pump out the air from the chamber, and observe the water boiling. The first bubbles that appear are likely to be from air dissolved in the water, but soon after it will be the water itself that boils.
If your school does not have access to a vacuum chamber, the experiment can be performed with a syringe, as outlined below.
Materials
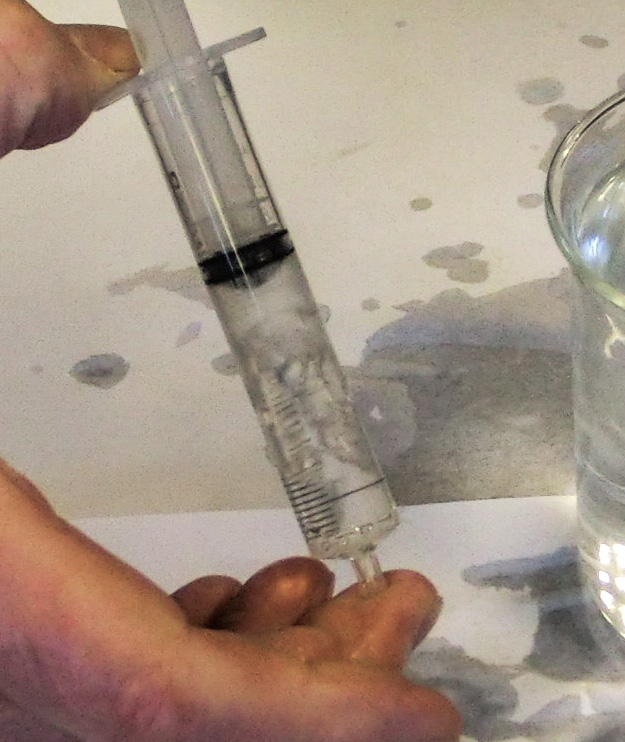
vacuum inside the syringe,
students see how water boils
when pressure is reduced.
Ole Ahlgren
- Clear plastic syringe
- Syringe valve (optional)
- Beaker
- Water (heated to different temperatures)
Procedure
- Place the syringe into a beaker full of water heated to approximately 37°C (body temperature). Pull back the plunger to take in a few millilitres of liquid.
- Remove the syringe from the beaker. Hold a finger (or place a valve) over the opening of the syringe and pull back the plunger. The water will start boiling (figure 3).
- Push the syringe in the opposite direction, and the boiling will stop.
- Repeat the demonstration with water of different temperatures. What do you observe?
When you pull back the plunger of the syringe, you increase the volume inside the syringe, resulting in a decrease in pressure. The pressure is now lower inside than outside the syringe. If cooler water is used (e.g. at room temperature), its vapour pressure will be lower, so the external pressure needs to be reduced more for the water to be at boiling point.
Activity 3: Overcoming air resistance
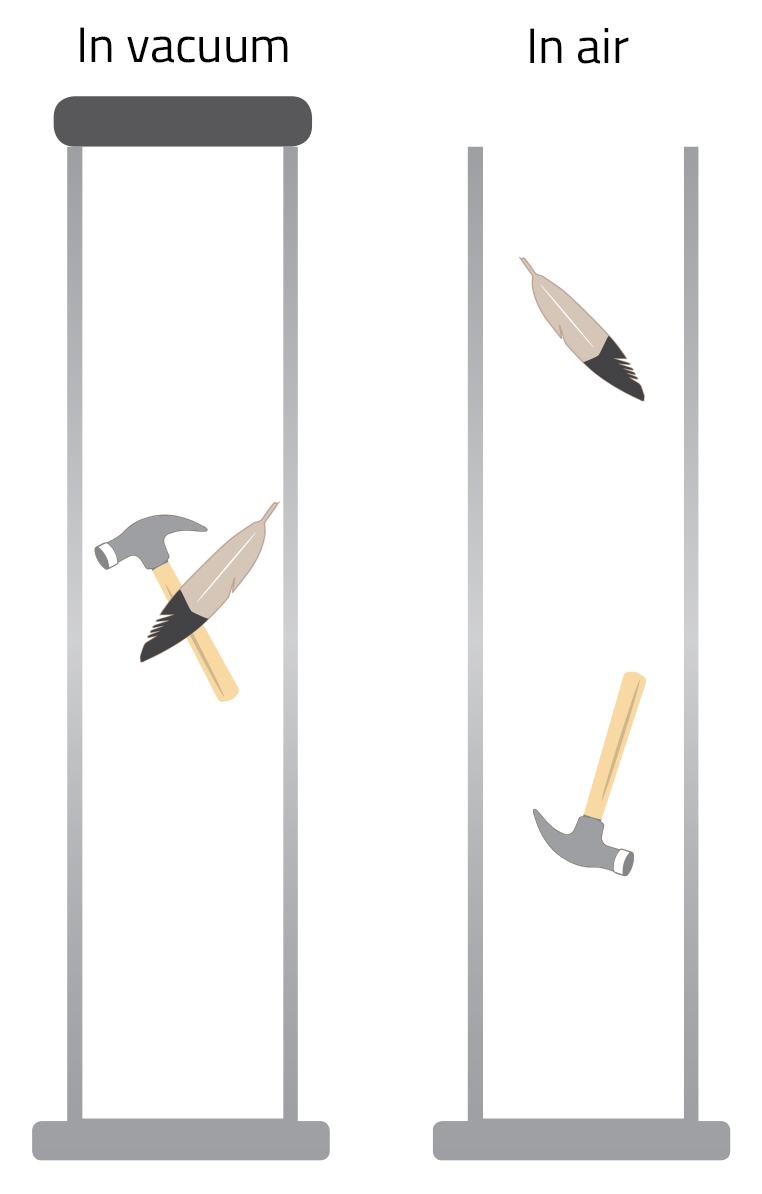
Galileo famously concluded that all objects fall at the same speed, regardless of their mass. We now know that, while this is true if there is no air resistance, this isn’t usually the case on Earth. In the hammer-feather drop experiment performed on the Moon during the Apollo 15 mission, astronaut David Scott held out a hammer and feather and dropped them at the same timew3. Both objects fell at exactly the same rate; since the Moon has no atmosphere, there was no air resistance. When dropping the same objects on Earth (in normal air), the feather falls much more slowly than the hammer, as the downward force of gravity is greater for the object with the greater mass. This means the opposing force of air resistance affects the feather more than the hammer (figure 4).
Nicola Graf
This principle can be easily demonstrated by using a vacuum chamber. A piece of paper and a steel ball can be used for the objects, as shown in our videow1.
Even without a vacuum chamber, you can demonstrate a similar effect by using only a coin and a piece of paper in the manner described below. Here, in addition to the forces of gravity and air resistance acting on the objects, aspects of fluid dynamics come into play.
Materials
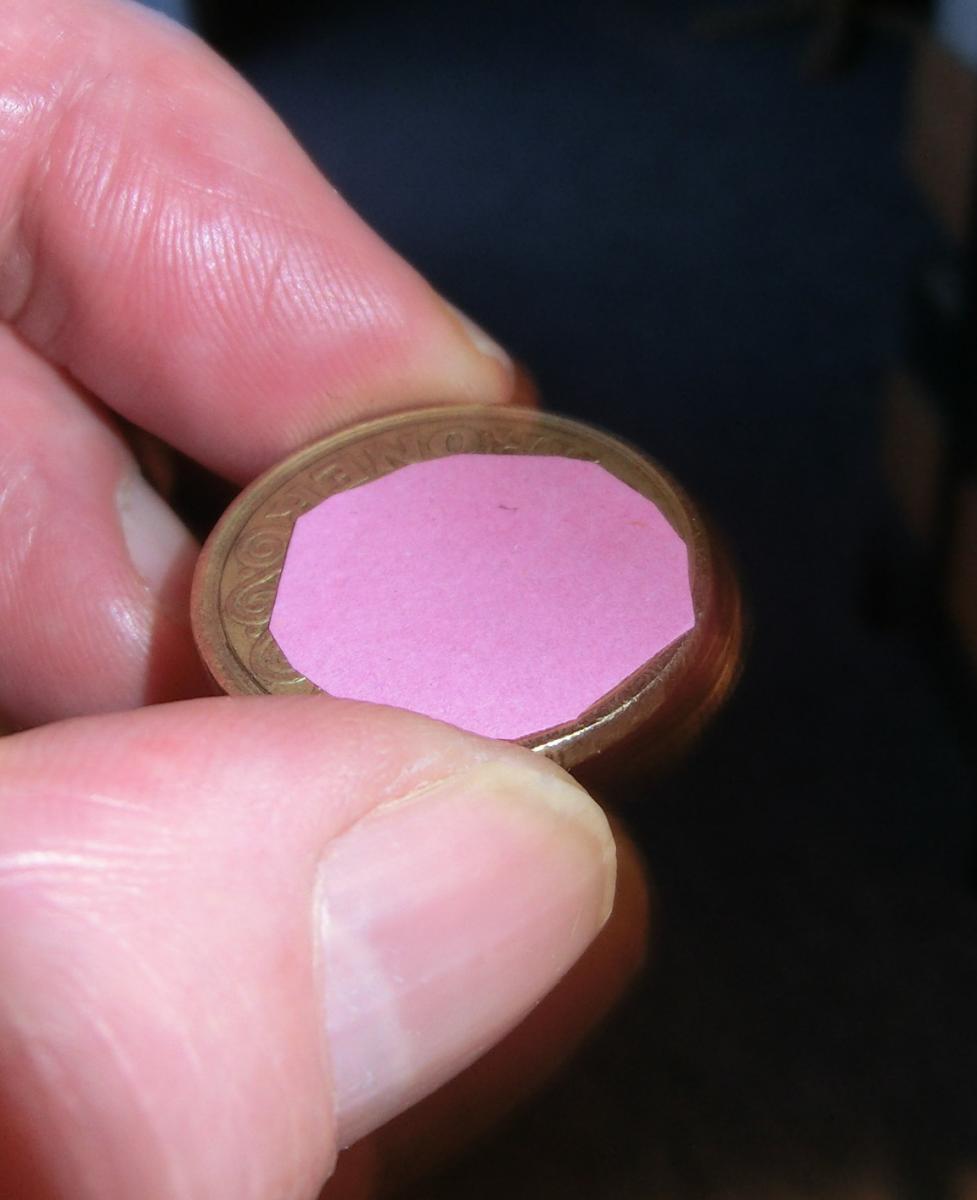
placed on top of a coin, and
the two objects are dropped
together from a height to
demonstrate air resistance.
Ole Ahlgren
- Coin
- Paper
- Scissors
Procedure
- Cut out a piece of paper, ensuring that it is smaller than the coin (figure 5).
- Place the paper on top of the coin and hold the coin between two fingers.
- Drop the coin from a height of about 1 metre. Notice how the paper ‘sticks’ to the top of the coin and that they land simultaneously.
- Now drop the paper and the coin separately but at the same time. Notice how the paper falls much more slowly than the coin.
- Cut out a piece of paper that is bigger than the coin.
- Place the paper on top of the coin, and drop the coin again. Notice how the paper does not ‘stick’ to the top of the coin this time.
When the coin falls, it pushes aside the air in front of it. If a smaller piece of paper is placed on top of the coin, the air in front of the paper is also pushed aside. As a result, the paper falls at the same rate as the coin. If the paper is bigger than the coin, the coin cannot push aside all the air in front of the paper, and the paper’s fall is slowed by air resistance.
Web References
- w1 – The author has produced a video showing the activities carried out in his workshop.
- w2 – To understand what happens to the human body in a vacuum, visit the NASA website and read their library of past questions and answers (see question 5) about being an astronaut.
- w3 – The famous drop experiment from the Apollo 15 mission is available to view on YouTube.
Review
This article sheds light on a topic that is usually considered particularly challenging, especially by primary school teachers. Each experiment involves a different physics concept (such as reaction forces or air pressure), but they are all connected by the common theme of space. Teachers can carry out all the experiments at once if they want to approach the subject as a whole, or they can pick individual activities to teach alongside the appropriate teaching unit. Overall, the article is very useful for both upper primary and lower secondary levels.
Dr Christiana Nicolaou, Archangelos Elementary School, Cyprus